If you’re looking for ways to make STEAM education as thrilling as a sprint to the finish line, you’ve come to the right place. We’ve crafted seven hands-on activities that will have your students thinking like engineers, creating like designers and competing like champions – inspired by the spirit and excitement of sport!
Each activity is a blend of creativity, teamwork and scientific exploration. You’ll have your students calculating trajectories, experimenting with physics and learning about the principles of design – all while having a blast. Ready to ignite the torch of curiosity?
Get your game face on. It’s time to teach, learn and play like champions!
1. High jump STEAM activity
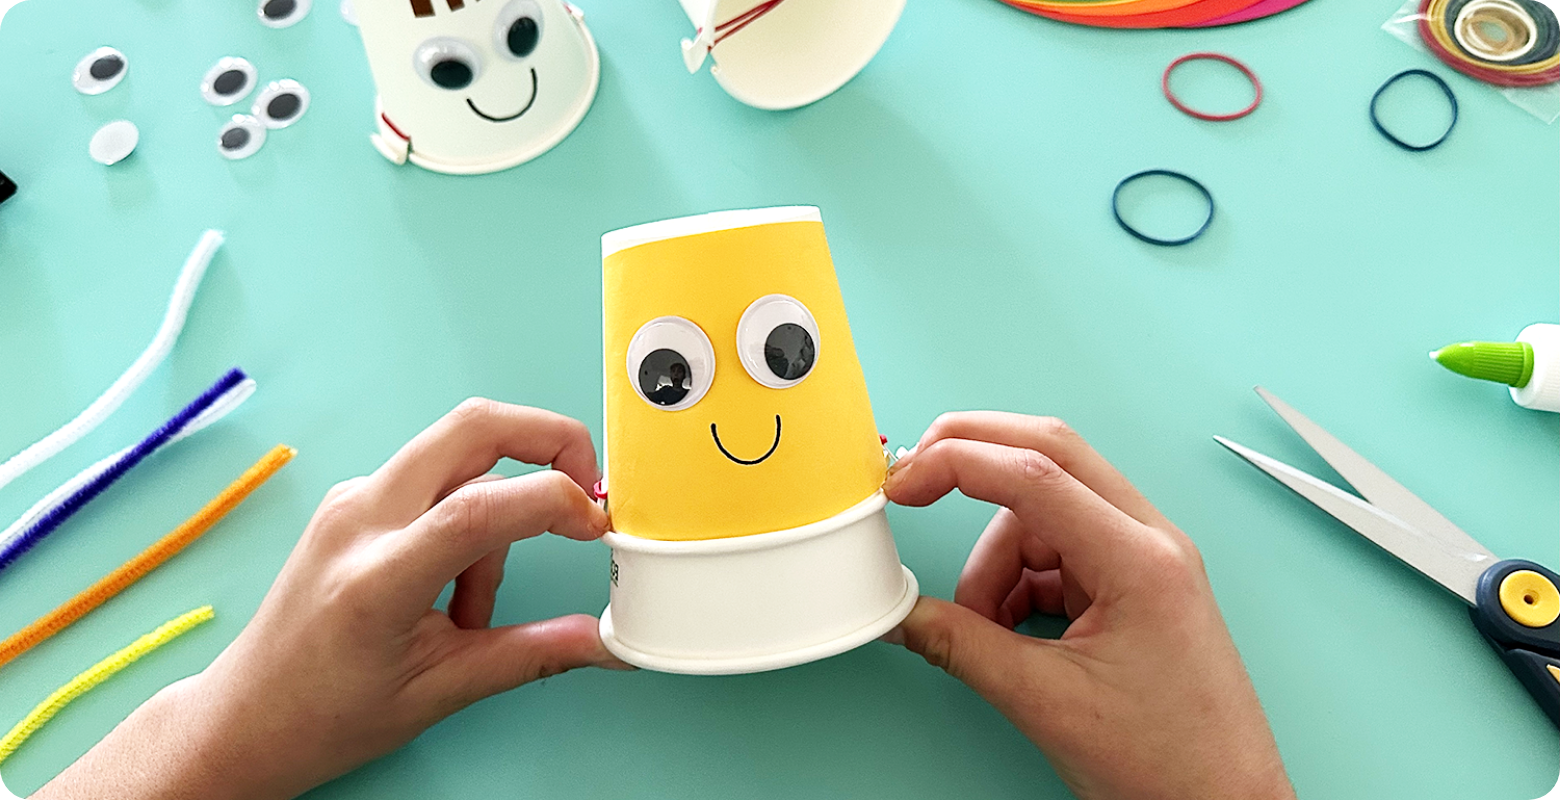
Using nothing but paper cups and rubber bands, participants will engineer their own innovative solutions to launch cups to impressive heights, combining creativity and physics in this engaging hands-on experience.
You’ll need:
Eco paper cups:
https://www.teaching.co.nz/product/JM850
Geoboard rubber bands :
https://www.teaching.co.nz/product/DM1032
Glue -on eyes:
https://www.teaching.co.nz/product/CL5333K
Gloss Coloured Paper:
https://www.teaching.co.nz/product/CS5102
Strong craft glue:
https://www.teaching.co.nz/product/CS0004
Scissors
Let’s make it!
1. Use scissors to cut two slits into the paper cup rim, roughly 1 cm in length and 1.5 cm apart. Repeat this step directly across from the other two slits. You’ll now have two ‘notches’ to hold the rubber band. This is your high jump contestant.
2. Decorate your high jump contestant with coloured paper, markers etc. Finish off with two glue-on eyes and set aside to dry.
3. Place your contestant on the table in front of you with the opening facing you. Take a rubber band and loop it around one of the notches, twist once and loop around the other notch.
4. Take another cup, turn it upside down on the table in front of you.
5. Gently slide your high jump contestant over the other cup. Hold on tight! You’ll feel the resistance of the rubber band wanting to let go.
6. Let go of the top cup and watch it jump up high!
Done! Your high jumper is ready to compete.
*TOP TIP – Experiment with the different sized rubber bands (diameter and thickness) to experiment with different tension levels, finding the perfect balance between elasticity and power to propel your athlete to greater heights with precision and control.
2. 100 m dash STEAM activity
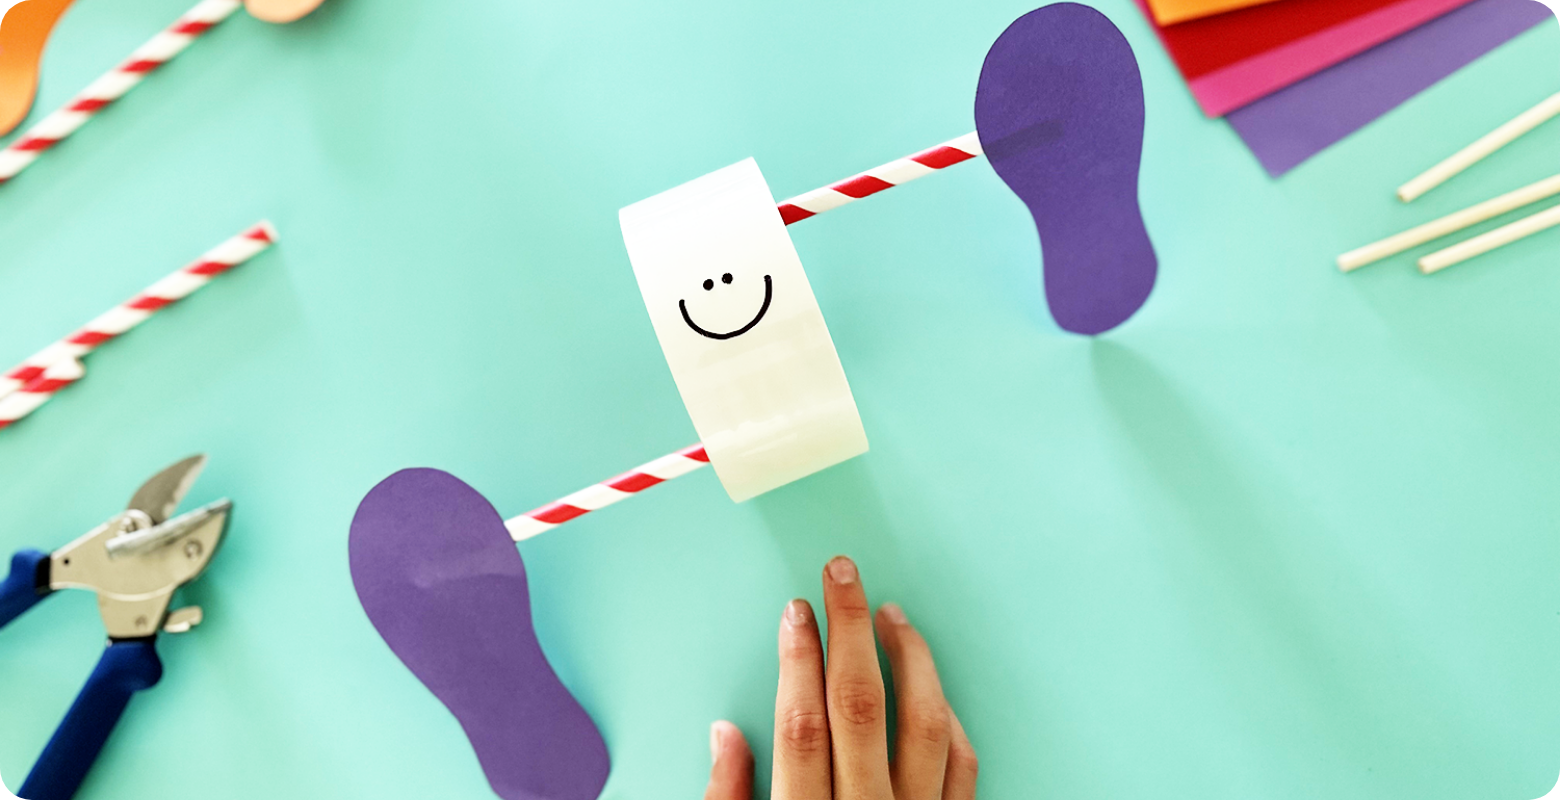
Step up to the starting line with the 100 m dash challenge! Using simple materials like packing tape rolls, wooden dowels and paper straws, create feet that’ll sprint their way to the finish line! Decorate your runner in team colours, mark out a course… take your mark, get set and go!
You’ll need:
Wooden dowels:
https://www.teaching.co.nz/product/SER1824-20
Multi cutter:
https://www.teaching.co.nz/product/SER1823-81
Clear packing tape:
https://www.teaching.co.nz/product/DP0295
Paper straws:
https://www.teaching.co.nz/product/JM500
Coloured paper :
https://www.teaching.co.nz/product/QL90190
Scissors
Let’s make it!
1. On coloured paper, draw the outline of shoe prints (or trace your own shoes or feet). Use scissors to carefully cut out the shapes.
2. Place the two shoe prints in front of you like you would to put on a pair of shoes. Cut a paper straw in half and tape one straw half to each foot, roughly 1/3 of the way down the foot just below the big toe. The other two straw ends will stick out in the middle of the feet.
3. Cut a wooden dowel in half to make two short wooden dowels. Tape one end of each dowel to a roll of packing tape’s inner tube. Make sure the dowels are at opposite ends of the inner tube (you can also make your own cylinder tube from strong cardboard, PVC pipe off cuts etc).
4. Slide the two paper straws over the dowels (sticky tape side facing down). Give the roll of tape a gentle push and watch those feet run!
Done! Your athlete is ready for the 100 m dash.
*TOP TIP – For optimum performance, ensure the feet are securely taped to the straws, and the wooden dowels securely attached to the packing tape roll to avoid wobbling during the dash, guaranteeing a smoother race experience.
3. Swimming race STEAM activity
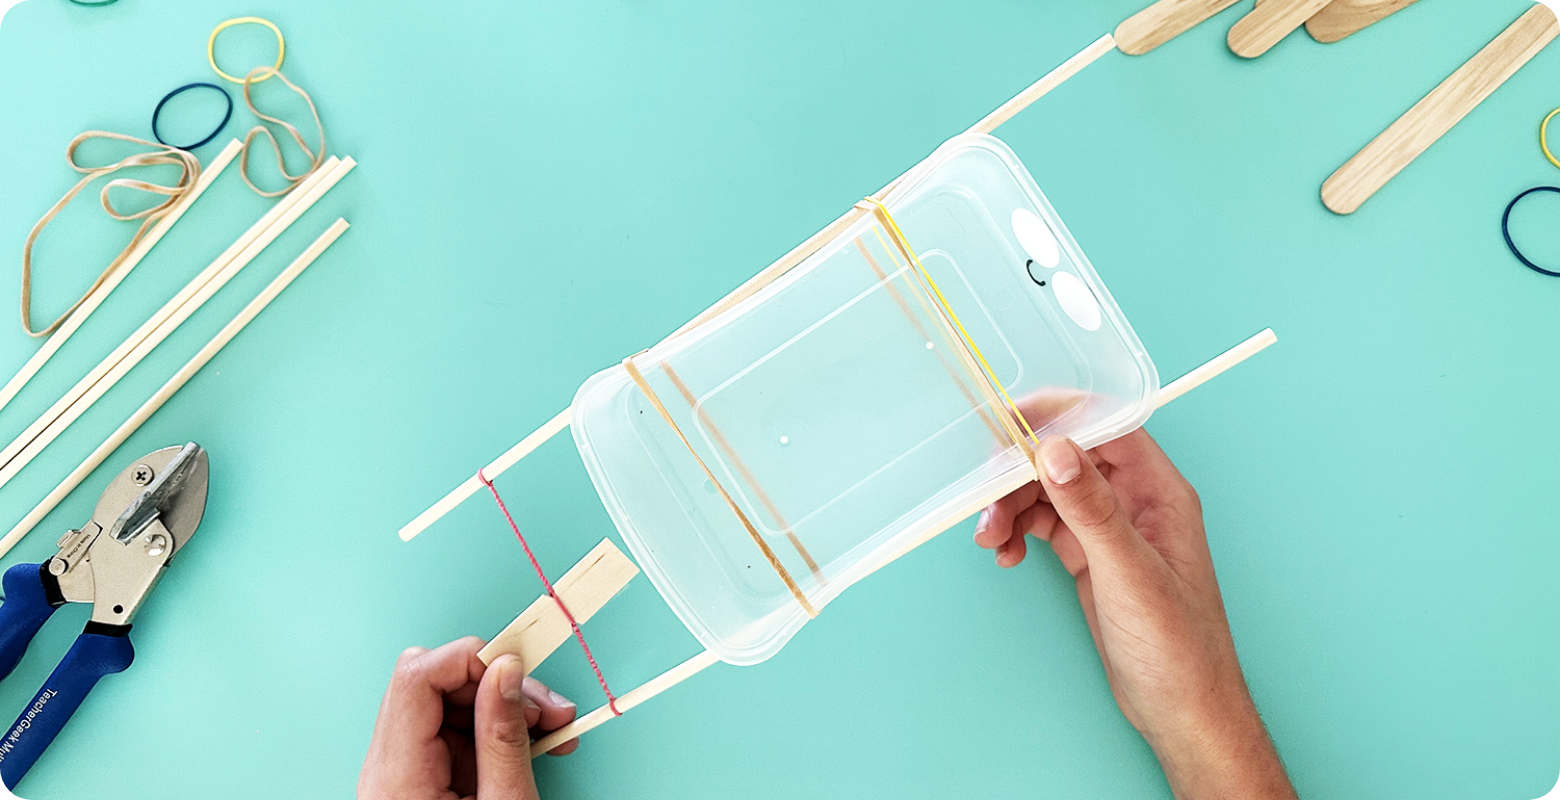
Students craft their own aquatic athlete using a plastic take away container, wooden dowels, rubber hands and pop stick paddle, immersing themselves in the principles of engineering and fluid dynamics as they compete in epic swimming challenges.
You’ll need:
Plastic takeaway container (rectangle)
Wooden dowels:
https://www.teaching.co.nz/product/SER1824-20
Thick rubber bands :
https://www.teaching.co.nz/product/QL1979
Thin rubber bands :
https://www.teaching.co.nz/product/ACC46192C
Jumbo pop sticks:
https://www.teaching.co.nz/product/JM100
Multi-cutter:
https://www.teaching.co.nz/product/SER1823-81
Joggle eyes:
https://www.teaching.co.nz/product/CL5333K
Permanent makers:
https://www.teaching.co.nz/product/TEB0104
Tacky glue:
https://www.teaching.co.nz/product/EC125
Let’s make it!
1. Using a thick rubber band, wrap two wooden dowels onto the takeaway container, one on each side. Wriggle the rubber band in place towards one end. Place another rubber band on the other end of the container binding the dowels in place for balance.
2. Wrap a thin rubber band around two ends of dowel to hold the paddle.
3. To make a paddle, use the multi-cutter to shorten a jumbo pop stick to roughly 6 cm in length (a few notches cut into the middle on both sides will help guide winding too). Place the paddle in the middle of the thin rubber band and wind around and around, tightening the rubber band. Hold on tight! You’ll feel the tension of the swimmer ready to go!
4. Gently place the swimmer into the water, let go and off it goes!
Done! Your swimmer is ready to compete.
*TOP TIP – For improved stability and streamlined motion, balance the weight distribution of your swimmer by adjusting the positioning of the wooden dowels and pop stick paddle, optimising performance and reducing drag for a faster swim.
4. Yacht regatta STEAM activity
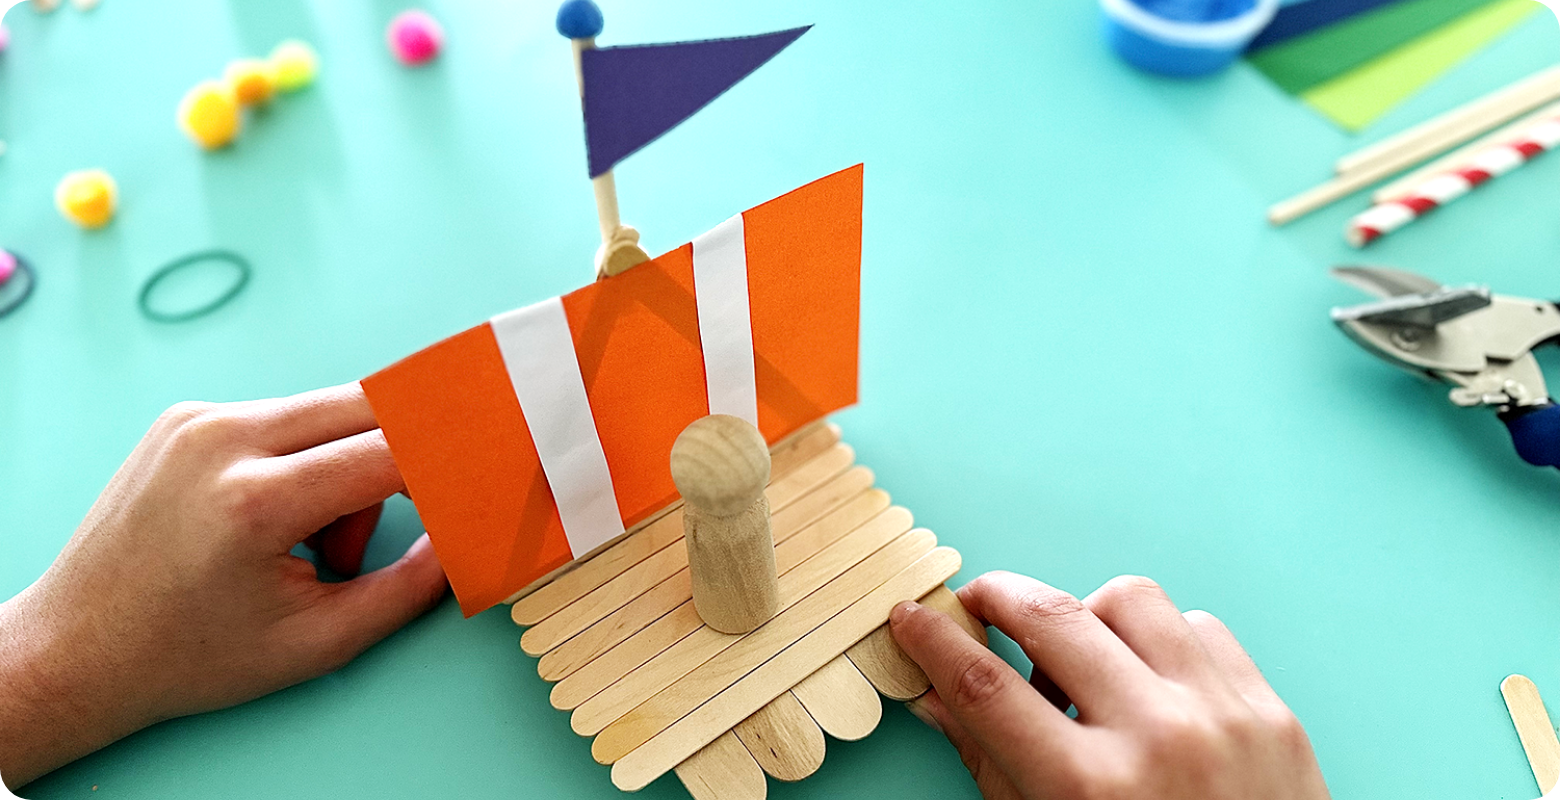
Using an array of simple construction materials, participants will engineer their own miniature floating boats, competing in an exciting regatta that blends imagination with hands-on craftsmanship. Let’s set sail!
You’ll need a variety of loose parts for children to assemble. Choose from:
Aluminium foil :
https://www.teaching.co.nz/product/ST0182
Coloured cover paper:
https://www.teaching.co.nz/product/TEB0001
Cork sheet:
https://www.teaching.co.nz/product/DC51327
Glue gun:
https://www.teaching.co.nz/product/CS1380
Strong craft glue :
https://www.teaching.co.nz/product/CS0004
Masking tape :
https://www.teaching.co.nz/product/DP0502
Paddle pop sticks:
https://www.teaching.co.nz/product/CL2328
Paper cups:
https://www.teaching.co.nz/product/JM850
Plastic bottles
Rubber bands:
https://www.teaching.co.nz/product/ACC46192C
Scissors
Sponges:
https://www.teaching.co.nz/product/OT034
Sticky tape:
https://www.teaching.co.nz/product/DP5073
Take away containers
Washi tape:
https://www.teaching.co.nz/product/TH1625
Wooden dowels:
https://www.teaching.co.nz/product/SER1824-20
Magiclay:
https://www.teaching.co.nz/product/TH0295
Let’s make it!
1. Gather your materials – you’ll need an array of construction items to create the three main components of your boat – a base (hull), a mast and a sail.
2. Use a glue gun or strong glue to adhere the components together. Set aside to dry.
3. Test your boat by placing in water and watching it float. Adjust the sail and weight distribution as needed to improve stability and speed.
Done! Your boat is ready to complete in the yacht regatta.
*TOP TIP – For optimal performance, ensure that the weight distribution of your yacht is balanced by adjusting the placement of materials, to allow for smooth sailing and maximum speed during the regatta.
5. Shot put launcher STEAM activity
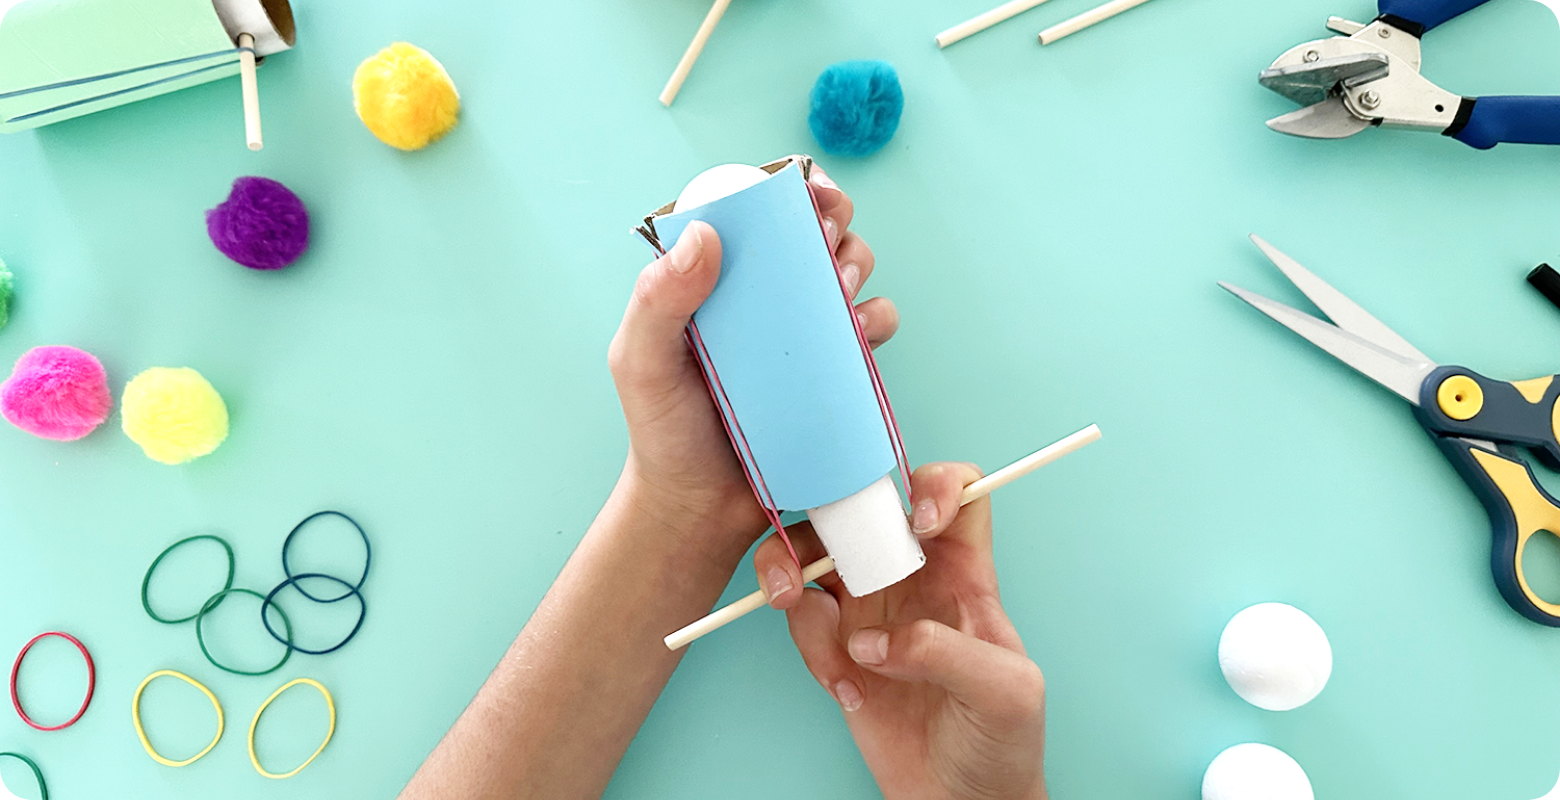
Crafted from a few simple supplies, the cardboard roll shot put launcher is sure to be a hit. It combines the thrill of physics and engineering principles. Students will dive into concepts like force, trajectory, and energy transfer as they experiment with different-sized inner tubes and launch all sorts of projectiles—table tennis balls, pom-poms, polystyrene balls, and more.
You’ll need:
Wooden dowel :
https://www.teaching.co.nz/product/SER1824-20
Multi cutter:
https://www.teaching.co.nz/product/SER1823081
Rubber bands – size 14:
https://www.teaching.co.nz/product/ACC46192C
Assorted cardboard tubes:
https://www.teaching.co.nz/product/ATH981
Cardboard Rolls:
https://www.teaching.co.nz/product/EC710
Masking tape:
https://www.teaching.co.nz/product/DP0502
Large cotton balls:
https://www.teaching.co.nz/product/UB0385
Neom pom poms, assorted sizes to experiment:
https://www.teaching.co.nz/product/CL0171
Large pom poms:
https://www.teaching.co.nz/product/SH1368
Table Tennis balls:
https://www.teaching.co.nz/product/WS810450
Polystyrene balls:
https://www.teaching.co.nz/product/SER1121061
Single hole punch:
https://www.teaching.co.nz/product/ACC003
Teacher scissors:
https://www.teaching.co.nz/product/DP14849
Let’s make it!
1. From the assorted cardboard tubes, take the second largest size OR use scissors to cut a regular cardboard tube lengthways (CL9821), squeeze the two loose edges over each other, overlapping to make a thinner tube. Tape to hold in place.
2. Use the single hole punch to punch two holes into the thinner tube opposite one another, roughly half an inch from one end.
3. Cut a wooden dowl in half and push through one hole, through the middle of the thinner tube until the dowel’s ends sit evenly out both holes.
4. On the largest sized assorted cardboard tube (or regular cardboard roll) cut two slits into one end of the tube roughly 1 cm long and 1.5 cm apart. Repeat this step on the same end, directly across from the other two slits. You’ll now have two ‘notches’ to hold the rubber bands.
5. Insert the narrow tube into the larger tube – the notches at the top of the large tube and the smaller tube with the dowel poking out the bottom.
6. Loop a rubber band into one of the ‘notches’, pulling the rubber band down the outer side of the tube and loop over one of the ends of the dowel. Repeat this step with another rubber band on the other side of the cardboard tube.
7. Hold your launcher with the dowel at the bottom and place a cotton wool ball in the top of the launcher so that it rests just on top of the narrow tube.
8. You’re ready to launch! Gently pull back on the dowel so that the inner tube extends out the back of the launcher and aim…
9. Release the dowel and watch the cotton ball fly!
Done! Your shot put launcher is ready to compete.
*TOP TIP – Foster creativity by decorating your launcher with paint, markers or embellishments – compete individually or together with team colours!
6. Basketball shootout STEAM activity
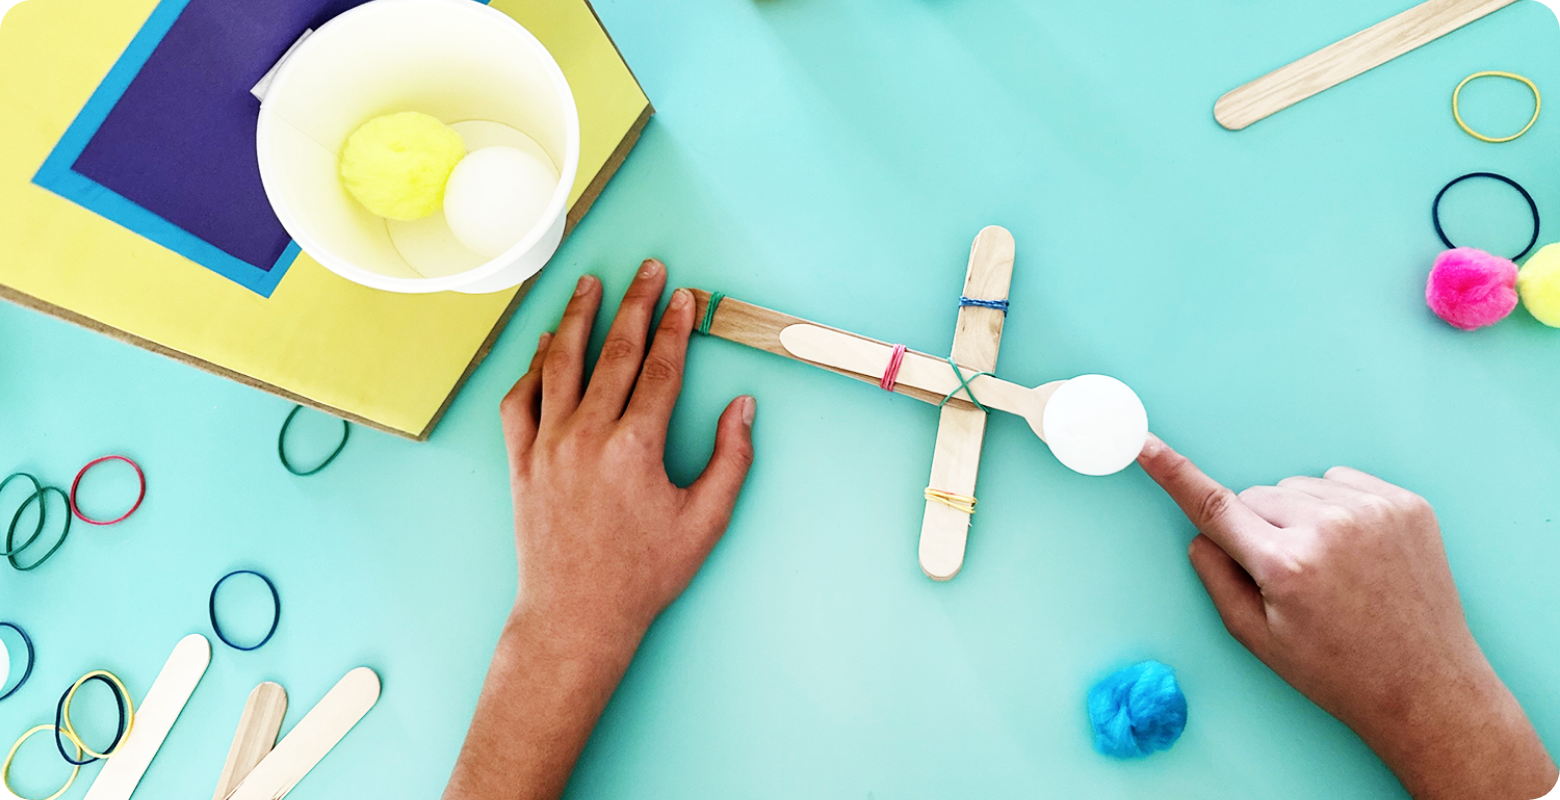
Create a thrilling basketball shootout game with pop sticks, a wooden spoon and rubber bands. Challenge your friends to hit the paper cup basket while exploring the concepts of force, angles and trajectory. Let the friendly competition begin – may the best engineer win!
You’ll need:
Jumbo pop sticks:
https://www.teaching.co.nz/product/JM100
Rubber bands – size 14:
https://www.teaching.co.nz/product/ACC46192C
Eco wooden spoons:
https://www.teaching.co.nz/product/NP9257
Eco paper cups:
https://www.teaching.co.nz/product/JM850
Table tennis balls:
https://www.teaching.co.nz/product/WS810450
Polystyrene balls:
https://www.teaching.co.nz/product/SER1121061
Masking tape:
https://www.teaching.co.nz/product/DP0502
Small cardboard box
Let’s make it!
1. Place two jumbo pop sticks together, one on top of the other, and secure together with a rubber band roughly 2 cm from each end.
2. Slide an eco-spoon over the top of the two joined pop sticks, roughly halfway down, and under one of the rubber bands to hold it in place. Make sure the spoon is facing up to hold the ball.
3. Take seven more jumbo pop sticks and stack them on top of each other. Secure both ends with rubber bands, roughly 2 cm from each end.
4. Hold the two pop sticks with the wooden spoon in one hand and use the other hand to slide the seven-pop stick stack under the spoon and jamming it between the two pop sticks. Secure in place with another band if needed.
5. Use masking tape to adhere a paper cup to a small cardboard box and place in front of you nearby. You’re ready to shoot your basketball! You can also add multiple cups to a larger box with score points for an even more challenging shootout.
6. Place a table tennis ball on the spoon and gently pull the spoon back, aim and shoot!
Done! You’re ready to compete.
*TOP TIP – Experiment with different balls to launch including large pom poms or 3.8 cm polystyrene balls to see which go higher and longer. You can also add multiple paper cups to a larger box, adding points to score depending on which ‘basket’ your ball lands in.
7. Balancing gymnast STEAM activity
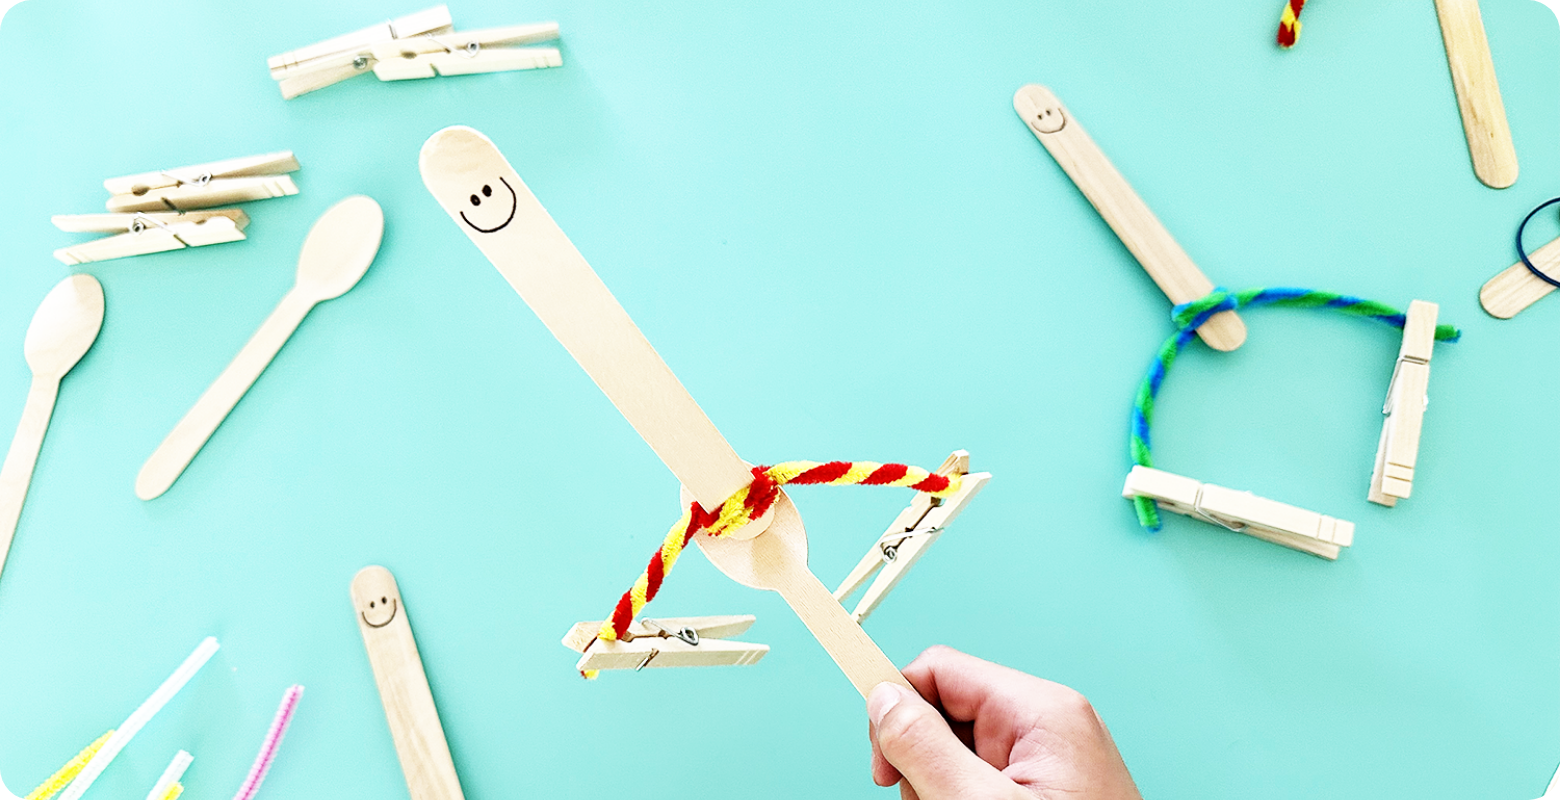
Discover the fun of physics as students craft a balancing gymnast using only pop sticks, wooden pegs and pipe cleaners. Watch as the gymnast balances on a wooden spoon, demonstrating principles of centre of gravity and equilibrium. Children will marvel at the science behind the perfect balance and have a blast with every wobble and tilt!
You’ll need:
Jumbo pop sticks:
https://www.teaching.co.nz/product/JM100
Eco wooden spoons :
https://www.teaching.co.nz/product/NP9257
Pipe cleaners:
https://www.teaching.co.nz/product/SH1394
Wooden pegs:
https://www.teaching.co.nz/product/SH440
Washi tape, to decorate:
https://www.teaching.co.nz/product/TH1625
Let’s make it!
1. Twist two pipe cleaners around each other to create one thick pipe cleaner.
2. Wrap the pipe cleaner around one end of a pop stick and twist the pipe cleaner tightly in place.
3. Place a wooden peg at the two ends of the pipe cleaner (and add some colourful washi tape to give your gymnast some flare).
4. Hold an eco-wooden spoon in front of you and place the gymnast onto the spoon with the pipe cleaner and pegs dangling close to the spoon.
5. Test out the balance, shifting the pipe cleaner and wooden pegs a little at a time until the balance is spot on.
Done! Your gymnast is ready to compete!
*TOP TIP – Ensure the pipe cleaner arms/legs are evenly spaced and symmetrical to achieve the best balance on the wooden spoon. Be patient! It will take time adjusting here and there until you get it spot on.
Congratulations on transforming your classroom into a STEAM hub of sporting fun. As you continue to ignite the torch of knowledge, may your classroom radiate brilliance like a true champion. We look forward to seeing your students shine at the next event! Tag @modernteaching so we can join in!

