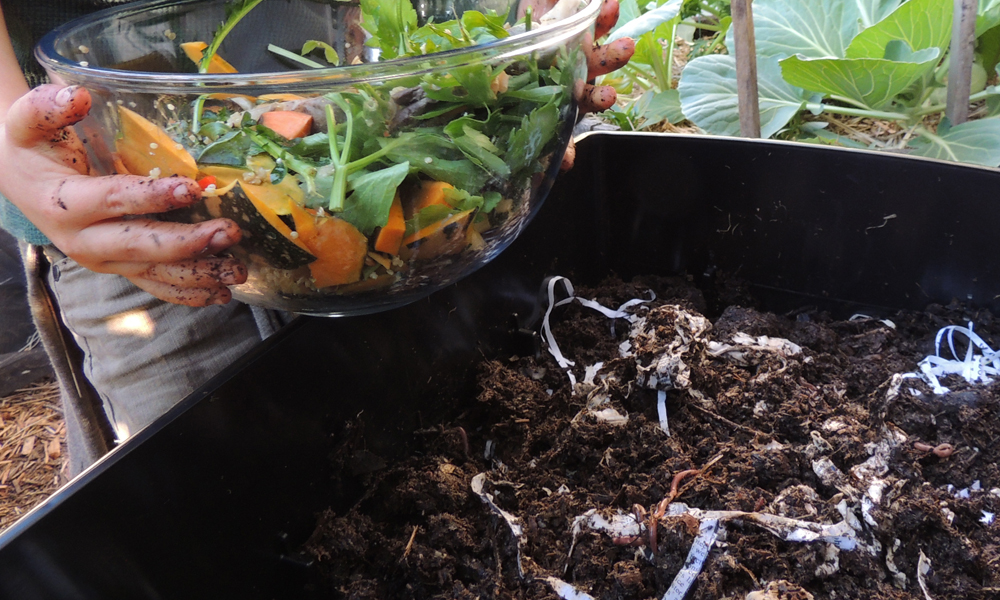
A worm farm is a great way to recycle organic waste that would ordinarily end up as landfill. This organic waste would include food ‘waste’ (such as food scraps and from school canteens or childcare centre kitchens, lunch box leftovers etc.) and garden waste (such as leaf debris, weeds, plant trimmings etc.) The worms gobble up the waste and turn it into nutrient rich plant food. This includes liquid fertiliser (worm wee) and worm casings (worm poo), both excellent for improving the health of soil and plants and helps your school gardens to thrive.

Setting up and caring for a worm farm can be such a fun and rewarding way to explore and connect with the natural world around us. A worm farm is an ongoing learning experience. It’s a terrific way to educate children about the importance of sustainable practices, and has endless learning opportunities including maths, language and literacy and scientific areas such as biology and soil chemistry. Caring for a worm farm also fosters a sense of responsibility as children learn about the wonderful world of worms and the interconnectedness of living things – how our actions leave a ‘footprint’ on the world. This footprint can affect other living things in either positive or negative ways, including all those tiny earthworms.
By using a worm farm, your school or childcare centre is able to significantly reduce the amount of organic waste that would normally go into landfill. Let’s look at this a bit closer. All those leftover vegetable peelings, apple cores and other organic waste in landfills produce a liquid called leachate – which contributes to environmental problems including the production of the powerful greenhouse gas methane as well as contributing to the pollution of streams, oceans and underground water. The good news is that putting organic waste into a worm farm can greatly help the environment.

Fun Facts about worms…
- Worms can eat their own body weight in food every day.
- Worms have no legs, arms or eyes.
- Worms have five hearts.
- Worms breathe through their skin.
- Worms are cold-blooded.
- Worms make liquid fertiliser – that’s their wee.
- Worms makes fantastic compost, or soil conditioner called casings – that’s their poo.
- Worms can regenerate themselves.
- Worms have both genders in one.
So, you’ve started your worm farm journey. Where to next? Like all living creatures worms need three things to survive – shelter, food and water. A worm farm is basically a giant community of composting worms living in a series of stackable boxes: the second, and even third, working tray (on top), the first working tray (in the middle) and the liquid collection tray (on the bottom), which has a tap to easily collect your liquid fertiliser. One of the best ways to collect this ‘liquid gold’ is to leave a bucket under the open tap for it to drain in freely. This helps to keep the liquid fertiliser from flowing through and prevents your worm farm beginning to smell.

So that’s the worm’s shelter sorted. What about their food and water? Worms like to eat most fruits and vegetables as well as soaked cardboard or egg cartons, teabags, coffee grounds, egg shells and even hair! They enjoy munching on so many things, but there are exceptions! They cannot eat meat products or bones, dairy products, oils and grease, citrus, chilli, garlic or onions. They like a moist home and so any paper or cardboard added to the worm farm will need to be soaked or wetted to ensure those little worms don’t get a tummy ache.

Let’s get started. A worm farm uses composting worms: Tigers (Eisenia Fetida), Reds (Eisenia Andrei) or Blues (Perionyx Excavatus/Spenceralia sp.) They like to live in a shady spot in the garden so they don’t overheat in the sun and can even be kept inside. Once you’ve found the perfect spot you’re ready to begin. Start by making your worms their bedding material. This can be a combination of finished compost, leaves and wet paper or even coir fibre works well. The worms will live in the bedding layer and dine on their meals, eventually working their way up through the other layers of the worm farm where they will continue to gobble up all those kitchen and garden scraps, turning them into worm casings for the garden. The bedding needs to be moist and ideally 10-15cm deep. When you buy worms, they will often come already living in their bedding layer which can be spread out onto your first working tray (a worm farm starter box will usually have a few thousand worms to get you started). Your worms are ready to wriggle into their new home. Spread them out onto their bedding and you’ll see them make their way down amongst the bedding. Welcome home worms!

No doubt it’s been a big journey for your worms, and now that they’re in their new home they will like a little meal to get them going. A few handfuls of food scraps are ideal. The smaller your food scraps are cut up the faster your worms will be able to get through them. It’s recommended that roughly 500g per 2000 worms per week is the ideal amount for your worm community to handle. The more the worms multiply the more organic waste they’ll be able to eat through. One of the fascinating facts about worms is that they keep multiplying to fit the size of their home. When their home is full they stop breeding. As older worms die off they start to multiply again. This process is called self-regulation. Try not to overfeed your worms, lots of composting fruits and vegetables sitting around will start to smell. It’s a good rule to remember to feed your worms once they’ve managed to get through just about all of their last meal. Once the worms have been fed they can be kept comfortable with a moist covering. A few layers of wet newspaper or a piece of hessian are ideal. The worm farm lid can then be placed over to keep them safe from rain, heat or too many curious little hands lifting the lid to go exploring.

When your first working tray is full, the other worm farm layers can be stacked on top one by one. Simply add in the worms’ meals and they will make their way up to explore and feast on their latest menu. Worms need a moist home to survive. Keeping the worm farm moist can be done by pouring water into the top layer to flow through, with excess moisture able to escape out through the tap. In hot and dry weather your worms might need water added to their home every day. Be careful not to drown the worms though! Your worm farm should be moist, not flooded. A wet sponge consistency is just right. The excess water will be able to drain out into the bucket. As always, be mindful of the safety of children with access to the worm farm – liquid building up in the bucket can quickly become a drowning hazard for young ones.
And that’s it, you’re all set to go. It’s such a rewarding experience to embed sustainable practices into our everyday lives. By setting up and caring for a worm farm you’ll be creating a happier and healthier environment for your childcare or school community. We wish you all the best on your worm farm adventures!
Featured Product: Worm Farm
Do you have a worm farm in your classroom? We would love to hear from you!