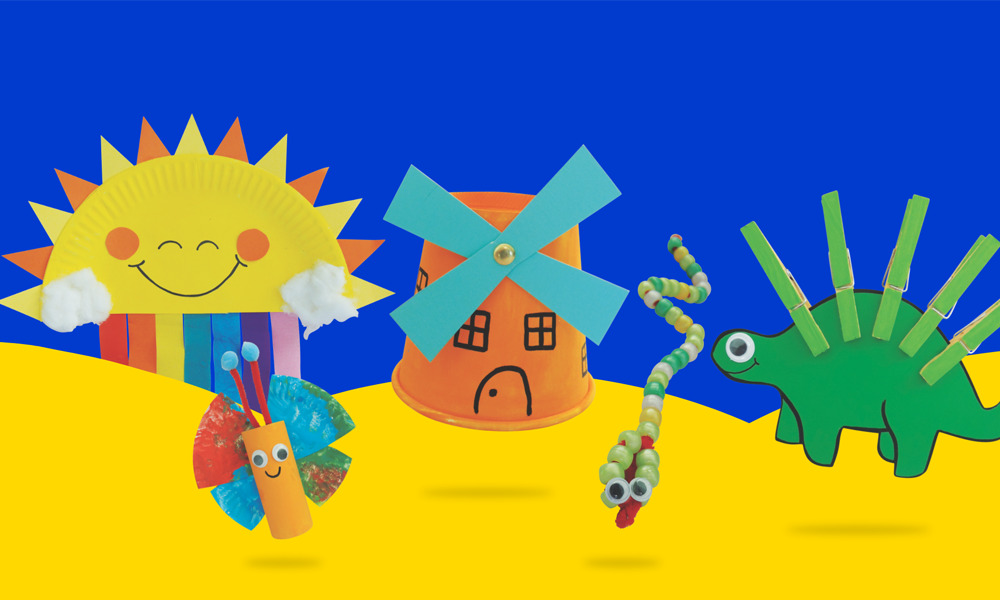
From sand art to a paper plate sun… try some quick, cool fun over the long, hot summer. Celebrate the colours, textures and feathery, fluttery creatures of summer with these 7 super-easy craft activities. Designed for little hands to deliver a big result, share your summer craft handmade creativity and tag us @modernteaching! We love seeing your style! So roll up your sleeves and dive in! We’ll guide you through each summer-loving step.
Sand Art Jar
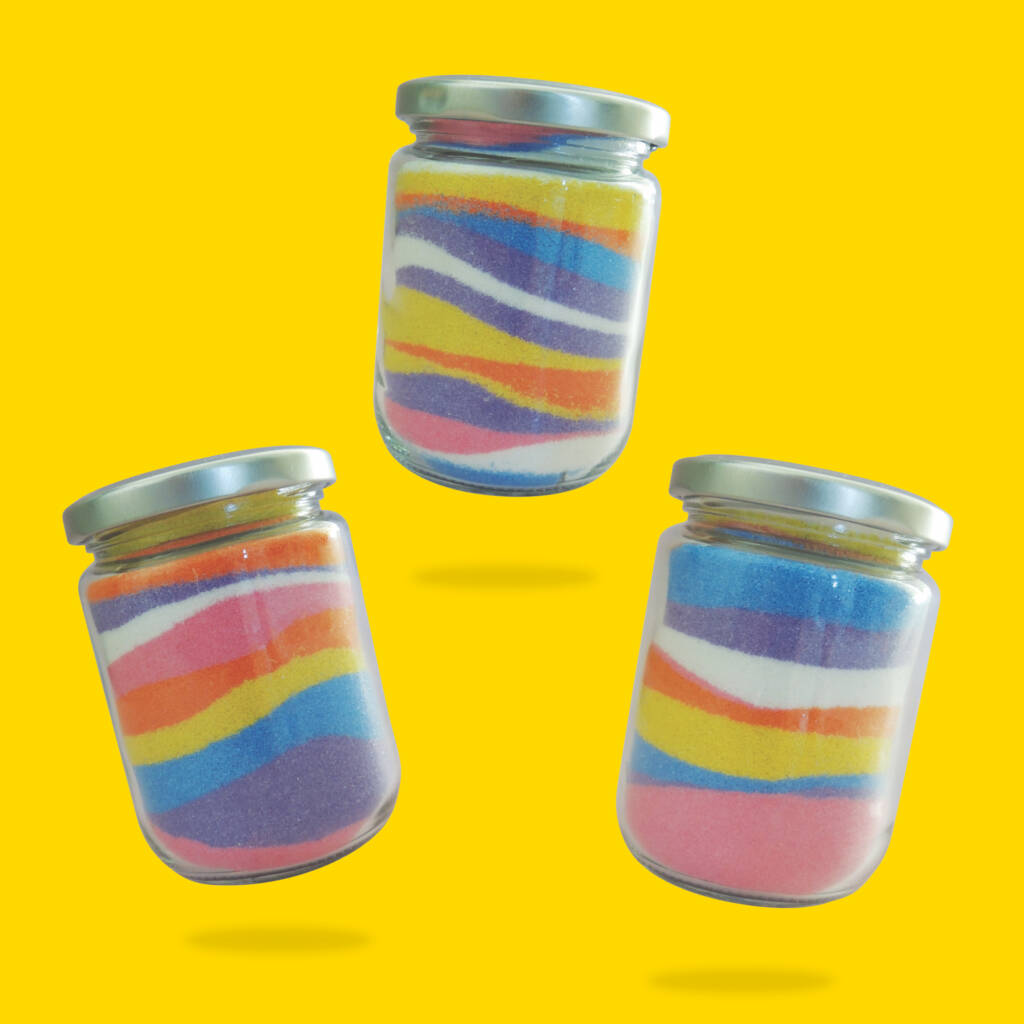
Summer in a jar! This is so simple, dreamy and impactful. Making a humble jar take on summer sand beach vibes is so easy! It will look so cute on a shelf and teaches children about colours, patterns and textures. Follow along step-by-step here.
You will need:
Step-by-step:
Take the lid off the glass jar and set aside.
Use a spoon or dispenser bottle to pour layers of coloured sand into the jar one at a time.
Use as many colours and layers as desired until the jar is completely full.
Apply a thin layer of Strong Craft Glue to the rim of the lid and tightly screw onto the jar.
Wipe away any excess glue and set aside to dry.
Done! The perfect Sand Art Jar is ready.
TOP TIP – Make mesmerising layers by tilting the jar slightly in different directions when adding each colour of sand.
Cardboard Tube & Paper Plate Butterfly
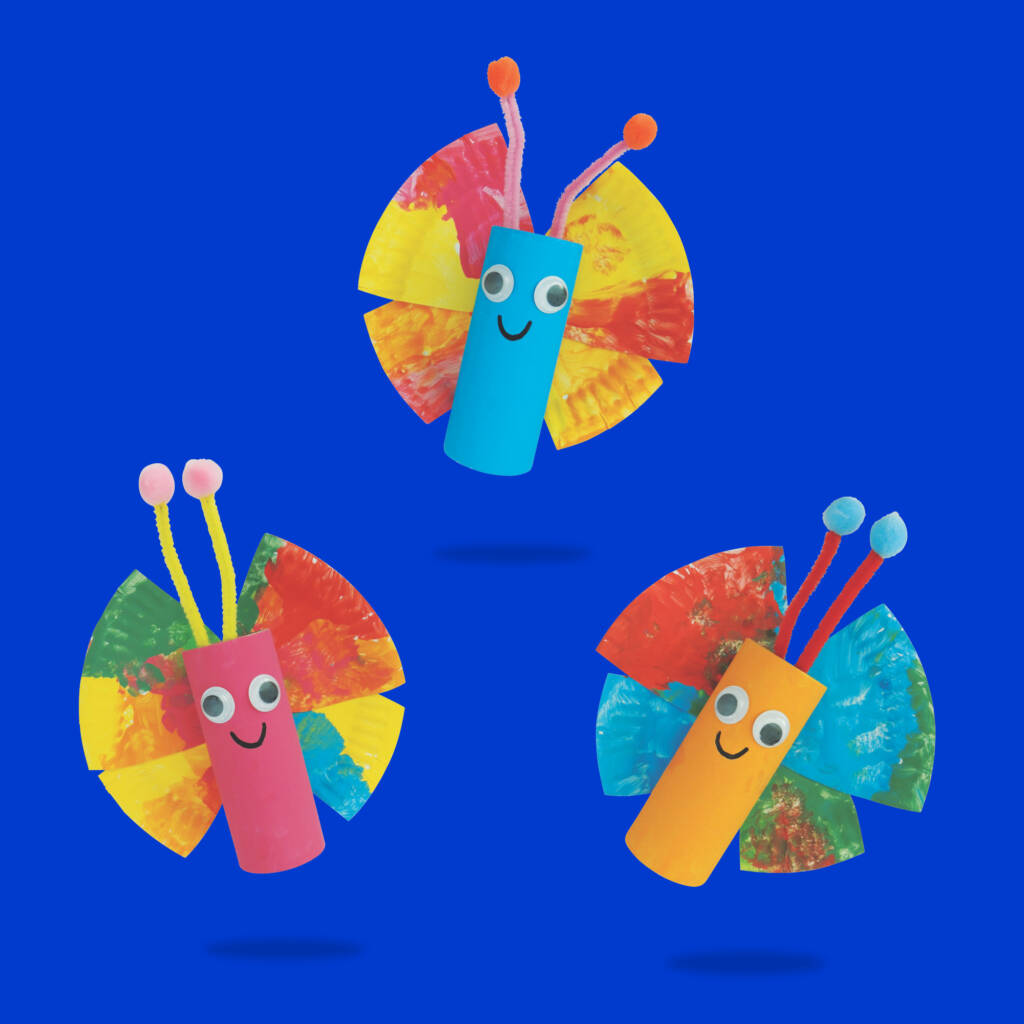
Make a family of adorable butterflies and watch your heart flutter. These butterflies can be as colourful and imaginative as you like. Why not create a summer theme wall for your butterflies to fly free?
You will need:
All Purpose Washable School Glue
Step-by-step:
Using lots of bright colours, apply paint to a paper plate and a cardboard roll and set aside to dry.
When thoroughly dry, cut the paper plate into quarters to make the butterfly’s wings (children old enough to be handy with scissors might benefit from drawn-on cutting lines to follow).
To assemble the butterfly, use strong glue to adhere the four wings to the cardboard roll body and two joggle eyes.
To make the antennae, fold one pipe cleaner in half and adhere two pom poms to the two ends with strong glue.
Stick the antennae to the inside of the cardboard roll with masking tape.
If desired, use strong glue to decorate the wings with scraps of paper, snipping them into shapes as desired and set aside to dry.
When thoroughly dry, personalise further by drawing a mouth and any other features as desired.
Done! Your perfect Butterfly is ready.
TOP TIP – To hang in the learning environment, poke a skewer through the back of the butterfly’s cardboard tube body and thread a length of string through.
Birds Nest
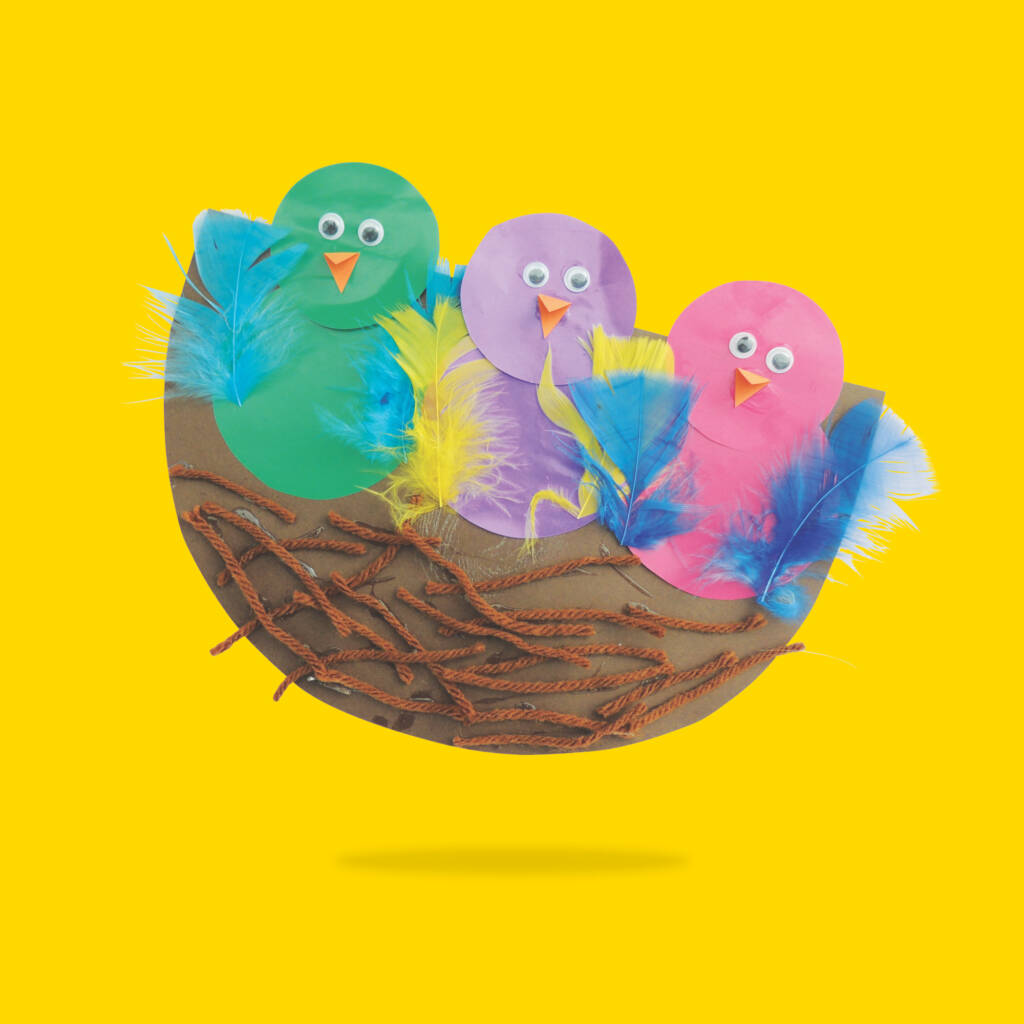
This sweet bird’s nest with a family of little birds is so much fun to make and looks great. Where will your summer birds nest live? Have fun with your colourful, feathered friends as children learn about textures, colours and different ‘homes’.
You will need:
A4 Creatistics Brown Cover Paper
All Purpose Washable School Glue
Creatistics A4 Orange Cover Paper
Step-by-step:
With brown cover paper, cut one rough semicircle shape and set aside.
With your gloss squares, use a round object (measuring cups work well) to trace and cut out circles – one large and one smaller. Two circles will make one bird. Set desired quantity of circles aside.
Take an orange gloss square, fold it in half and cut small triangles along the folded line. These will open out to make the bird’s beak. Set aside.
Snip short lengths of brown yarn (each roughly 5(L)cm) and set aside.
Ready to assemble! Use all-purpose washable school glue to adhere the pieces together – 1 larger circle to make the bird’s body and one smaller to make the head with a beak. Add feathers for wings and yarn to create a cosy nest.
Add two joggle eyes to each bird and set aside to dry.
Done! Your perfect Birds Nest is ready.
TOP TIP – Young children with emerging scissor skills might enjoy working with a selection of pre-cut shapes to assemble, or paper eye stickers instead of joggle eyes.
Pony Bead Snake
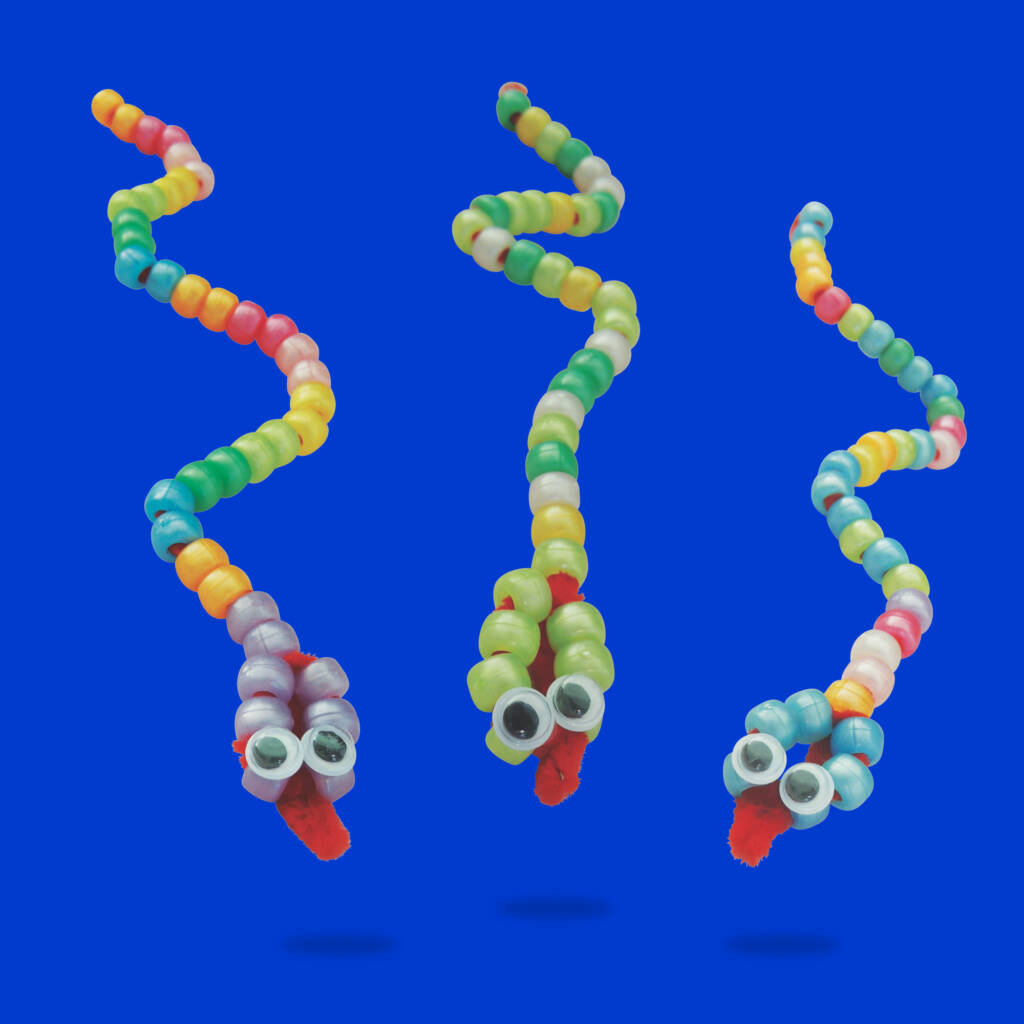
Snakes alive! Beads make a great basis for craft activities, developing fine motor skills in young children and encouraging creativity. Watch a slithering (but friendly) snake come to life in this summer craft activity children will love. Slither along step-by-step here…
You will need:
All Purpose Washable School Glue
Step-by-step:
Thread the 1st bead onto the pipe cleaner and bend the very end around the bead, securing it in place to prevent the rest of the beads from falling off.
Thread 28 more beads onto the pipe cleaner to form the snake’s ‘body’.
To make the head, thread six beads of the same colour and then curve back around to form a head shape (three beads on each side of the head) and firmly twist the pipe cleaner around itself between two beads at the snake’s ‘neck’.
Bend the remaining length of pipe cleaner back to poke out through the middle of the head to form a tongue.
Use Washable School Glue to adhere two joggle eyes onto the head, and an extra dab of glue as the tail and head to secure for play and set aside to dry.
Done! Your perfect Pony Bead Snake is ready.
TOP TIP – These adorable snakes aren’t just for craft! They make wonderful props for children’s dramatic play and recounting of favourite stories.
Paper Plate Rainbow Sun

Here comes the sun! With some crepe streamers and paper plates, little ones can create a salute to the sun! Encourage environmental awareness and how Planet Earth and the sun work together. Children have freedom creating the sun’s friendly face too. Use this craft activity time to teach about weather, heat, clouds and rain (and rainbows!).
You will need:
Creatistics A4 Yellow Cover Paper
Creatistics PVA Washable School Glue
Step-by-step:
Cut one paper plate in half to make the sun and paint it a bright, sunny yellow.
To make the clouds, glue several cotton wool balls to either side of the paper plate’s flat surface and set aside to dry.
To make the sun’s rays snip yellow and orange paper into long tringles, and either glue or sticky tape them onto the back of the painted plate.
Cut strips of crepe paper roughly 30cm in length to make the rainbow, one each of red, orange, yellow, green, blue and purple.
Arrange the crepe paper into rainbow form and glue or tape the lengths to the back of the sun’s flat surface so they can hang down.
Finish off by personalising your sun further with a smiling face.
Done! Your perfect Paper Plate Rainbow Sun is ready.
TOP TIP – To turn your paper plate rainbow sun into a 3D hanging artwork, simply paint another half plate to glue to the back of the sun, punch a hole through the two sides and hang it in your learning environment with a length of twine.
Spinning Paper Cup Windmill

This craft activity lets children create an adorable windmill complete with moving paper blades. Not only is this handmade activity fun, but it also helps children understand basic motion and wind energy (and maybe they can see some famous windmills around the world!).
You will need:
?utm_source=blog_AU&utm_medium=blog_post&utm_campaign=T423_ECSummerActivities_TOFU_Blog
Jovi Basic Tempera Paint
All Purpose Washable School Glue
Step-by-step:
Decorate a paper cup with brightly coloured paint and set aside to dry.
To make the windmill’s blades, cut two lengths of coloured cardboard (each length measures 9cm long, 2cm wide at the ends, and 1cm wide in the centre).
Use a skewer to poke a hole through the centre of each blade and push a split pin through the holes. Use a dab of school glue to secure the windmill blades to the pin and set aside to dry.
Use markers to decorate the dried windmill cup with windows, a door and any other desired features (remember your windmill will stand upside down).
Use a skewer to poke a hole through the front of the cup, roughly 1.5cm from the top (the bottom of the cup).
Push the split pin (with blades) through the cup’s hole and secure it in place, opening the fasteners inside the cup.
Done! Your perfect Spinning Paper Cup Windmill is ready.
TOP TIP – Make light work of making windmill blades by cutting out a template for preschoolers to trace around or have pre-cut blades ready for younger years.
Wooden Peg Creatures
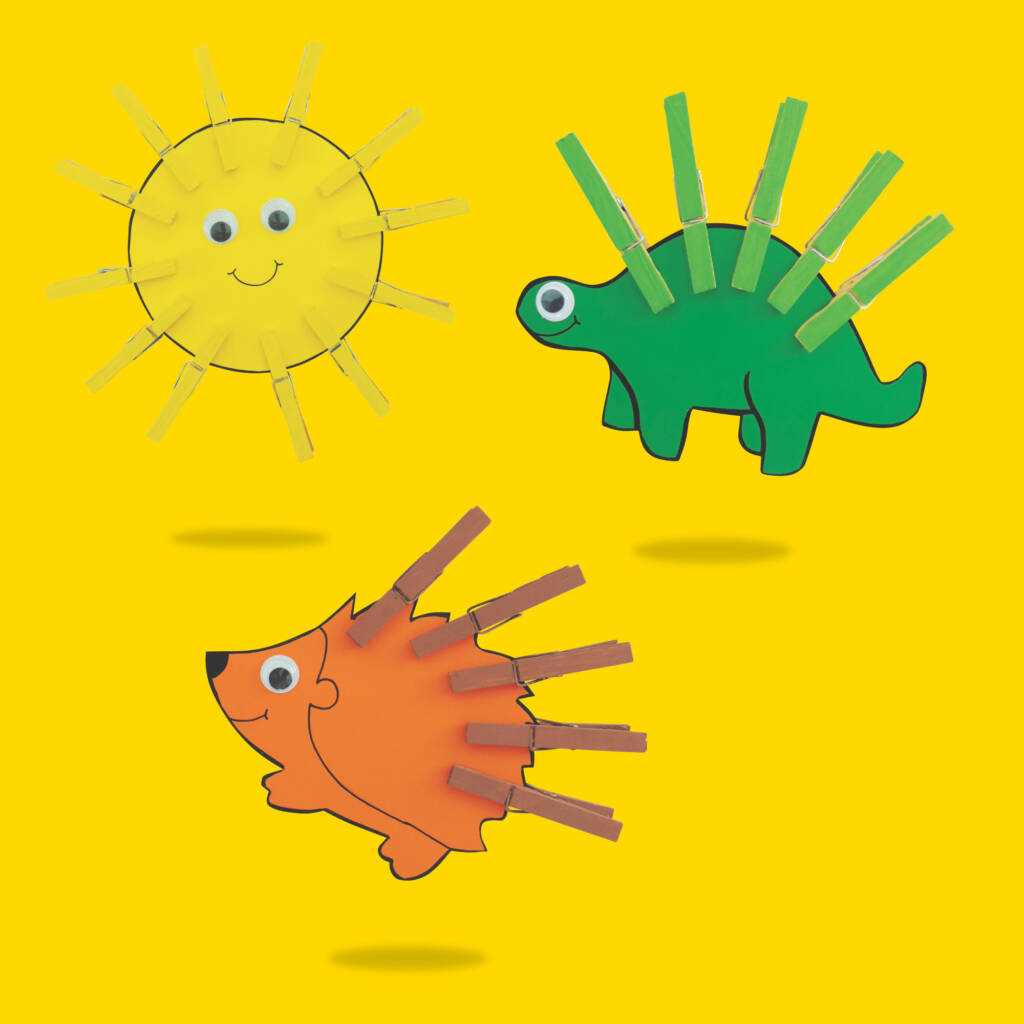
Peg-tastic animals and shapes! In this fun activity, creativity and imagination will run wild as children create their own little creature that has a spiky feature or rays. How about a “peg-asus” with pegs for wings (see what we did there!)?
You will need:
Creatistics Acrylic Paint Pack
Step-by-step:
With a pencil or marker, draw your desired creature that features spikes, such as a dinosaur, echidna, hedgehog or a sun.
Carefully cut the shape out.
Use Tacky Craft Glue to attach joggle eyes to your creature and set aside to dry.
Using coloured paint, cover the wooden pegs in your desired shade (green for a dinosaur, yellow for a sun, etc.) and set aside to dry.
Use markers to add desired details, such as fur, feathers, scales, facial features, etc.
When the pegs are dry, peg them into position on your creature.
Done! Your perfect Wooden Peg Creature is ready.
TOP TIP – Young children with emerging scissor skills might enjoy working with pre-cut shapes or paper eye stickers instead of joggle eyes.
So, hands up who’s ready for hands-on summer craft? Enjoy these 7 handmade summer craft activities and if you’d like to download the step-by-step activity pack pdf, click here.
Happy crafting over summer and make sure to share your crafty summer awesomeness with us @modernteaching.