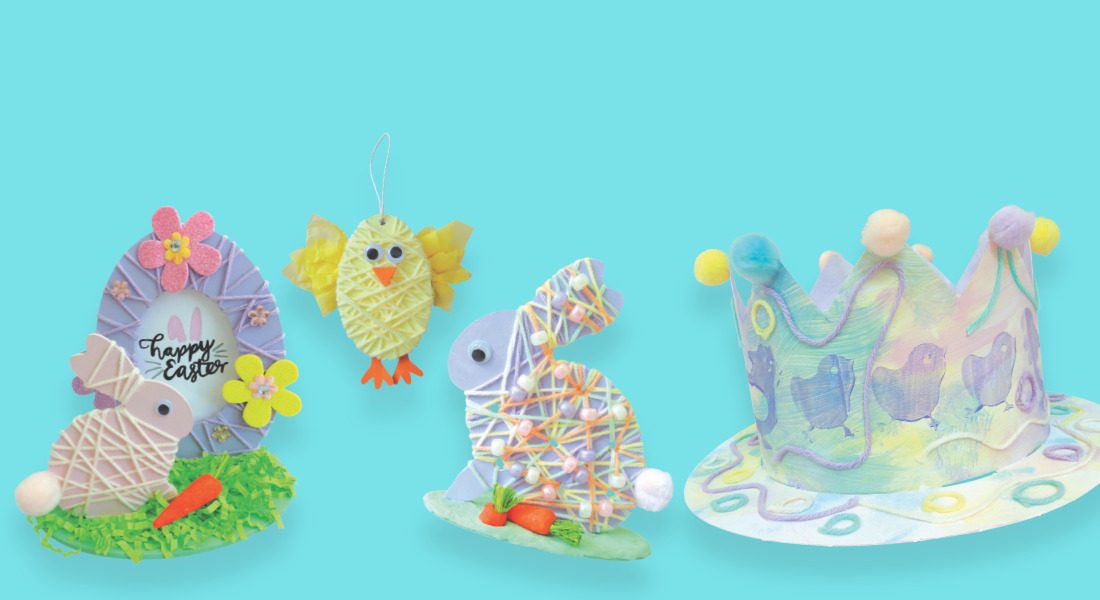
Break out the bunny onesie, because Easter’s coming! It’s time for hat parades, egg hunts, chocolate bunnies and colourful craft egg-tivities!
Here are 6 egg-cellent, egg-straordinary and egg-stra special craft activities to help little crafters create gifts, ornaments, cards and other seasonal cuteness. They’re easy, and they produce beautiful Easter treasures! Let’s hop right into it…
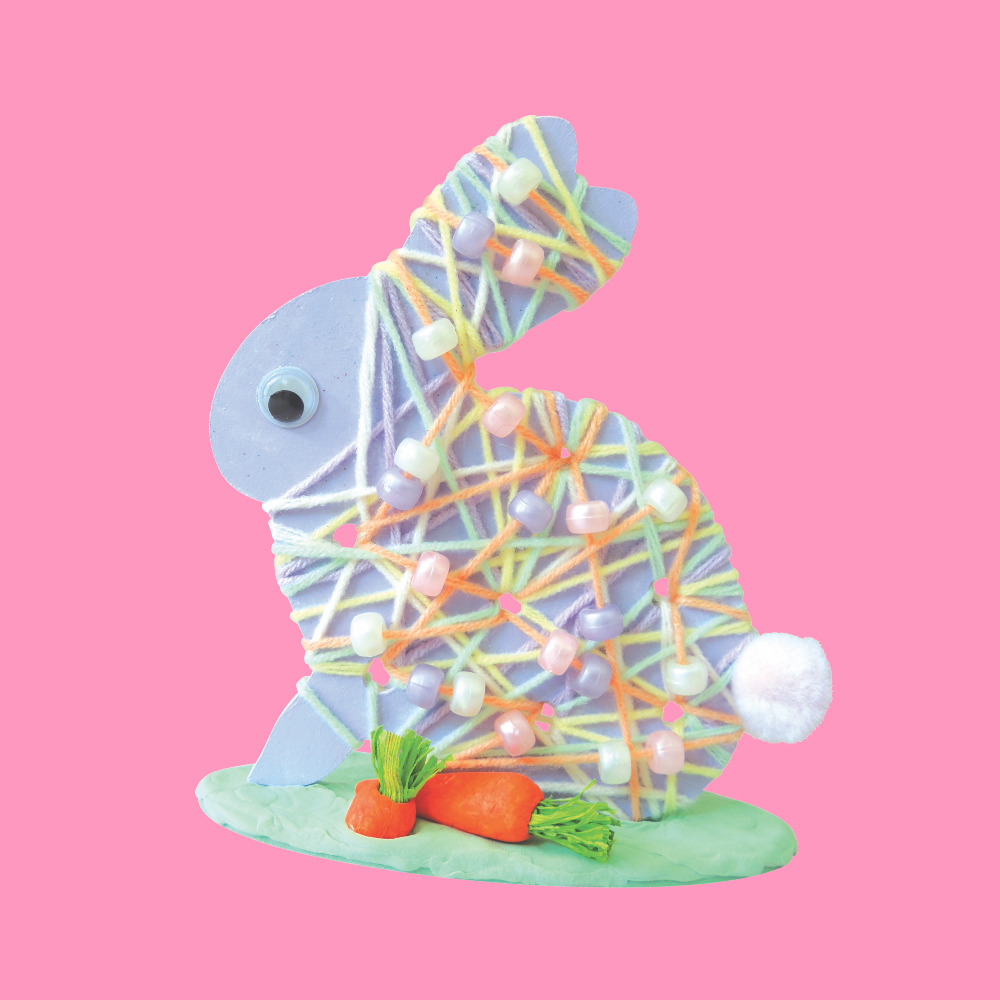
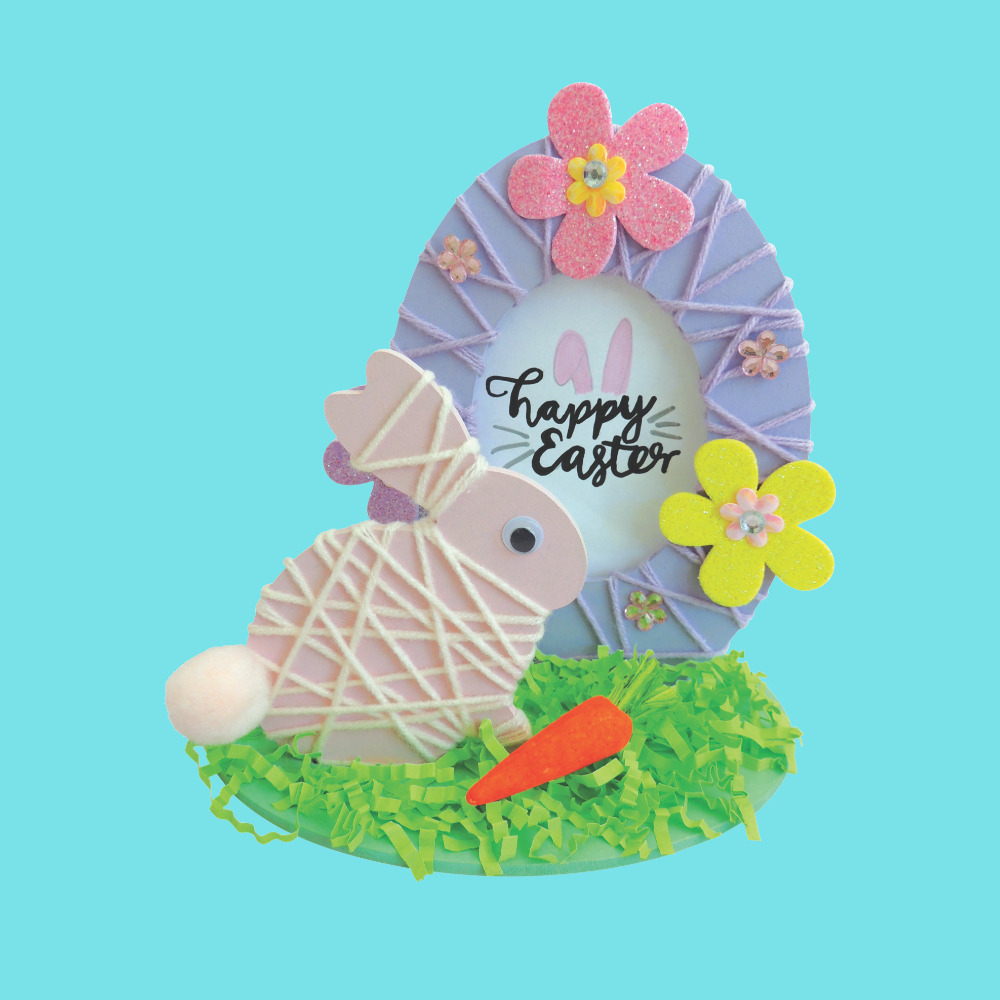
Wooden Weaving Bunny
You will need:
Step-by-step:
Assemble the Wooden Weaving Bunny by slotting the bunny into the stand.
Apply your desired shades of pastel paint to the bunny and stand, and set aside to dry. Repeat paint application if desired.
Cut a workable length of yarn roughly 40cm long and thread one end onto a plastic lacing needle. Tie the other end around a section of the bunny with a firm knot at the back.
Thread the lacing needle with its yarn through the pre-cut holes of the bunny, weaving in and out all over as desired.
When there’s only a short length of yarn left, remove the plastic threading needle and tie onto the bunny with a firm knot at the back.
Repeat steps 3 to 5 with as many colours of thread as desired.
When you’ve reached the last length of thread, begin by tying the end to the bunny and then slot a pastel bead onto the yarn, setting it in place at the front of the bunny while weaving. Continue adding pastel beads as desired and tie off the end of the yarn firmly at the back.
Mix green and white silk clay together to form a pastel green and press down onto the stand to cover the surface.
Use craft glue to adhere joggle eyes, a pom pom tail and a few carrots.
Done! The perfect Weaving Bunny is ready.
TOP TIP: Younger age groups can swap the beads for ready-to-use foam or felt shapes with a dab of glue.
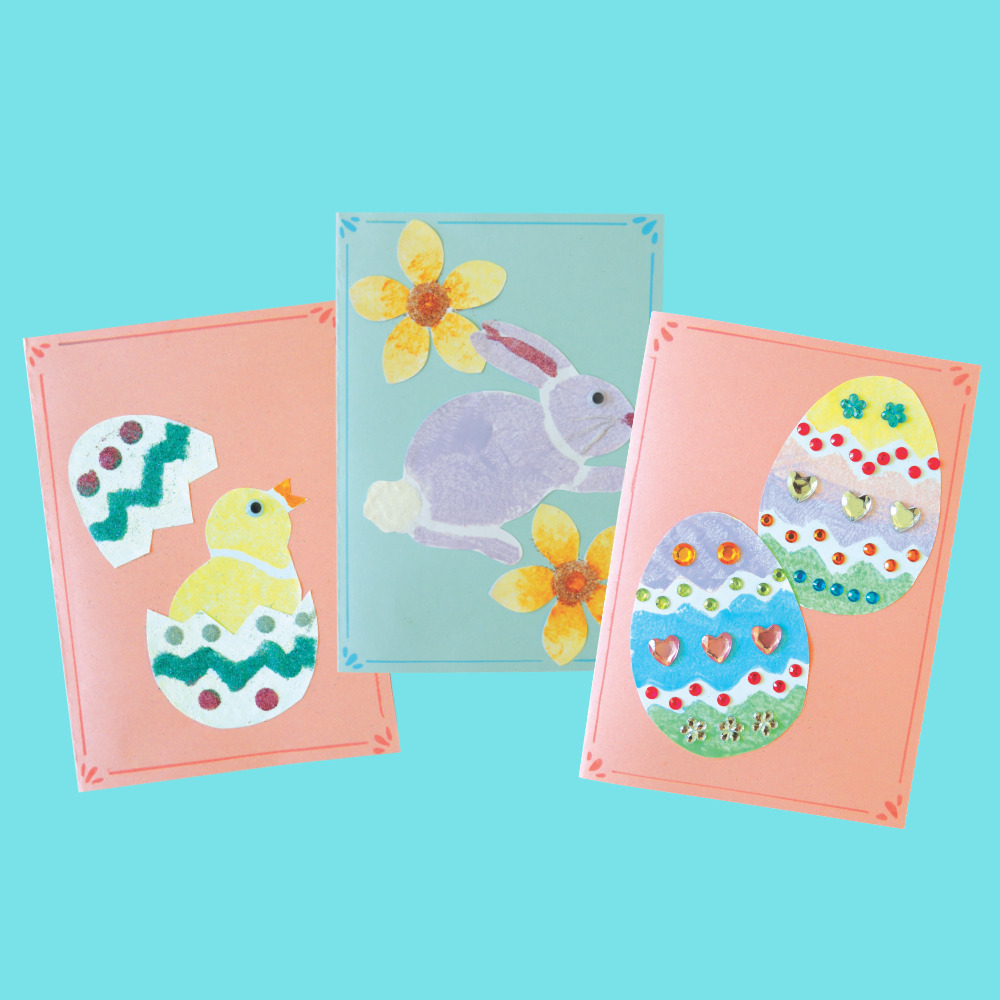
DIY Stencil Cards
You will need:
Creatistics A4 White Cover Paper
Step-by-step:
Pour a small amount of pastel paint onto a flat surface (painting trays, plates, etc). Use a brush or roller to even out the colour.
Lay an Easter Stencil over a piece of white cover paper and secure in place with a bit of masking tape.
Gently dab a sponge into the paint (avoiding large blobs).
Gently dab the sponge over the stencil, making sure to sponge all the sections of paper through the stencil’s cut-out pattern.
Carefully remove the masking tape and lift the stencil off the paper. Set the paper aside to dry.
Fold a piece of pastel cardboard in half (two short lengths together) to make a card.
When the paint has dried, cut out the stencilled shape and use a glue stick to attach to the card.
Use coloured makers, Bio-Glitter and joggle eyes as desired to add detail to the cards and set aside to dry.
Done! The perfect DIY Easter Stencil Card is ready.
TOP TIP: For early childhood-aged children not yet confident with scissor skills, pop the stencil directly onto the pastel card to paint the pattern.
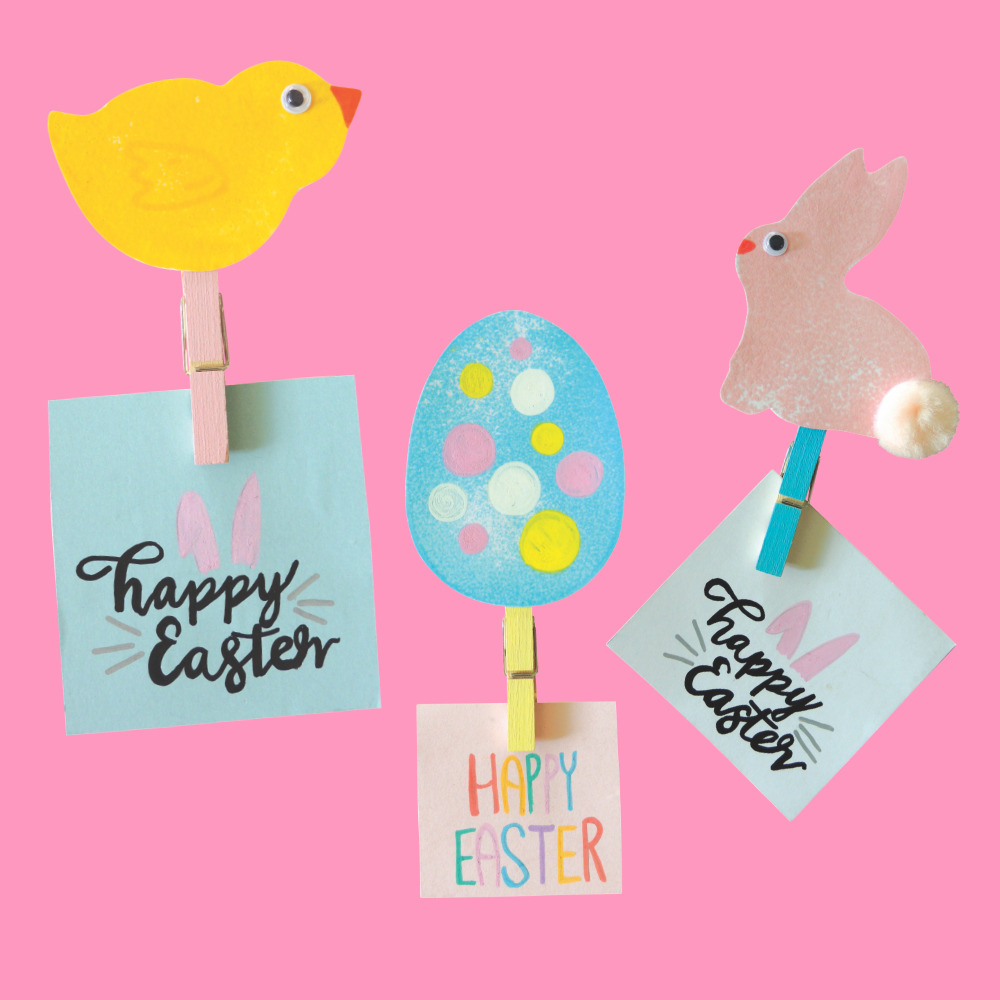
Sponge Print Fridge Magnets
You will need:
Step-by-step:
Pour a small amount of pastel paint onto a flat surface (painting trays, plates, messy mats, etc) and use a brush or roller to spread the colour to an even layer.
Gently press an Easter Sponge into the paint, then lift out of the paint and gently press down onto the cardboard. Lift off once more, leaving the painted print on the cardboard. Repeat as desired with each shape to fill the paper. Set aside to dry.
Use the leftover paint or POSCA markers to add detail over the dried paint (an orange beak, patterns on the eggs, etc) and set aside to dry.
Feed the dried painting through a laminator and set aside to cool down.
Carefully cut around the shapes.
Use strong craft glue to attach a wooden peg to the back of the laminated shape and joggle eyes onto the chick & bunny and set aside to dry.
Peel and stick a self-adhesive magnet to the back of the peg.
Done! The perfect Easter magnet is ready.
TOP TIP: Easter sponges are wonderfully versatile! Sponge the shapes onto cards, wrapping paper and Easter Hats. Or snip the prints out and paste them onto pop sticks for adorable storytelling props!
Wooden Diorama Frame
You will need:
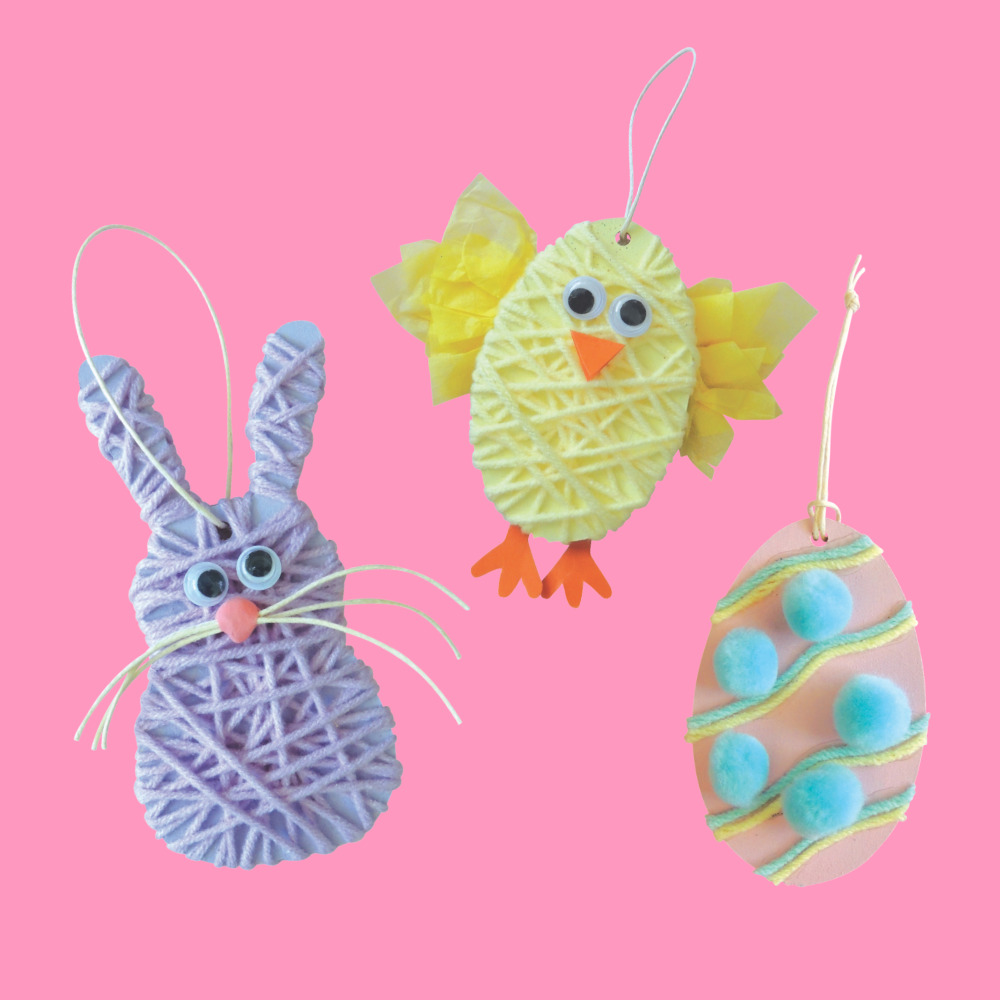
Yarn Chick, Bunny & Egg Ornaments
You will need:
Step-by-step:
Cover the wooden ornament in a layer of pastel paint and set aside to dry. Repeat paint application as desired.
For the Bunny and Chick, cut a workable length of yarn, wrap it around the wooden ornament, and tie it with a strong knot.
Wrap the yarn around the ornament until it looks full of colour (if needed, add another length of yarn). Tie the yarn off securely at the back.
For the Bunny – snip three lengths of beading cord 10cm in length, tie a knot in the middle to make whiskers, and press a small amount of pink Magiclay around the middle to hide the knot and make a nose. Attach in place with craft glue, along with two joggle eyes. Set aside to dry.
For the Chick – scrunch two tissue squares from the centre to make the wings. Fold an orange paper square in half and roughly draw a foot. Snip the foot out (you should now have two) and snip a small triangle shape along the remaining paper’s fold to make a little beak. Attach the feet, wings, beak and two joggle eyes in place with craft glue. Set aside to dry.
For the Egg – use the craft glue nozzle to ‘draw’ lines and squiggles on the surface, carefully placing short lengths of yarn over the glue. Finish off with a few pom poms and set aside to dry.
For each decoration, snip a short length of beading cord, thread it through the pre-cut hole and tie it into a loop to hang.
Done! The perfect Easter Yarn Ornament is ready.
TOP TIP: Taping the yarn at the back of the ornament with masking tape periodically will provide support for children with emerging fine motor skills.
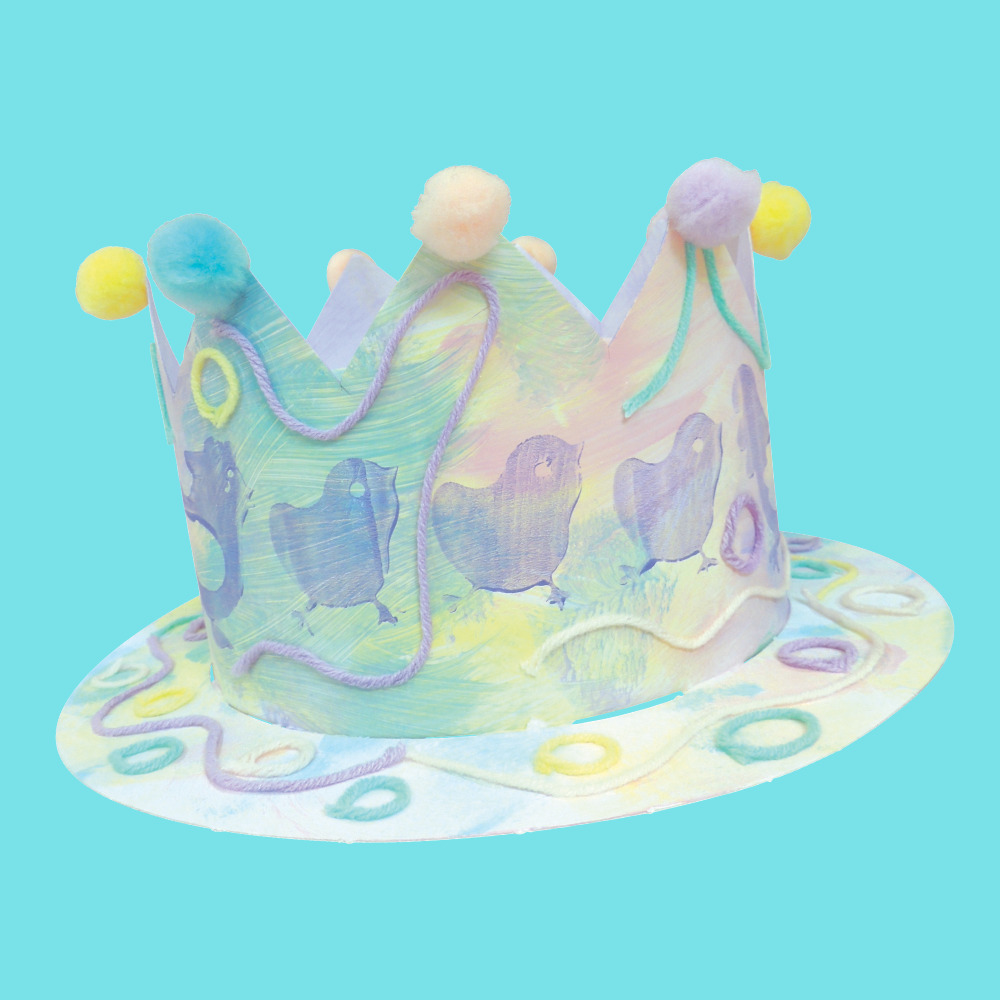
Roller Print & Yarn Bonnet
You will need:
Step-by-step:
Pop-out each piece from the large sheet of card.
Use brushes or sponges to apply a thin layer of pastel paint to the pieces and set aside to dry.
Pour a contrasting-coloured paint onto a messy mat or painting tray and use a brush or roller to smooth the paint to an even layer. Only a little paint is needed to make smooth prints.
Gently roll the Easter Rollers in the paint, ensuring an even layer of paint over each raised shape.
Roll the paint-loaded Easter Roller over the cardboard pieces, leaving behind its colourful print. Repeat as desired and set aside to dry.
Use the strong craft glue nozzle to ‘draw’ wavy lines over the crown and brim pieces, snip lengths of pastel yarn and gently press into place using the glue lines as a guide. Use the craft glue to ‘draw’ lines and shapes to shake Bio-Glitter onto, and small blobs of tacky glue to adhere the pom poms. Set aside to dry.
To assemble, sticky tape the scalloped crown piece together by the tabs, making sure it will fit the brim.
Sticky tape the tabs on the bottom of the crown piece to the underside of the brim.
If desired, sticky tape the tabs on the top circle to the crown piece (making a shelf to hold extra decorations). Set aside to dry.
Done! The perfect Easter Hat is ready.
TOP TIP: There’s no need for precise designs! The free-form style of this Easter Hat craft is wonderfully open-ended.
We hope you love getting crafty this Easter and creating these 6 fun activities. If you’d like to download the step-by-step activity pack pdf, click here. Happy crafting, and please share your crafty Easter creations with us @modernteaching.