STEM! It’s a word we have all been hearing a lot about lately! At the beginning of this year, I started teaching at a new school and quickly learnt that STEM was a focus for teaching and learning. To be honest, I felt quite nervous because I did not know much about STEM when I started. I had so many questions… What exactly is STEM? What does it look like with 5 year olds? What resources was I supposed to use? What types of activities could I do? Over the past year I have learnt a lot about STEM through trial and error and I have implemented a range of STEM activities with the students in my class – and you can too!
In this blog, I will discuss what STEM is, why STEM is important, list my favourite STEM materials and share my favourite STEM activities.
What is STEM?
STEM is a growing movement in education that is being integrated into classrooms all around the world. STEM stands for Science, Technology, Engineering and Mathematics. STEM is about combining these subjects together, rather than teaching these curriculum areas separately. By combining these subject areas together, students are able to apply elements of each subject to another and learn in different ways. My favourite part of STEM is that students learn through hands-on experiences to achieve an outcome.
Why is STEM important?
So why the big focus on STEM? Why exactly is it SO important? One of the reasons why STEM has been pushed into the spotlight is because the fields of Science, Technology, Engineering and Maths are becoming increasingly important every year. These industries are growing at a high rate and the future workforce will need to be skilled in these areas in order to fill these STEM-related positions.
As teachers, we are preparing students for the future, for jobs that don’t even exist yet, which means it is crucial that we are teaching skills that equip our students for the future. STEM prepares students for the future by teaching problem solving skills, innovative and creative thinking and digital skills. Teaching these important skills means that we are helping to prepare children to succeed in the future world of technological change.
What kind of materials do you need for STEM activities?
One of the things I love most about STEM is that the materials needed are very basic, affordable and readily available. Here are some of my must-have STEM materials:
-
- Sticky tape and/or masking tape (and lots of it!!)
- Blu tack
- Pipe cleaners
- Paddle-pop sticks
- Toothpicks
- PVA glue
- Scissors
- Aluminium foil
- Cardboard and paper
- Cardboard tubes
- Plastic cups
- Straws
- Recycled materials such as egg cartons, cardboard boxes etc
- Balloons
- String
What kind of STEM activities can you do in your classroom?
Whenever I am implementing a STEM activity in my classroom, I follow the same set of steps within a lesson:
-
- Present the STEM challenge and materials
- Divide students into groups
- Allow groups time to plan (discuss and draw designs)
- Students construct and build their design
- Students test their own design and watch other groups test their designs
- Group discussion – groups explain why they chose their design, if their plans look different from what they actually made and why it changed (they often do and that is fine!)
- Group reflection – we discuss what is successful/not successful and groups reflect on what they would do differently next time. During this time students are also encouraged to reflect on how well they worked as a team.
Here are some STEM activities I have implemented in my Prep classroom with children aged 5-6:
Paper Chain Challenge

What materials did we use?
-
- Cardboard
- Scissors
- Sticky tape

What did we do?
This is one of the easiest STEM activities for teachers to prepare, as there is minimal prep work. In this STEM challenge, students must work together to create the longest paper chain from only one piece of paper! To begin, I divided students into groups of 4-5 and each group was given one piece of cardboard, a pair of scissors for each group member and a roll of sticky tape. The groups were given time to discuss and plan their design on a whiteboard. Students were encouraged to label their design by writing what materials they used. It is always interesting to hear students collaborating and planning during this stage.
After students had time to plan (about 5 minutes), they got started on their paper chain. During this time, teamwork and collaboration were encouraged. After each group had finished their paper chain, we lined them up to see which was the longest. We had a group discussion about why certain chains were longer than others. Lastly, students were given reflection time.
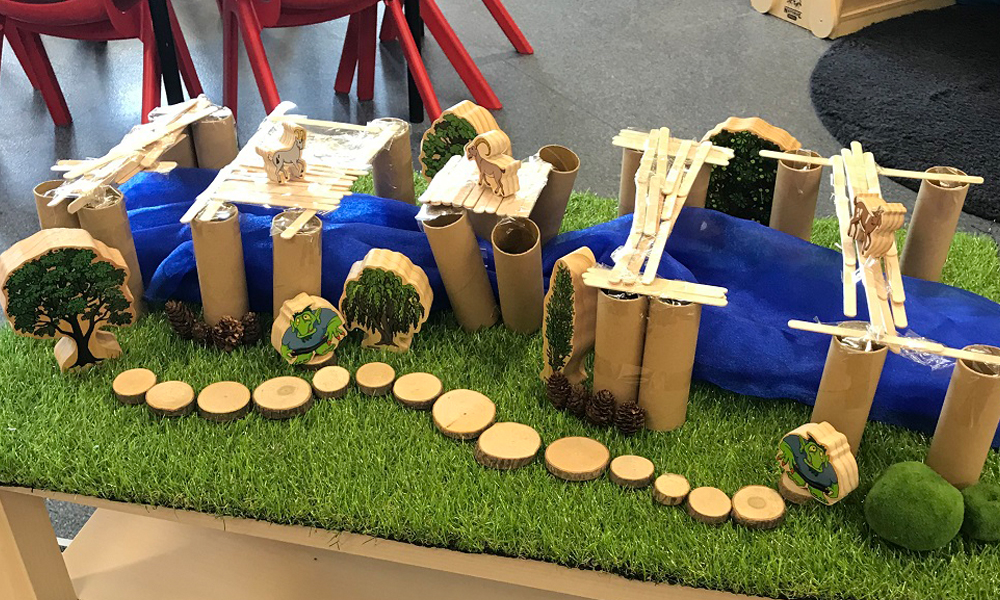
Design A Bridge For The Three Billy Goat’s Gruff

What materials did we use?

What did we do?
Picture books are a fantastic way to introduce a STEM challenge. In this activity, we brought the book ‘The Three Billy Goats Gruff’ to life! First, we read this classic tale and then I told my students that we were going to work in teams to create a bridge so that the Three Billy Goats Gruff could cross the river. I divided my students into groups of 4-5 and each group received their materials; 4 cardboard rolls, 20 paddle-pop sticks and a roll of sticky tape.

They used a whiteboard and marker to plan, draw and label their design during the planning phase of the lesson (about 5 minutes).
After their plans were drawn, students worked together in their groups to collaboratively build their bridge using the materials. After they finished, each group tested their design by placing their bridge over the river (we used blue material) and seeing if their bridge could hold one or more of the Three Billy Goats Gruff figurines.

My students had a great time testing out each other’s designs and playing with the goats and troll as they re-enacted the story. We ended this lesson by having a group discussion about how all of the bridges were successful, even though they were constructed differently.
Design A Marble Maze

What materials did we use?
-
- Cardboard lids
- Straws
- Marbles
- Markers
- Sticky tape
- Scissors

What did we do?
One of the most exciting STEM activities we have done this year is making our own marble mazes. A big reason why my students LOVED this activity so much was because they each got to make a marble maze and take it home at the end of the day. Rather than focusing on teamwork, this activity focuses on each individual child creating and problem solving. To begin this STEM lesson, I introduced the activity and the materials we were going to use. I also showed them some examples of marble mazes to give them some direction, for those students who may not have seen one before.

Students were given time to plan their design before they started creating and constructing. After planning, students worked independently to create their marble mazes – it was amazing to see every single child being so creative! We added a bit of extra excitement to our marble mazes by drawing ‘obstacles’ for the marble to get past – for example, a monster, a mud pit etc.

After we all completed our marble mazes, my students loved testing out their own and each other’s marble mazes and seeing how well their designs worked. We reflected at the end of our lesson and students were encouraged to think about what worked, what didn’t work and what they would do differently next time.
Build A Balloon Tower

What materials did we use?
-
- Balloons
- Balloon pump (lots of balloons to blow up!)
- Masking/ Sticky tape
- Large pieces of cardboard (for base)
- Tape measure (to see which tower is the tallest)

What did we do?
This STEM challenge felt like a BIG PARTY in the classroom! That’s because our STEM challenge was to make a balloon tower. Yep, that’s right – a tower made out of balloons! This STEM activity required lots of problem solving, teamwork, communication and quite a bit of PERSEVERANCE (prepare for some balloons to POP!). We used sticky tape to create our balloon towers but I would definitely use masking tape next time as I think it wouldn’t pop as many balloons.

The aim of this STEM challenge was to build the tallest freestanding balloon tower. Students worked in groups to first plan their design and then construct it. Each group was given 20 balloons, a cardboard base and sticky tape. It was very interesting to observe the different techniques students used when building their balloon tower. Make sure you have some spare balloons set aside because it is highly likely that you will have some balloons pop. After each group completed their balloon tower, we measured them to see which tower was the tallest. We reflected on why some designs worked better than others and students were encouraged to think about what they would do differently next time.
Looking for more Early STEM Activities? Stay tuned for Part Two of this blog where plenty more exciting STEM ideas will be shared!
ABOUT HEIDI:
Heidi Overbye from Learning Through Play is a Brisbane based, Early Years Teacher who currently teaches Prep, the first year of formal schooling in Queensland. Heidi is an advocate for play-based, hands-on learning experiences and creating stimulating and creative learning spaces. Heidi shares what happens in her classroom daily on her Instagram page, Learning Through Play. See @learning.through.play for a huge range of activities, play spaces and lesson ideas.