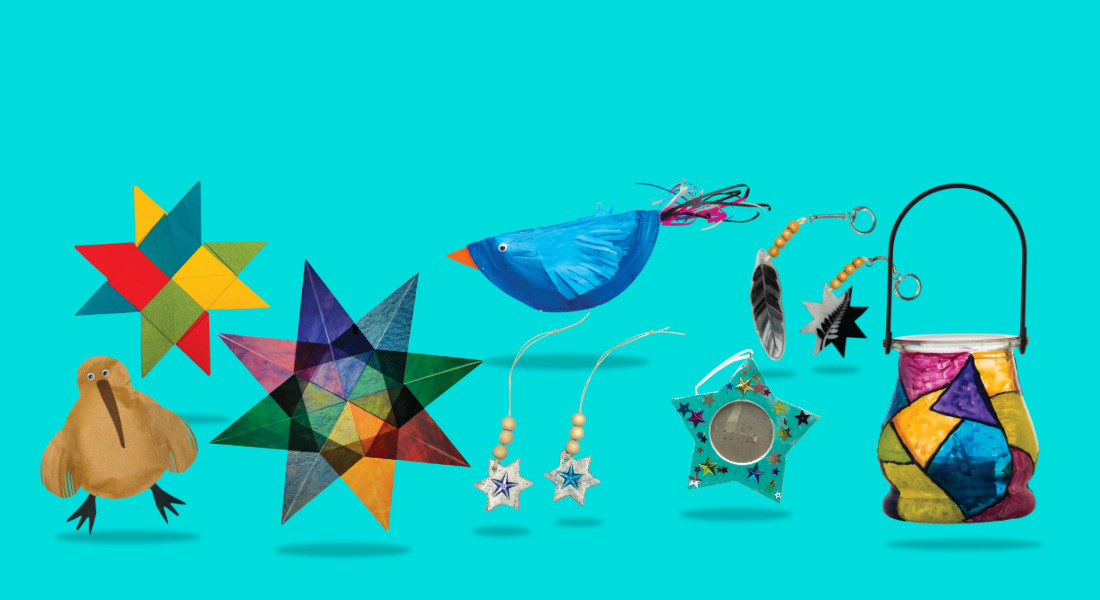
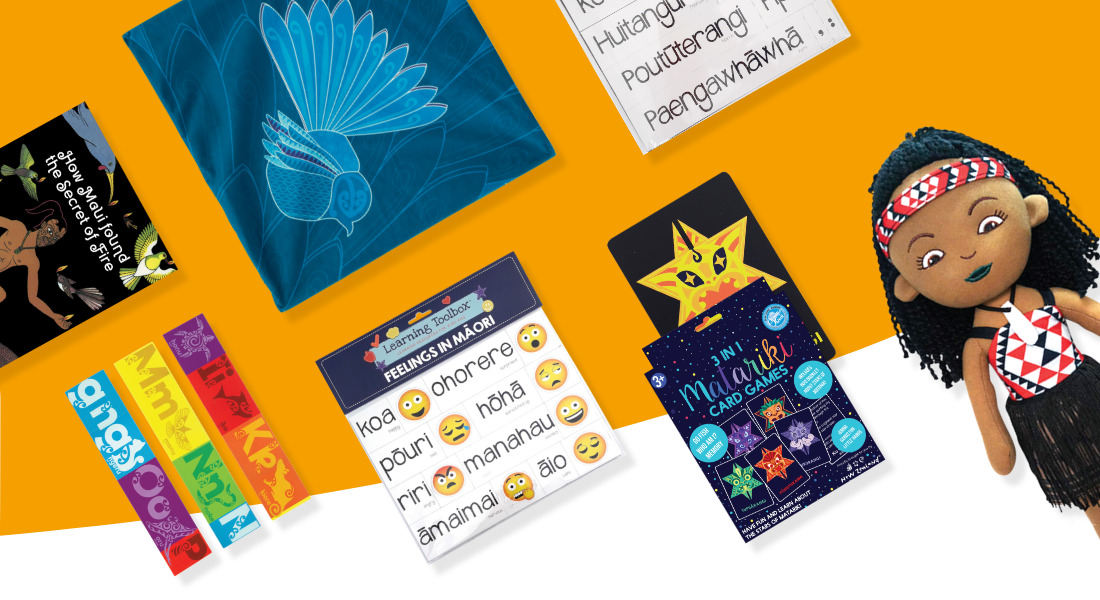
Haere Mai! Today we’re exploring arts & crafts inspired by Aotearoa New Zealand and the dynamic Māori culture. With some basic supplies, and a few simple steps, you’ll soon have a classroom full of creations inspired by the Land of the Long White Cloud.
We’ve got crafts for Matariki, the famous cluster of stars heralding the start of the Māori new year. Make your own feathered Piupiu or experiment with weaving & Raranga techniques. New Zealand’s national identity, the silver fern, has been honoured with clay. And of course, we have the unique and utterly adorable Kiwi. That’s only a hint of what’s to come…
Let’s get started!
Folded Stained Glass Matariki Star
Paper folding activities are brilliant for fine motor development as well as cognitive strength (improving perception, logical thinking, focus and concentration) all of which benefit children’s mastery of curriculum outcomes.
Celebrate the Matariki Star Cluster with these captivating 8-point stars. Made from stained glass craft paper, they let light shine through the colours, creating mesmerising folded lines and shades from light to dark. Satisfying to look at and make, you won’t want to stop at one!
Step-by-step
Choose 8 pieces of Stained Glass Craft Paper and cut them into squares (alternatively use square shaped paper).
Fold one piece of paper in half (point to point) and then open out.
Fold the paper in half again (the other two points together) and then open out again.
You will now have 2 folds (in a cross pattern from all 4 points) in the paper to guide your next steps.
Turn the paper to face you like a diamond.
Fold the right side corner into the centre (the east point to the middle line).
Fold the left side corner into the centre (the west point to the middle line) creating a kite shape.
Glue these two sides down using a tab of glue stick.
Repeat steps 2 to 8 for the remaining 7 pieces of square paper.
To assemble the star, glue stick each side together, placing each piece on top of the previous one.
The final piece should tuck neatly under the first piece to finish off.
Done! Your Stained Glass Matariki Star is ready.
*TOP TIP – If you’ve chosen Stained Glass Paper to craft with and cutting it down into a square, the trimmings make the most beautiful additions to other crafts – feathers for birds or Piupiu skirts, lanterns, stained glass collage and more.
Featured Products;
Stained Glass Craft Paper – Pack of 24 https://www.teaching.co.nz/product/re5257
Creatistics Glue Stick 25g – Pack of 12 https://www.teaching.co.nz/product/jn1203
Celebration Dough Stars
We use our hands all day, every day and so developing strength and dexterity in those small hand & finger muscles is critical for carrying out all the daily tasks we need to do. Working with dough (and dough tools) is a brilliant way for children to develop their fine motor muscles. Kneading, squeezing, pulling, pinching, rolling and snipping are all powerful ways to strengthen hands and fingers – all while nurturing creativity as children make & create.
To celebrate Matariki, we’re making sparkly dough stars! When your dough stars are finished, you’re ready to squish them up and make them all over again! Any teacher will tell you that the squishing of dough creations is just as much fun as making them!
However, if you’d like to make permanent stars to take home, simply swap the Creatistics dough for Silk Clay or Magiclay which will dry and harden when exposed to air. When you’ve finished playing, simply shape into stars and set aside to dry – don’t forget to poke a hole in the top for hanging thread and beads if desired too.
Step-by-step
Choose your desired dough colours and portion out for each child.
Sprinkle glitter and glitter stars on the table, inviting children to dab their dough on them and mix through as desired.
Use a rolling pin to flatten out the dough to roughly 1cm thick.
Using the star or shooting star cookie cutter, press gently into the dough until its cut all the way through.
Gently remove your glitter star and admire.
Repeat as desired!
*TOP TIP – Creatistics glitter shakers make it super simple for children to sprinkle their own glitter and stars in small ‘bite size’ portions developing their autonomy as their experiment with different sensory mediums.
Featured Products;
Creatistics Skin Tone Dough https://www.teaching.co.nz/product/cs2900
Creatistics Pastel Dough https://www.teaching.co.nz/product/cs2901
Metal Cutters https://www.teaching.co.nz/product/dn2757
Bio-Glitter https://www.teaching.co.nz/product/cs1108
Glitter Stars https://www.teaching.co.nz/product/cl6586
Stained Glass Art Stars
There’s just something extra special about stained glass art. The cheerful colours bring joy to the learning environment, and when the sun reaches just the right spot in the sky, it shines through all those beautiful colours to light up the room in festive rainbows.
Super simple to make, these Stained Glass Art Stars can be crafted using a few basic craft materials, and yet they make a huge impact in a classroom celebrating the start of the Māori New Year. Read on to make your very own Matariki stars.
Step-by-step
Using a pencil and ruler, finely mark 1cm lines running the length of the black card.
Carefully cut along the pencil markings, making black card strips.
On a flat surface, arrange 5 strips of card into a star shape, with the ends touching.
To secure your star apply a touch of glue stick where the strips of card meet.
Gently apply glue to one side of the star.
Place Stained Glass Craft Paper or Cellophane onto the star, gently pressing into the glue to hold in place.
Carefully cut away the excess stained glass paper or cellophane, leaving a neat edge that can’t be seen from the other side.
Continue steps 6 and 7 until all the open sections (windows) of the star have been filled with colour and trimmed to fit.
Gently apply glue stick to 5 more strips of black card, and gently lay them over the back of the decorated star, sandwiching the ‘stained glass’ inside.
Using scissors, carefully trim the stars points into clean edges.
Set aside to dry thoroughly.
The stars can be stuck to windows or hung in the classroom by attaching a string or ribbon loop to the top point.
Done! The perfect Stained Glass Star is ready.
*TOP TIP – Cutting the stained glass paper into quarters, or cellophane into smaller pieces will be more manageable for younger ages to work with.
Featured Products;
Mount Card Black 220gsm A4 https://www.teaching.co.nz/product/whp070
Stained Glass Craft Paper https://www.teaching.co.nz/product/re5257
Assorted Cellophane https://www.teaching.co.nz/product/aus201
Creatistics Glue Sticks https://www.teaching.co.nz/product/jn1203
Metallic Glitter Glue Stars
Celebrate the start of the Māori New Year with a classroom shining bright with Matariki stars. With a simple cardboard base, aluminium foil covering and glitter glue embellishments you’ll soon be on the way to having your own night sky constellation. Keep as they are to stick to walls and windows or punch a hole to attach hanging thread for dangling from the ceiling, in any which way they’ll be a sight to behold!
Step-by-step
Using thick cardboard, draw or trace the shape of a star with a pencil and carefully cut the shape out with scissors.
Apply a small layer of glue to your star and then carefully wrap with aluminium foil, or foil sheets – folding the foil over the points of the star until both sides are covered (adding dabs of glue as you go will help the overlapping edges stay firm.
Set aside to dry thoroughly.
Use glitter glue to draw lines over the aluminium foil, creating sections and patterns. If using different coloured foil sheets, create glitter glue lines directly over the edges of each coloured paper.
Set aside to dry thoroughly.
Use a hole punch to create a hole, and thread desired length of metallic yarn through to hang.
Done! Your Metallic Glitter Glue Stars are ready.
*TOP TIP – Creating stars of different sizes to represent the various stars in the Matariki cluster, transforming your learning environment into the night sky.
Featured Products;
Large Poster Board https://www.teaching.co.nz/product/aus081
Foil Roll https://www.teaching.co.nz/product/st0182
Foil Sheets https://www.teaching.co.nz/product/aus040
Glitter Glue https://www.teaching.co.nz/product/cs6120
Washable School Glue https://www.teaching.co.nz/product/cs0001
Cardboard Weaving Baubles
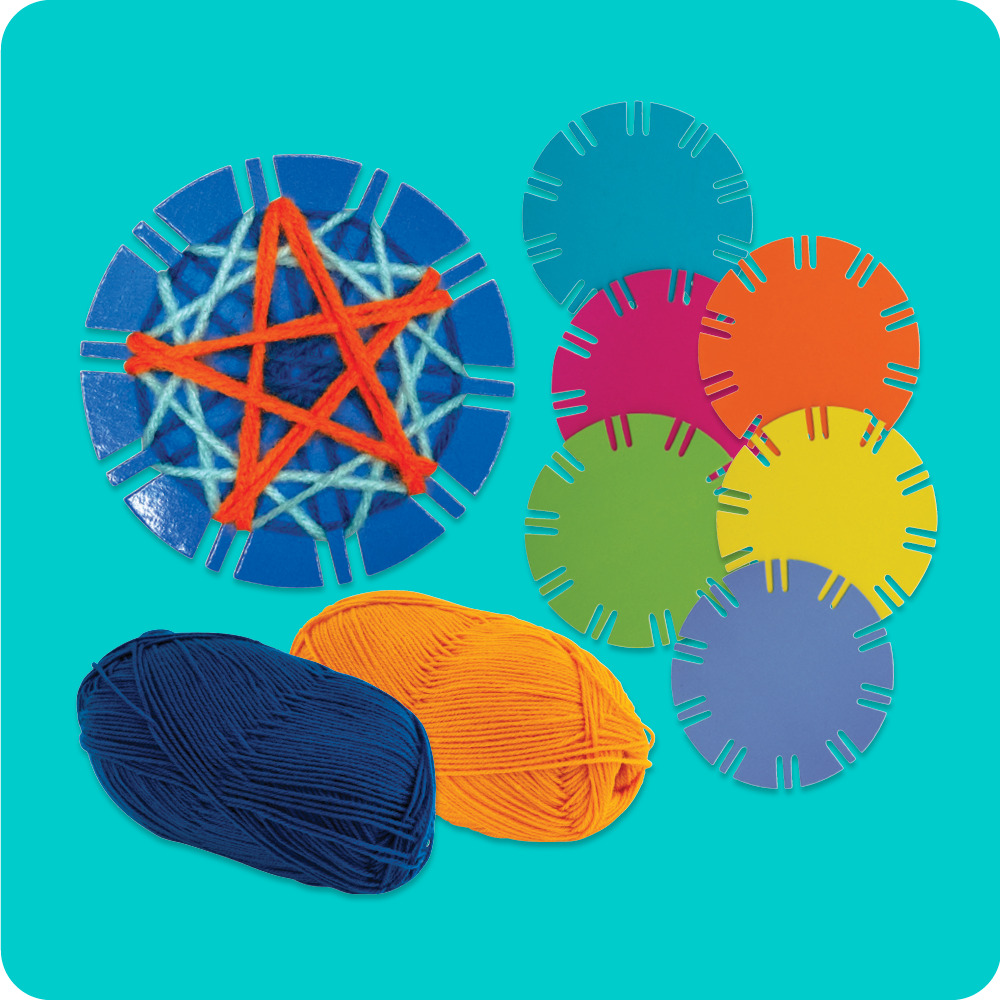
Not just a weaving activity! These Cardboard Weaving Baubles foster the development of creativity, fine motor skills maths knowledge too! That’s right, your students will be learning their times tables as they weave. Simply use the 10 points around the bauble to multiply and weave a pattern. Each point represents the last digit of each of the times tables. Included in each pack are teacher notes and images to follow along.
Pair your baubles with packs of bold primary coloured yarn, and supplement with individual colours of our choosing, in orange, pink, purple, dark blue, light blue, grey or brown. Older students might like to use embroidery thread to create their weaving works, offering a more refined finish. Leave as simple yarn weaving or add some sparkly embellishments as desired. Let your inner creativity guide you along.
Step-by-step
Choose your desired coloured weaving bauble.
Cut long lengths of your chosen yarn/thread, wrapping it around the bauble and tying the end securely at the back.
Start to wrap the yarn around the bauble, letting the notches guide your pattern.
When all your notches have been used, securely tie the yarn off at the back and snip off the excess.
Choose to finish off with some embellishments or keep on weaving.
Choose a contrasting coloured yarn, cut a medium sized length, and tie one end to some yarn in the middle of the bauble, tucking the tail end under to hide.
Weave the contrasting coloured yarn over and under the first coloured yarn, creating a weaving pattern as you make your way around the circle.
When your contrasting yarn runs out of length simply tie another colour on and keep on weaving (remembering to tuck the tails under your weaving design).
When you’ve run out of bauble room to weave, tie off securely and tuck the last tail in to hide it.
Finish off by tying/ or gluing a short length of yarn/string or ribbon to the top of your bauble in a loop to hang it from.
Done! The perfect Raranga bauble is finished.
*TOP TIP – Younger students will find shorter lengths of yarn more manageable, while older students will feel capable to experiment with longer yarn lengths, complex patterns and colour formations.
Featured Product;
Cardboard Weaving Baubles https://www.teaching.co.nz/product/th906
Matariki Clay Stars
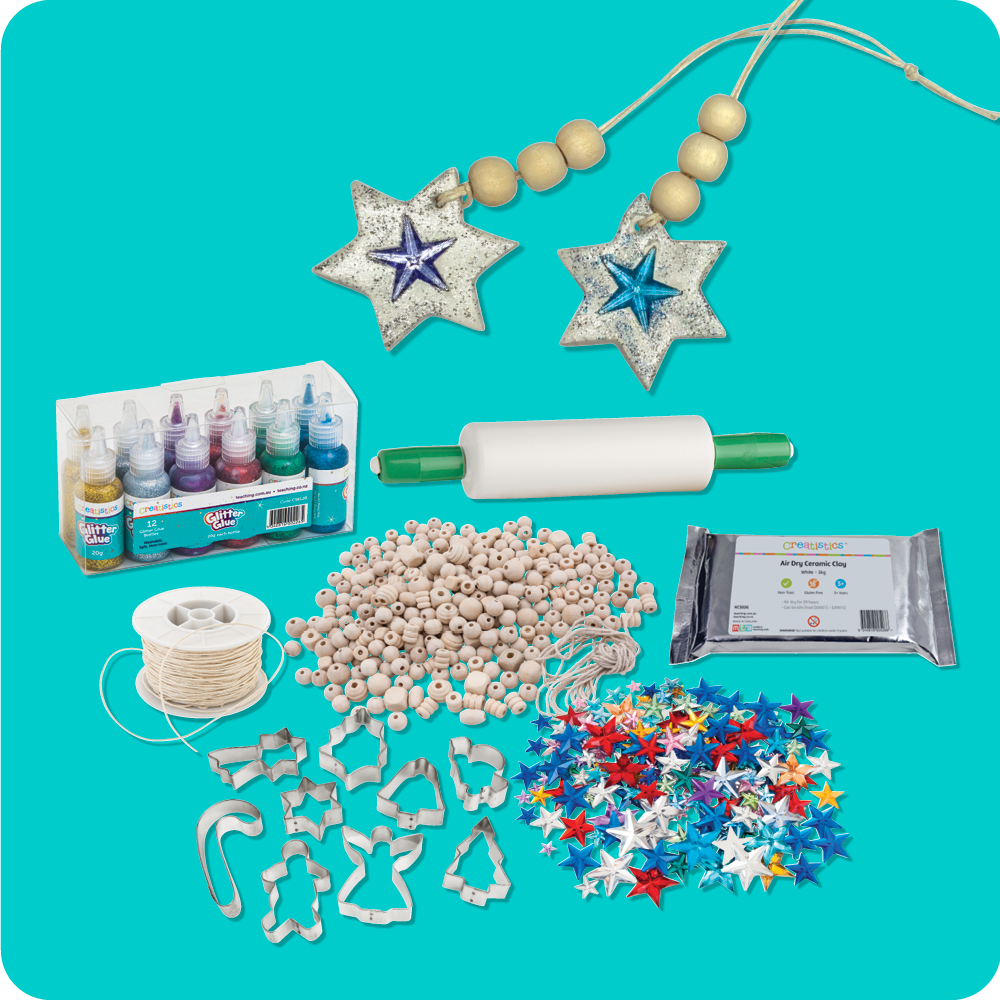
Air dry clay, cookie cutters, wooden stamps, and glitter glue – yes please! So many crafting favourites feature in this extra special Matariki clay star ornament activity. The end results will proudly adorn the classroom and then taken home where they’ll be treasured for years to come. They’re so much fun to make you’ll soon have one for all your loved ones!
Step-by-step
Using a wooden rolling pin, roll out a handful of air-dry clay until it is smooth and flat (roughly 1cm thick to ensure your decorations are sturdy).
Press the star cookie cutter shape into the dough and press firmly until it cuts through the clay.
Gently remove the excess clay (this clay can be used again or used to make extra embellishments including clay beads).
Next, gently press star block print stamp into the clay star and lift, creating an indented pattern.
Using a skewer or the pointed end of a pencil, gently poke a hole in the top of your star (ensuring your hole is large enough to thread your chosen cord or twine).
Lift your decoration and gently smooth down the edges with your fingers (a little bit of water on your fingers will help with super smooth edges).
Set aside for 48 hours, or until completely dry.
When the star ornament is completely dry (clay will lighten and feel firm to the touch) add a thick layer of glitter glue to the surface, letting the glue flow and sit in the indented pattern.
Set aside to dry for 24 hours.
Adding several layers of glitter glue (and setting aside to dry between layers) will add extra shine and lustre to your decorations.
When your ornament is completely dry, thread your desired length of metallic embroidery thread through the star, and tie in place with a knot.
Done! The perfect Matariki clay star decoration is ready.
*TOP TIP – Gently pressing rhinestones into your wet clay decorations will add an extra special touch to your stars.
Featured Products;
Air Dry Clay 1kg https://www.teaching.co.nz/product/kc1026
Glitter Glue https://www.teaching.co.nz/product/cs6120
Rhinestones https://www.teaching.co.nz/product/cl7552
Cookie Cutters https://www.teaching.co.nz/product/dn2757
Sparkly Matariki Popstick Stars
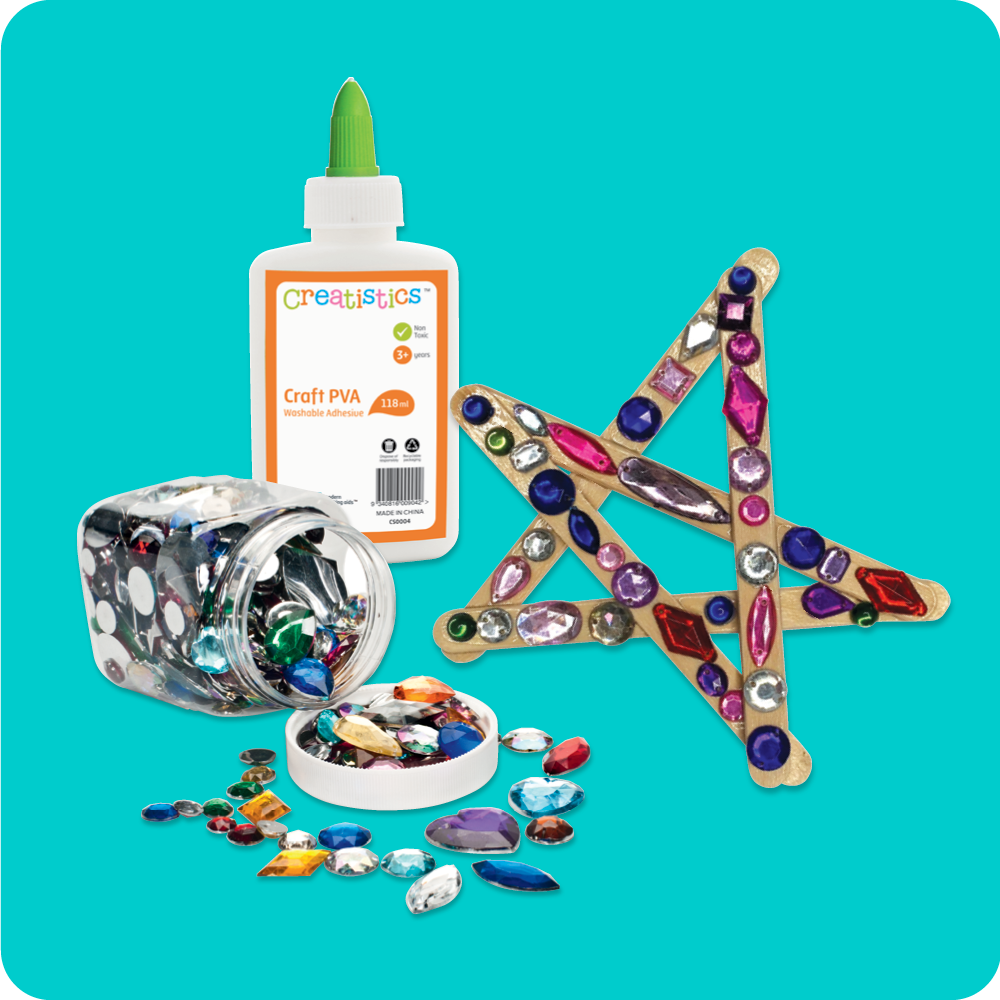
Pop stick crafts have been a part of our childhood for generations – and rightly so! Their versatile open ended possibilities act like a blank canvas, allowing children’s imaginations to craft them into the most amazing things. Working the thin pop sticks (and embellishments) into place will build children’s focus and concentration, developing their fine motor dexterity along the way too. Work planning and design into your creations to build STEM and STEAM focused lessons too!
Keep a natural feel with plain pop sticks or go for a bold statement with coloured pop sticks, which ever crafting style you choose, your pop stick Matariki stars are sure to brighten the sky!
Step-by-step
Count out 5 or 6 Paddle Pop sticks per star and arrange them into their star formation as pictured (the tips of the pop sticks meeting up with each other to form the points).
Use strong craft glue to adhere all the parts of the pop sticks that over lap/touch each other.
Set aside to dry for 24 to 48 hours.
When thoroughly dry your star will be strong enough to handle and decorate.
To decorate, apply a layer of paint and/or strong glue to the front of the star and stick on your desired number of embellishments.
Finish off with some dabs of glitter glue – the more sparkles the better!
If hanging your stars in the classroom, tie a length of string, cord or ribbon to one of the points and firmly tie off making a loop to hang.
Done! The perfect Matariki star is ready.
*TOP TIP – Younger age groups will find Jumbo Pop Sticks and Bio Glitter easier to handle than regular sized pop sticks.
Featured Products;
Paddle Pop Sticks – Pack of 1000 https://www.teaching.co.nz/product/jm67
Glitter Glue https://www.teaching.co.nz/product/cs6120
Strong Craft Glue https://www.teaching.co.nz/product/cs0004
Glitter Stars https://www.teaching.co.nz/product/cl6586
Mixed Rhinestones https://www.teaching.co.nz/product/nr030
Star Sequins https://www.teaching.co.nz/product/sh1057
Iron-on Bead Stars
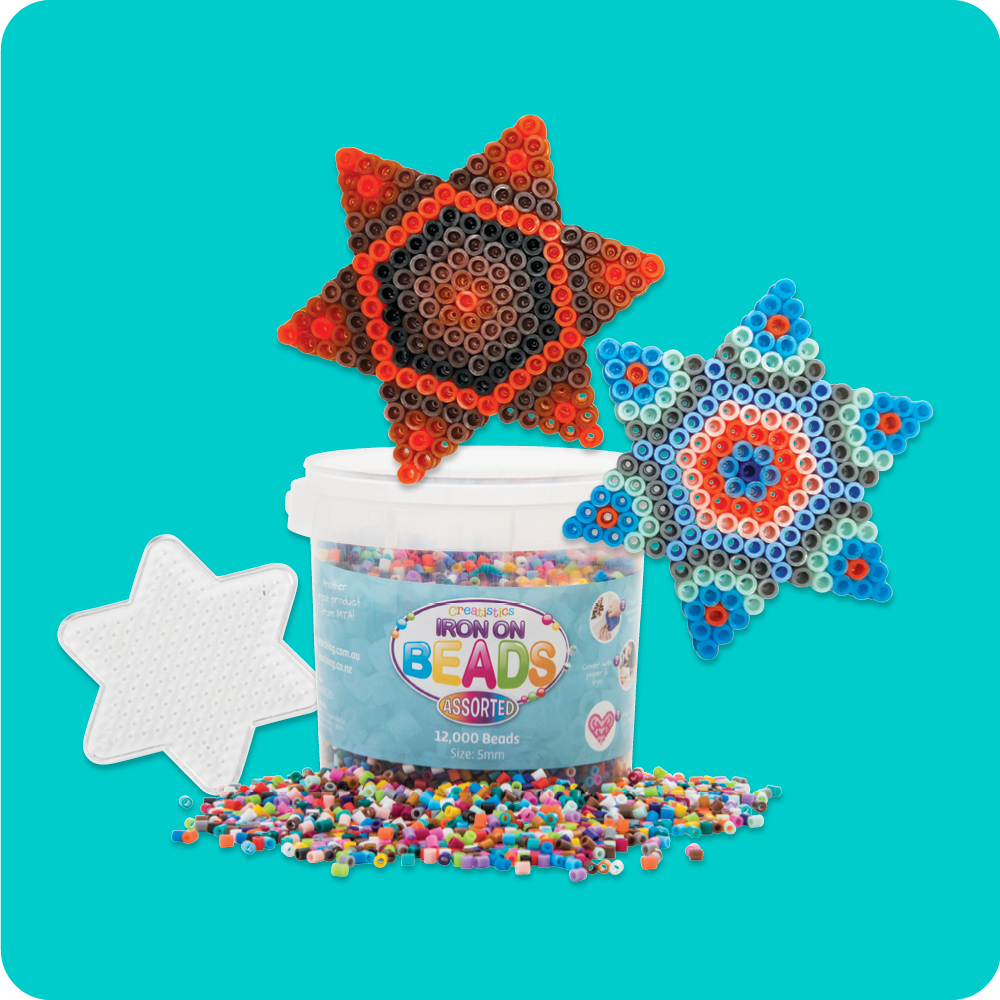
Iron-on Beads welcome children to create. They work like open-ended craft materials, inviting children to arrange them into any number of scenarios. Perfect to make jewellery or key tags, trinket bowls, coasters, embellishments and so much more – literally anything your imagination desires. And with so many colours to choose from, children can experiment with creative design as they work with colour and pattern making.
And this star shape is perfect to celebrate Matariki! The beads easily arrange on a bead board; just lay on a piece of ironing paper and with a quick iron over, the beads melt together to hold their shape. It’s super easy! Children can also use them as traditional beads, incorporating weaving into their works as they stitch through the bead openings – ideal for beaded jewellery or finishing off a hanging decoration.
Available in so many shades, choose from vibrant colours and the handy vibrant pack, pastel colours and the handy pastel pack or bright neon if you’re feeling like some flare. And for younger age groups, they might find the jumbo sized beads more workable along with their jumbo sized square bead boards.
Step-by-step
Arrange the iron-on beads into a star design on the star shaped bead board.
Warm a household iron to high making sure the steam is off.
Cover the design with a sheet of ironing paper and iron over until the beads start to melt and fuse together into a colourful and flexible shape.
Allow your design to cool before removing from the bead board.
Your Matariki star can be made into a magnet by sticking a self-adhesive magnet to the back, or turn your star into a hanging decoration with string and beads.
Done! The perfect Iron-On-Bead Matariki Star is ready.
*TOP TIP – Hot irons are not for young children. Have an adult help or complete the ironing steps.
Featured Product;
Creatistics Iron-on Beads Pack https://www.teaching.co.nz/product/amb200k
Air Dry Clay Fern Dish
Clay is valuable resource, inviting children to form their creative imaginings into solid works to treasure forever. It’s a beautiful way to connect to nature too, ethically using the resources our world offers in meaningful ways.
Air Dry Clay can make all sorts of wonderful works without the hassle of expensive kilns too. It’s also the ideal medium to make small plates and bowls, like these beautiful NZ Fern dishes– acting as desktop paperweights or handy holders for keys, coins, jewellery, and other small items. Not to worry if you haven’t got ferns close by, feel welcome to use any plants or flowers significant to your local area so that your clay dishes will reflect your own deep connection to the land.
Step-by-step
Divide 1kg Air Dry Clay packets into roughly 6 portions.
Using a rolling pin, and a flat surface roll out each portion to roughly 1 – 2cm thick.
Lay a cutting of a fern onto the clay and gently roll over the fern so that it leaves an imprint.
Carefully lift the fern off the clay.
Gently cut away excess clay with clay knife.
Gently lift the fern dish off your flat surface and use a little bit of water on your fingers to smooth the edges.
Gently place the clay into a shallow bowl (be carefully not to press the clay into the bowl)
Set aside to completely dry for a few days.
When thoroughly dry, decorate with paint and glitter glue as desired and leave to dry.
When thoroughly dry, coat with PVA Washable School Glue or Crystal Clear to provide a barrier to dirt, tarnish, wear stains and moisture.
Done! The perfect Air Dry Clay Matariki trinket tray is ready.
*TOP TIP – Appyling a dark shade of paint to the fern imprint and a light shade to the background will make the fern detail pop from the background.
Featured Products;
Air Dry Clay 1kg https://www.teaching.co.nz/product/kc1026
Glass & Tile Paint https://www.teaching.co.nz/product/cb2200
Crystal Clear https://www.teaching.co.nz/product/md025
Creatistics Poster Paint – Green https://www.teaching.co.nz/product/cs0077
Woven 8 Point Matariki Star
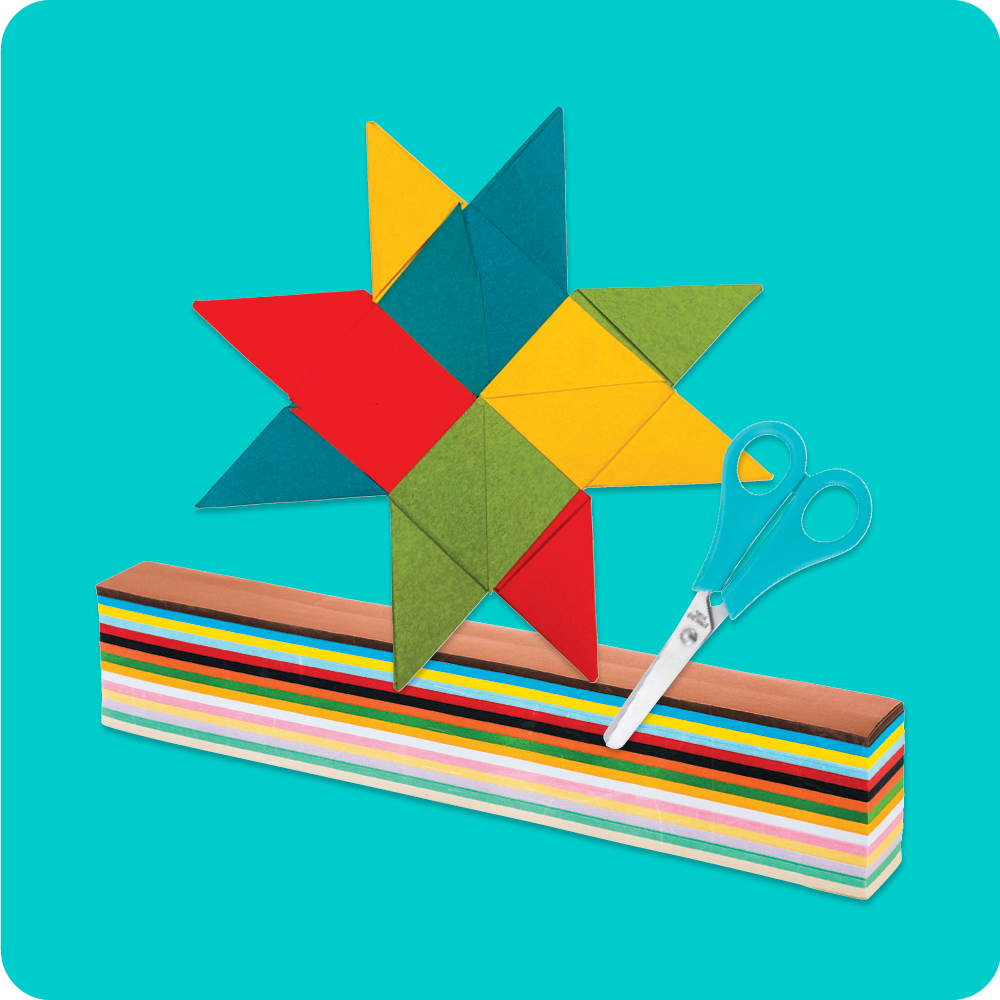
Paper weaving uses the same ‘over and under’ techniques of textile weaving, taking basic materials and weaving them into beautiful artworks. Just as stunning as the Matariki star cluster in the early morning sky during New Zealand’s mid-winter months, your classroom will look spectacular covered in stars. They also make the most adorable bunting, simply attach the stars to string or ribbon and hang around the learning environment for smiles as bright as the sky. You can even add a touch of bio- glitter or glitter glue to add a sparkle to your designs.
We’ve added the written step by step guide below; however, you might find working through the many videos online for ‘paper weaving stars’ visually helpful. Paper stars may look and sound tricky to make but you’ll soon have plenty!
Step-by-step
Choose 4 colours of craft paper strips and using a ruler, draw a feint pencil line down the lengths of the strips and then cut along the lines. Take 4 of those strips to make 1 star.
Fold the 4 strips of paper in half, creasing down the middle.
Lay the first strip down in front of you on a table with the fold pointing to the left and the open end pointing to the right.
Take the 2nd strip of paper and pointing the fold towards you open the ends and sandwich the first strip inside the 2nd strip (you will now have an L shape), take the 2nd strip a few cm down the length of the 1st strip.
Take the 3rd strip of paper and pointing the fold to the right, open the ends and sandwich the 2nd strip inside the 3rd strip.
Take the 4th strip of paper and pointing the fold away from you and end towards you, fold the 4th strip of paper around the 3rd strip.
Slide the ends of the 4th strip into the loop pf paper in the 1st strip.
Gently pull the ends of all four paper strips to tighten your weaving. It should look like a pinwheel shape (a square on the inside and the 4 paper strips pointing N, S, E and W).
Starting at the right side lift the top flap of paper and fold it to the left across the middle of the star.
Repeat step 9, moving clockwise around the star lifting the top flat of paper and fold it upwards across the middle of the star.
Finally, you’ll fold down the flap at the top of the star, but this time tuck the end of the flap inside the loop of paper created by the first flap you folded. Gently pull it all the way through to complete this stage.
To make the points of the star, take the top right strip and fold it backwards or under to make a right angled triangle and crease.
Fold that same strip down at a right angle again so that it forms a triangle shape (leaving a tiny gap running down the centre of the triangle will help with the next step).
Fold the triangle you just created in half towards the centre of the star to create 1 star point.
Fold the end of that strip under the first square of the centre it’s sitting on top of and trim off the excess.
Repeat steps 12 to 15 for all the star’s points (you’ll finish with 8 points).
Done! The perfect Woven 8 Point Matariki Star is ready.
*TOP TIP – Using 4 colours of paper will help you to work through each of the steps, keeping track of your weaving as you go.
Featured Product;
Craft Paper Strips https://www.teaching.co.nz/product/th911
Paper Weaving
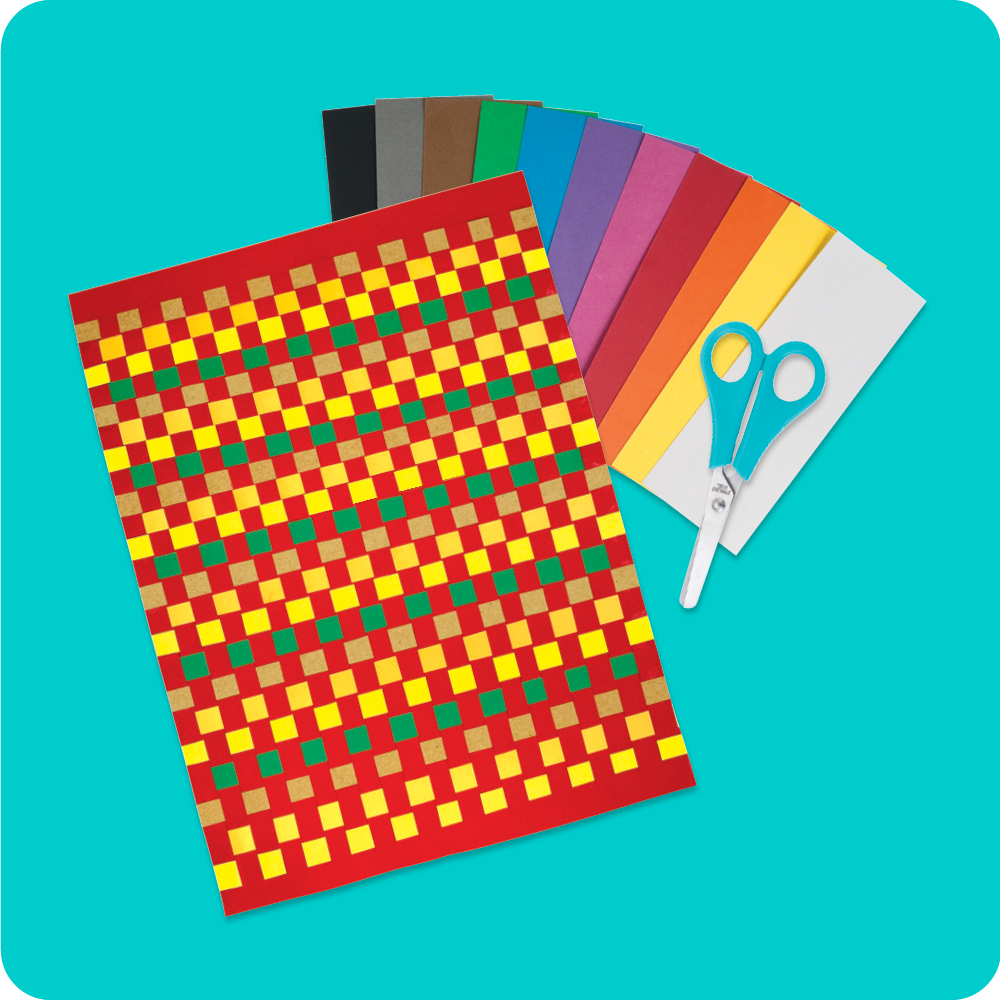
Weaving is a living artform, techniques evolving and adapting through time right up to the present. And with so many different paper options to choose from, your woven paper artworks can be as imaginative as you like. From pastel to fluorescent, bright, coloured, kinder, nature, nature trail or even magazines and newspapers as some of the options, everyone’s Raranga patterns will reflect their own unique style. Weave in straight lines or switch it up with 45 degree angles and formations for more complex patterns. There’s no end to options once you get started.
Step-by-step
To make the weaving frame, use a ruler and lead pencil to draw 1cm lines running the length of your paper (an A4 sheet of paper will fit 20 lines, giving you 21 sections).
Carefully cut along these lines – DO NOT CUT THE WHOLE LENGTH – make sure to leave a 1 to 2cm section at one end.
Use sticky tape or washi tape to attach the frame to your desk to hold it still.
With a contrasting piece of paper (as many colours as you like), repeat step one, drawing 1cm lines down the length of the paper.
Carefully cut the contrasting paper lines the whole length (these long strips will be your weaving paper).
Weave your contrasting paper through the weaving frame, weaving over and under the whole way along.
Carefully push your weaving paper up the frame so that it sits flush with the top.
Repeat step 7, each time gently pushing your paper up so that it sits flush with the previous row.
Continue weaving until your weaving frame is full.
To finish off, use a glue stick to adhere the edges in place (or sticky tape/washi tape).
Snip off the extra ends if desired.
Done! The perfect Paper Raranga artwork is ready.
*TOP TIP – Older students might like to work with even thinner strips of weaving paper (or even A3 paper), while younger age groups will benefit from wider weaving frames and strips.
Featured Products;
A4 Coloured Cover Paper https://www.teaching.co.nz/product/teb0001
A4 Kraft Paper https://www.teaching.co.nz/product/teb0087
A4 Pastel Paper https://www.teaching.co.nz/product/teb0801
A4 Skintone Paper https://www.teaching.co.nz/product/re5233
Plastic Ruler https://www.teaching.co.nz/product/teb6038
Sparkly Shooting Star Wands
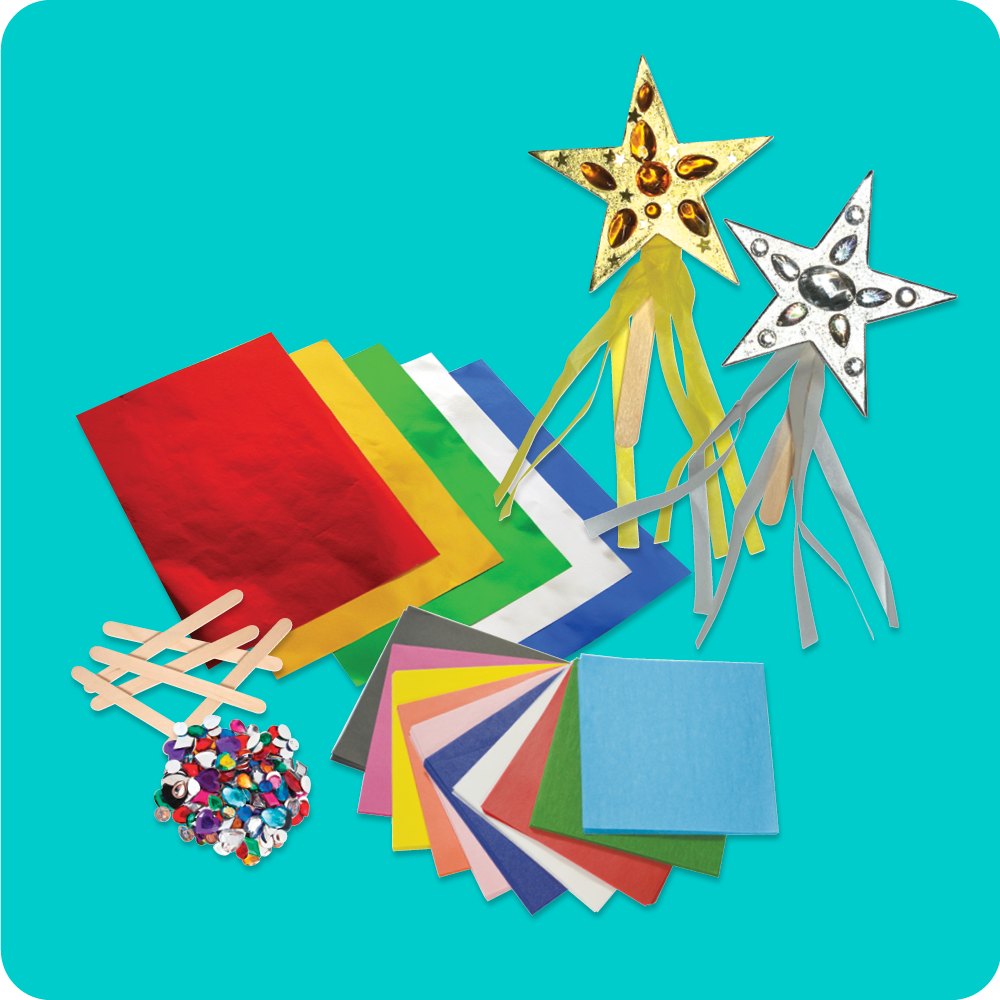
Aotearoa proudly boasts a stunning night sky. With little to no light pollution in many parts of both the North and South Island, the night sky appears closer and beautifully clear. If you watch closely, you might be lucky enough to see a shooting star.
These adorable shooting star wands combine papier mache techniques with paper art to make a sturdy prop ideal for both classroom decoration and pretend play! For this craft experience we’ve used the stars from the Papier Mache Christmas Ornaments (20 stars), using the remaining ornaments later in the year for Christmas crafts, but you can easily substitute the stars for cutting out your own with a few layers of thick cardboard, or upcycling delivery boxes.
Step-by-step
Apply a good layer of glue stick to one side of the star and press onto a piece of foil paper, using your fingers to smooth the surface.
Roughly cut around the star, leaving some overhang to fold over the back of the star.
Apply glue stick to the reverse side of the star and press the overhang foil down.
To neaten the reverse side of the star, use the star to trace and cut a star foil, pressing it down on the reverse side to cover the folded edges.
Cut 6 long and thin lengths of tissue paper, and glue them to the back of the star using school glue.
Add another dab of school glue to the back of the star and press a pop stick into the glue and over the ends of the tissue to sandwich them in place.
Set aside to dry.
When thoroughly dry, decorate the front of the star with rhinestones, glitter stars and glitter glue.
Set aside to dry for 24 to 48 hours.
Done! The perfect Sparkly Shooting Star Wand is ready.
*TOP TIP – To turn your wand into a decoration, omit the pop stick and add a loop of ribbon to hang.
Featured Products;
Papier Mache Christmas Ornaments https://www.teaching.co.nz/product/th929
Metallic Foil Sheets https://www.teaching.co.nz/product/aus040
Creatistics Glue Sticks 25G Pack of 12 https://www.teaching.co.nz/product/jn1203
All Purpose Washable School Glue https://www.teaching.co.nz/product/cs0001
Mixed Rhinestones 100g Pack https://www.teaching.co.nz/product/nr030
Glitter Stars – 100g Jar https://www.teaching.co.nz/product/cl6586
Coloured Tissue Squares https://www.teaching.co.nz/product/aus101
Paddle Pop Sticks Plain https://www.teaching.co.nz/product/jm67
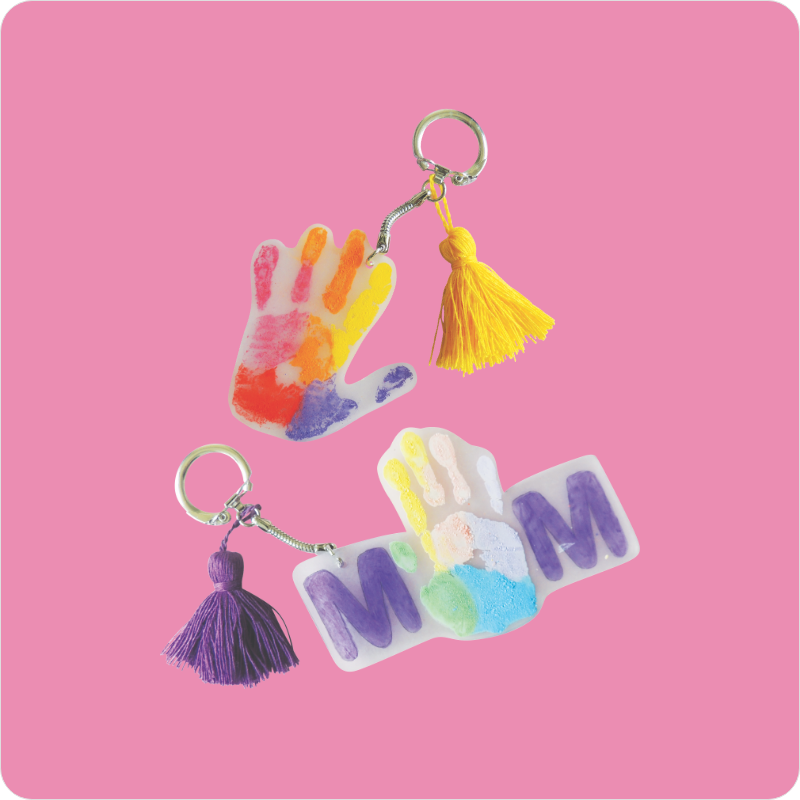
NZ Shrink Film Keychains
Shrink Film works like drawing on a piece of paper – only so much more fun! When you’re finished with your design, simply cut it out, punch a hole in the top (to thread into), and bake in the oven. You’ll see your design shrink before your very eyes! When it’s completely cooled, you’ll see it’s now a durable hard trinket ready to transform into a myriad of things.
Necklaces, bracelets, key chains, bag trinkets or car rear view mirror accessories are all super simple to make. Just thread some beading cord or leather through the hole, add some beads and finish off with a key chain as desired. Keep for yourself or gift to loved ones, these super simple decorations are sure to delight!
Read on to make your very own Matariki Star keychain – or Kiwi, NZ fern or anything your imagination desires. There’s no limit to your creations.
Step-by-step
Draw your star keychain designs onto the shrink using the matte side with coloured pencils or permanent markers (feel welcome to use a star template for precise measurements).
Carefully cut around design and punch a hole to attach the beading cord.
Pre-heat oven to 150°C.
Place your star designs on a lined tray (matte side up) and bake.
Plastic will begin to shrink after 10 seconds, watch carefully! They will shrink to approx. 60% of the original size.
Remove from oven once plastic has flattened and set tray aside to cool completely before handling.
Thread beading cord through the shrink film stars and add desired number of beads.
Firmly tie the cord onto the key chain to hold everything in place.
Done! The perfect Matariki Star keychain is ready.
*TOP TIP – Coloured pencil markings will darken in the oven; a very light shading is all that’s needed for bright vibrant colour.
Featured Products;
Clear Shrink Film https://www.teaching.co.nz/product/cs4000
Coloured Pencils https://www.teaching.co.nz/product/cs0108
Key Chain https://www.teaching.co.nz/product/th101-si
Natural Beading Cord https://www.teaching.co.nz/product/th345
Wooden Coloured Beads https://www.teaching.co.nz/product/am1770
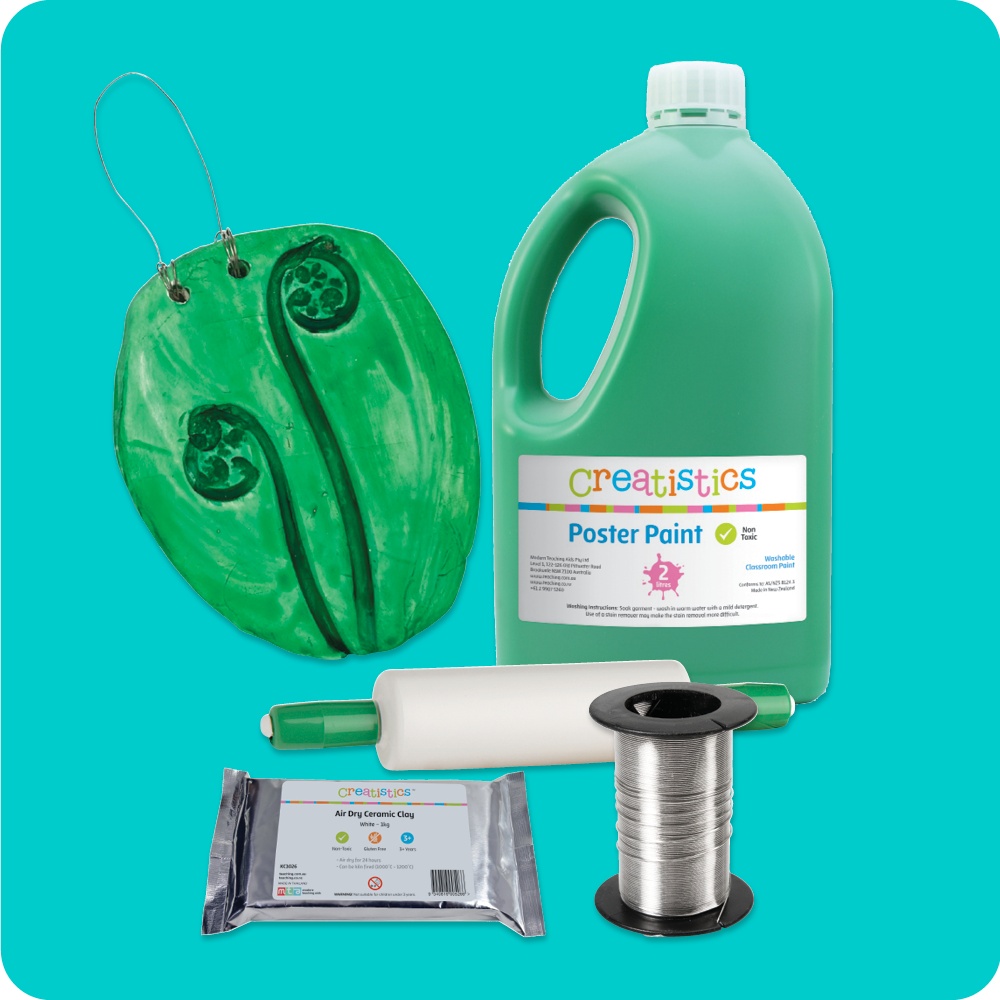
NZ Clay Wall Hanging
The shape of the New Zealand silver fern has a significant meaning – a sense of attachment to homeland along with the frond’s upright stance standing for strength, stubborn resistance, and enduring power. Not just beautiful, the fern plant has many uses. It’s trunk, foliage, sap and spikes have all being used for countless generations, making this stunning plant the ideal choice for our NZ Clay Wall Hanging. We’ve chosen to use the fern’s fronds just as they’re unfurling to signify the start of something new.
Step-by-step
Using a rolling pin, roll out a handful of air-dry clay until it is smooth and flat (minimum 1cm thick to ensure your creations are sturdy).
Gently press a New Zealand fern (or desired NZ flora) into the clay – a rolling pin can help press the plant into the clay.
Gently lift the fern off the clay, leaving its imprint behind.
Carefully cut your rough clay into a circle or square – using a template or plate can help with precise measurements (excess clay can be used again or used to make extra embellishments including clay beads for hanging decorations).
Gently press a skewer through the top of the clay to form a hole/holes to thread wire or hanging cord into (ensure your hole is large enough to thread your chosen cord or wire).
Lift your decoration and gently smooth down the edges with your fingers (a little water on your fingers can help).
Set aside for roughly 48 hours or until thoroughly dry.
When the clay ornament is completely dry (clay will lighten and feel firm to the touch) decorate with paint and glitter glue, allowing the darker shades to settle into the indented pattern (a light shading first, and going in again with a darker colour can help the pattern to ‘pop’).
Set aside to dry for 24 hours in between painting/gluing.
When your ornament is completely dry, thread your desired length of wire, cord or twine through the decoration, and tie in place with a knot.
Done! The perfect NZ Flora and Fauna inspired Air Dry Clay decoration is ready.
*TOP TIP – Older students will likely enjoy using wire to form a hanging loop, while younger students might find it easier to work with twine/cord or ribbon.
Featured Products;
Air Dry Clay 1kg https://www.teaching.co.nz/product/kc1026
Glass & Tile Paint https://www.teaching.co.nz/product/cb2200
Crystal Clear https://www.teaching.co.nz/product/md025
Craft Wire https://www.teaching.co.nz/product/the218
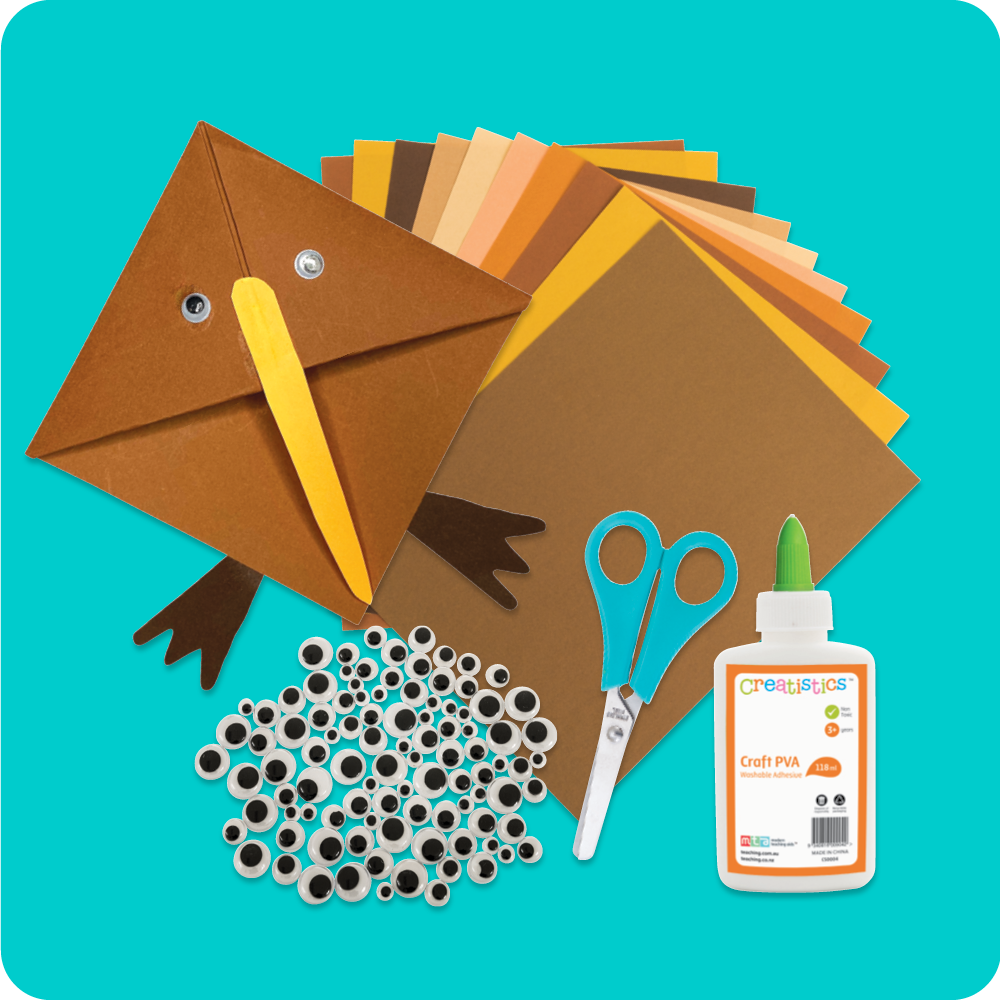
3D Paper Kiwi
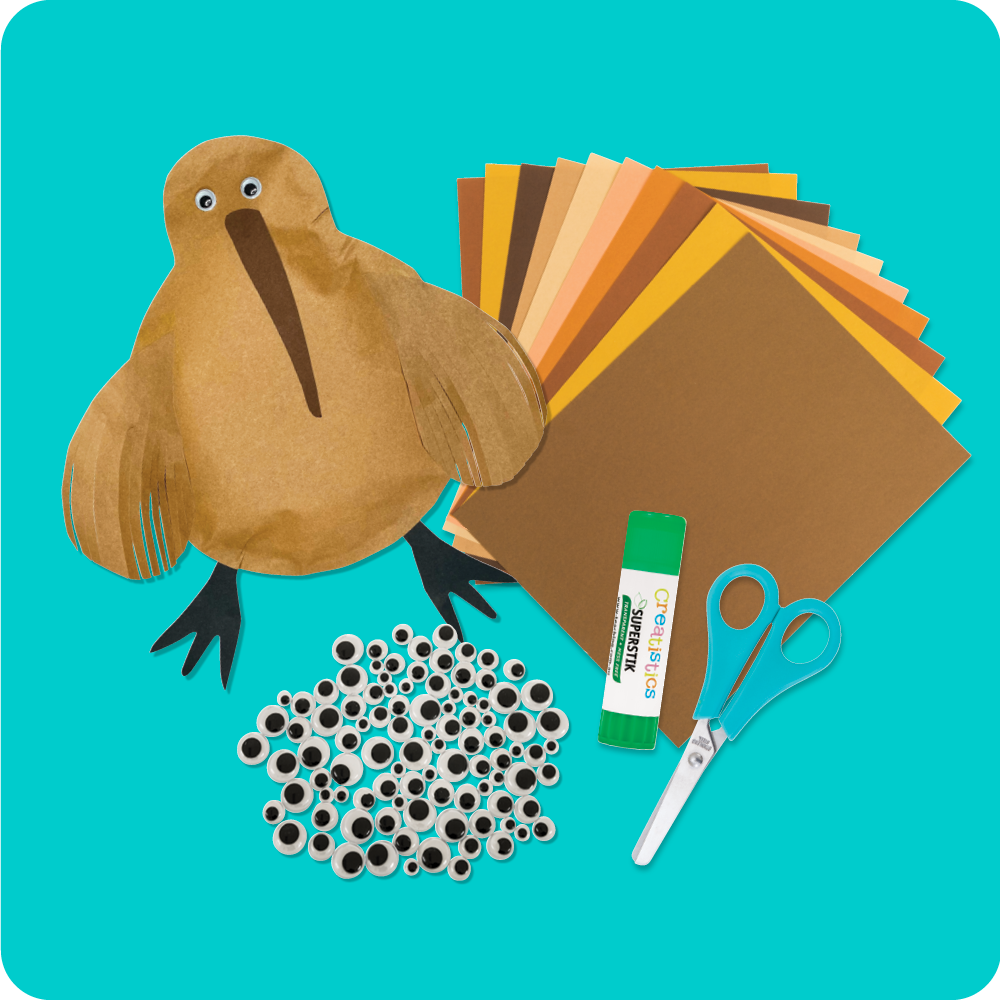
These adorable Kiwi’s offer children the ability to make their own creation bursting with personality. The free form shapes and choice of materials will make sure every bird is unique. We’ve used coloured paper to form our 3D Kiwi, but felt sheets are a terrific alternative for young students experimenting with textiles. Younger children might like to make a two dimensional Kiwi, working with flat paper and omitting the layers with padding inside. The beauty of this paper Kiwi activity is the ability to adapt it to children’s ages and abilities. Read on to make your very own national treasure, unique to New Zealand.
Step-by-step
Put 2 pieces of A4 brown paper on top of each other and carefully draw a large rough egg shape with a circle attached (this will be the Kiwi’s body and head).
Keeping both pieces of paper together, carefully cut along the drawn line.
Fold a darker shade of paper in half and roughly draw a Kiwi’s legs.
Carefully cut the Kiwi’s leg out, keeping the paper folded so you’ll have 2 legs.
Apply glue stick to the perimeter of your Kiwi’s body & head.
Place the 2 legs at the bottom of the body and add a small number of tissues or kitchen roll to the centre.
Gently place the matching body & head shape over the top of the 1st, smoothing down the edges to keep the legs in place and the tissues inside.
On another piece of matching brown paper, roughly draw 2 wings and cut them out.
To make the look of feathers, cut long thin fringing slices to the lower part of the wings.
Apply glue stick to the top of the wings and press onto the body.
On orange or a lighter shade of brown paper roughly draw a long beak (a thin carrot shape), and carefully cut out.
Apply glue stick to the top of the beak and press it down onto the Kiwi’s face.
Apply a small dab of school glue onto 2 x joggle eyes and carefully place them on the Kiwi’s face.
Done! The perfect 3D Kiwi is ready.
*TOP TIP – Free hand drawing rough shapes to make the Kiwi will give each of the creatures their own unique personalities.
Featured Products;
Skintone Paper https://www.teaching.co.nz/product/re5233
Creatistics Brown Cover Paper https://www.teaching.co.nz/product/aus143
Creatistics Black Cover Paper https://www.teaching.co.nz/product/aus140
Creatistics Glue Sticks Pack of 12 https://www.teaching.co.nz/product/jn1204
Joggle Eyes https://www.teaching.co.nz/product/th321
All Purpose Washable School Glue Pack of 12 https://www.teaching.co.nz/product/cs0001
Air Dry Clay Kiwi
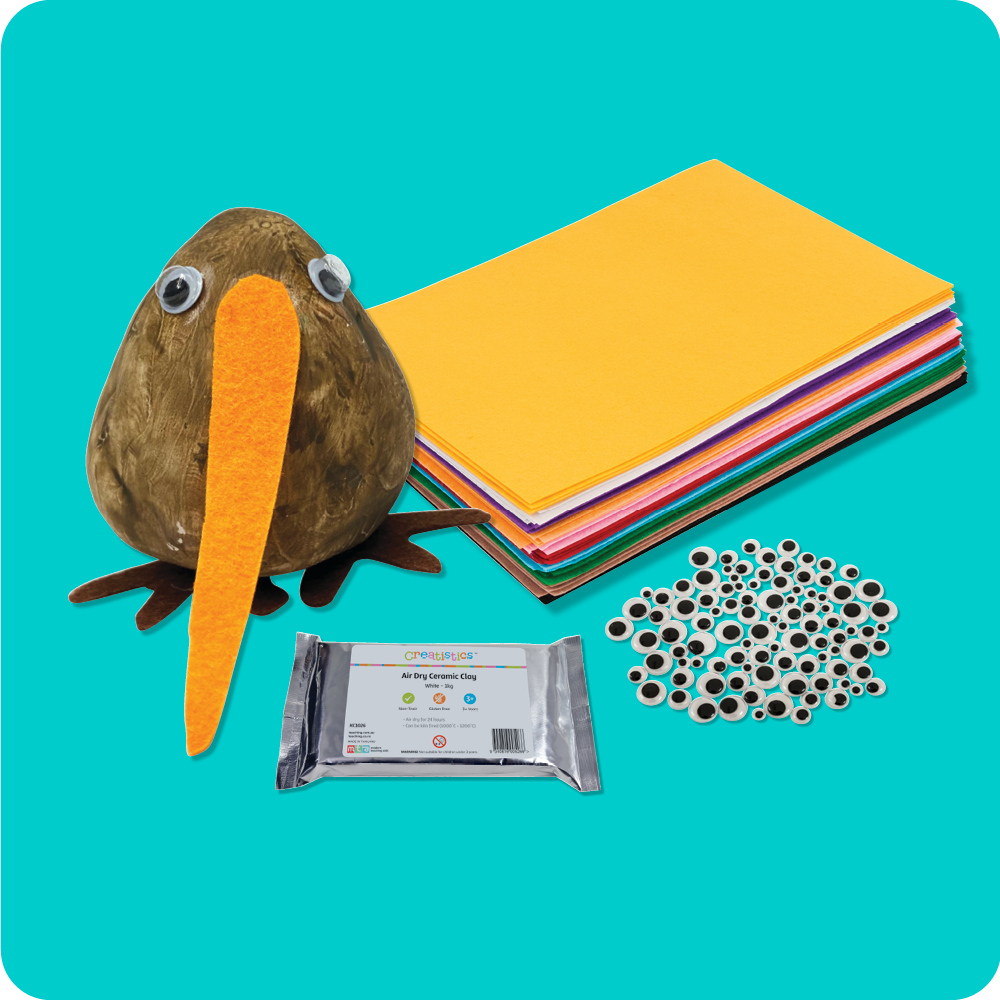
These adorable clay Kiwi’s make beautiful keepsakes, their solid heavy form also doubling as the perfect desk paperweight. The open-ended block of air dry clay adapts to children’s imaginings so they can make their own individual creations. No need for bulky or expensive firing kilns! Simply mould the clay, set it aside to air dry, add some paint and embellishments and you’ll have your very own clay work that’ll last a lifetime.
Step-by-step
Using your hands, roll a good palm sized chunk of clay into a rough ball shape, flat on the bottom to stand upright.
Set aside to dry thoroughly for 48 hours (over the weekend is ideal).
When thoroughly dry, your clay will harden and lighten.
Paint a layer of brown paint onto your Kiwi (using long paint strokes with darker shades to form feathers) and set aside to dry for 24 hours.
Cut a beak and feet from the felt sheets and attach to the clay body using strong craft glue.
Paint on eyes or glue on joggle eyes to bring your Kiwi to life and set aside to thoroughly dry.
Done! The perfect Air Dry Clay Kiwi is ready.
*TOP TIP – Older students might enjoy working with intricate clay work, forming the beak and legs out of the Air Dry Clay rather than adding felt details.
Featured Products;
Creatistics Air Dry Clay https://www.teaching.co.nz/product/kc1026
Felt Sheets https://www.teaching.co.nz/product/flt016
Creatistics Strong Craft Glue https://www.teaching.co.nz/product/cs0004
Total Wash Beige Paint https://www.teaching.co.nz/product/fn154
Total Wash Brown Paint https://www.teaching.co.nz/product/fn153
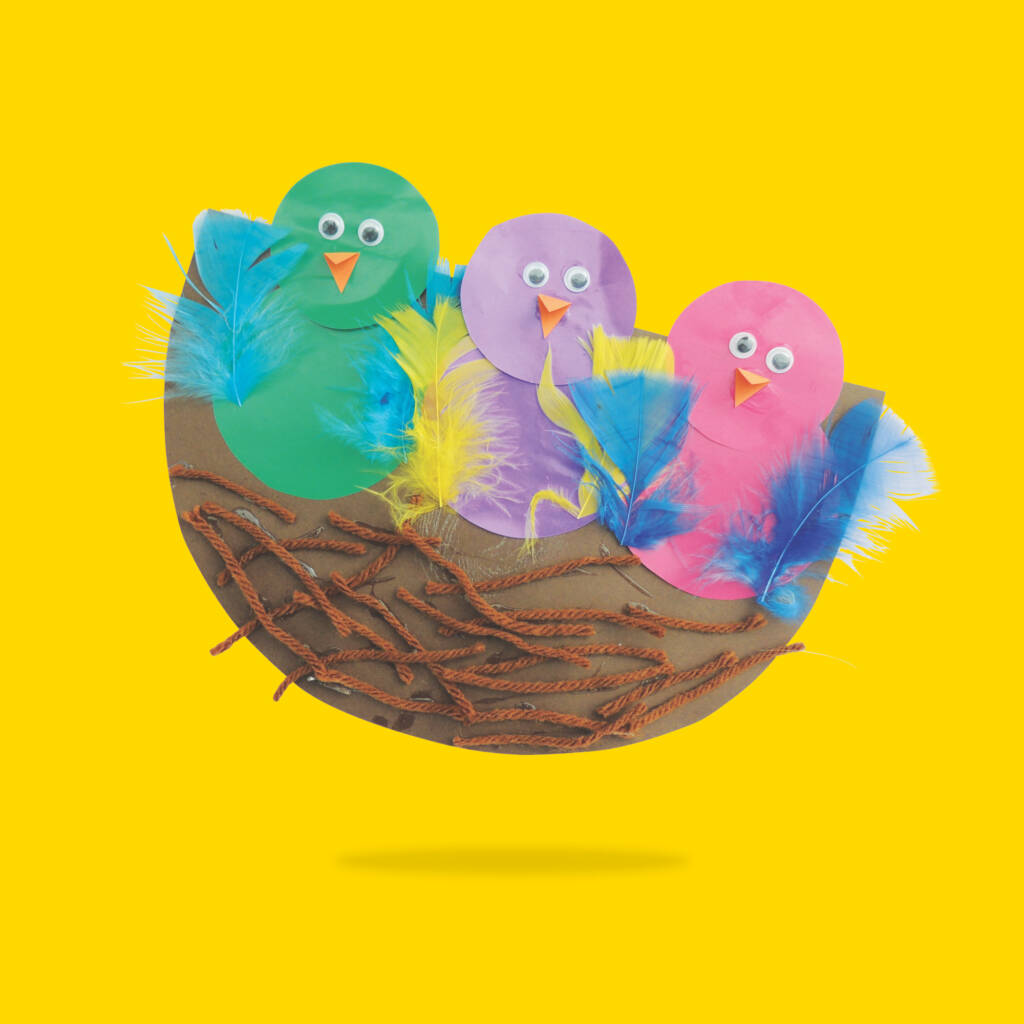
NZ Eco Plate Birds
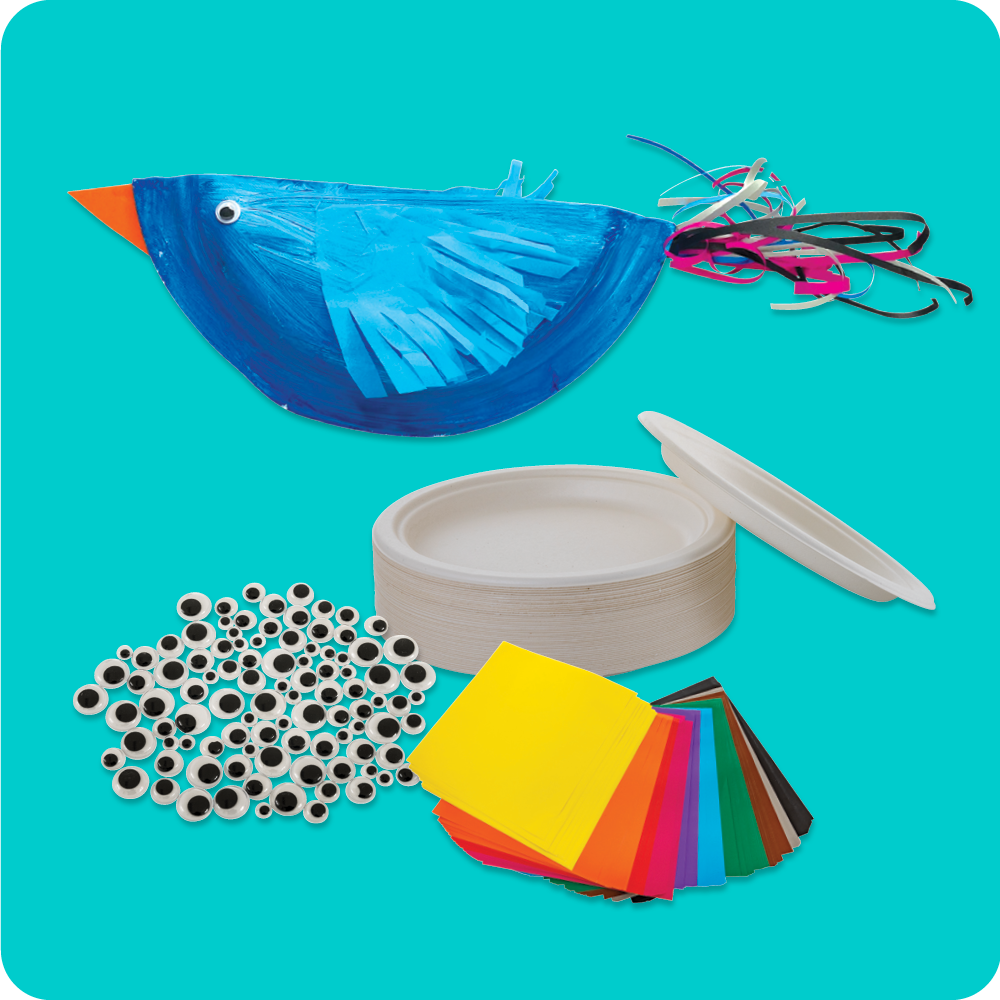
Made using eco-friendly sugar cane plates and FSC paper, these environmentally conscious birds reflect New Zealand as a leader for sustainable practices – they’re also super cute!
We’ve chosen blue to make our bird, using The South Island Takahē as our inspiration, but there’s so many incredible bird species that call New Zealand their home. Which one is your favourite?
Step-by-step
Fold the Sugar Cane Plate in half, forming a semi-circle that’s able to stand on its own.
Cover the plate with a good layer of paint, choosing the shade of your favourite bird native to New Zealand.
Set aside to dry.
Cut a beak out of coloured paper (we folded the paper and cut a triangle, with the fold opening and closing to form the beak shape).
Cut long lengths of coloured paper to firm the bird’s tail.
Glue the beak and tail to the underside of the bird, hiding the ends of the paper where the eco pate folds.
To form the bird’s feathers, rough circles out of the tissue, with long scissor snips to form fringing to mimic feathers.
Glue your feathers into place with school glue (a few layers of feathers will bring authenticity to your works).
Lastly, glue on two joggle eyes to bring your birds to life.
Set aside to thoroughly dry.
Done! The perfect NZ Eco Plate Bird is ready.
*TOP TIP – Folder older students with competent scissor skills, or adults only – To curl the bird’s tail, open a pair of scissors as wide as possible and place the blades against a strip of paper, gently press the paper onto the blade and scrape it along the strip towards the end. Repeat as desired.
Featured Products;
Large White Sugar Cane Eco Plates https://www.teaching.co.nz/product/jm950
Small White Sugar Cane Eco Plates https://www.teaching.co.nz/product/jm950
Tempera Poster Paint – Set of 12 https://www.teaching.co.nz/product/jv506
Gloss Paper Squares – Pack of 360 https://www.teaching.co.nz/product/cs5106
Coloured Tissue Paper – Pack of 100 https://www.teaching.co.nz/product/me90
All Purpose Washable School Glue https://www.teaching.co.nz/product/cs0001
Joggle Eyes Assorted Stackable Container https://www.teaching.co.nz/product/th321
Kiwi Paper Bookmarks
Perfect for book lovers AND for encouraging reluctant readers to turn the page, these sweet little Kiwi’s would love to join in on your reading adventures. We’ve used A4 sheets of Skintone paper cut down to squares to make our Kiwi’s, but any easily foldable square paper will work (Pattern Paper Squares, Origami Paper, Rainbow Paper Squares etc). Perfect for a rainy day, after school hours care or to reignite reading time, these DIY bookmarks will be a hit anytime!
Step-by-step
Choose your desired paper square.
Fold the square in half to form a long triangle – folding tip to tip, rather than edge to edge).
Turn your triangle so that the long length is at the bottom and the tip of the triangle is pointing up.
Fold the left and right corners to the tip of the triangle (this will give you a square shape with two flaps).
Fold these two flaps back down.
Flip down one of the top sheets so that tip touches the long length and crease.
Fold the flaps you created back up and tuck into the bookmark. This will create a pocket that your Kiwi will slot onto the corner of a book.
Cut a beak and feet out of another sheet of paper and attach to the Kiwi bookmark with glue stick.
Draw on eyes, or glue on joggle eyes to bring your Kiwi to life.
Set aside to dry thoroughly.
Done! The perfect Kiwi bookmark is ready.
*TOP TIP – For visual learners, there’s plenty of videos online showcasing how to make corner bookmarks. Search for ‘origami corner bookmark’ and follow the steps, you’ll soon have your very own critter guarding your favourite book.
Featured Products;
Pattern Paper Squares – Pack of 500 https://www.teaching.co.nz/product/cs0260
Creatistics Glue Sticks 25g – Pack of 12 https://www.teaching.co.nz/product/jn1203
Joggle Eyes Assorted Stackable Container https://www.teaching.co.nz/product/th321
Woven Wall Hanging
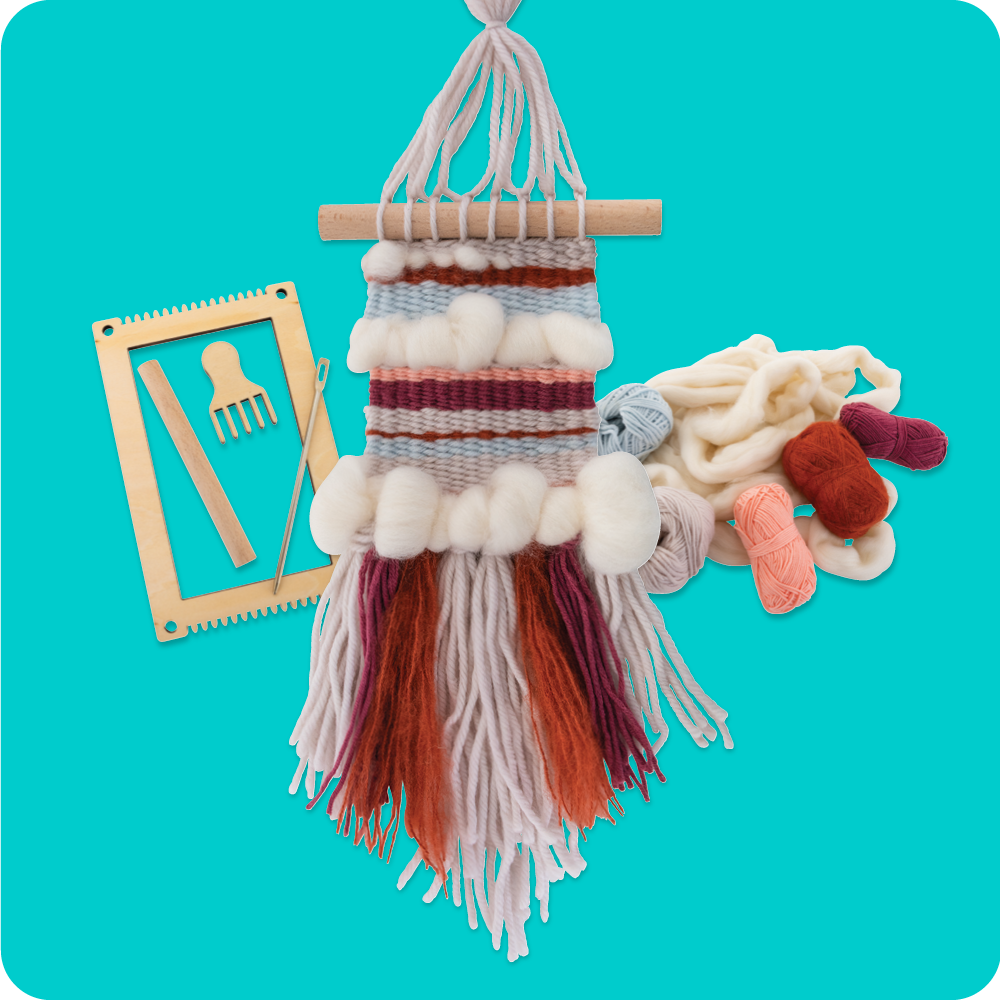
The Weaving Loom & Wool Kit of 10 includes everything you need to make 10 stunning woven wall hangings. Featuring beautiful calming shades of wool & wool roving to weave through the loom, your students will be well on the way to mastering textile projects. The simple weaving used here can be easily adapted to incorporate Raranga, Tāniko, Araoaki, Whatu and Whiri for advanced students exploring Māori weaving techniques.
Once your students woven wall hangings have decorated the classroom, they’ll surely be treasured at home for years to come.
Read on to work through the steps below to make your very own Woven Wall Hanging, also available as a handy illustrated PDF printout to follow along.
Step-by-step
Choose the colour of wool that you’d like shown at the top of your wall hanging. Wrap this wool around the look starting from the top corner and ending at the bottom opposite corner in vertical rows.
Tie the ends together diagonally in a double knot at the back of the loom.
Slide the wooden dowel under the vertical rows of wool on the front of your loom. This will hold up the strings, making it easier to weave.
Create a row of fridge along the bottom of your wall hanging using a few lengths of wool for each (the more lengths of wool you have will make the fridge fuller).
Lay the middle of the fridge lengths of wool over 2 of your vertical rows of wool and loop the right and left ends down and up through the middle.
Pull down on the ends to form a knot. Continue creating a row of fringe all along the bottom.
Begin weaving rows of wool above the fringe using the large tapestry needle. Change colours of wool as you work to create a lovely pattern. Tip: don’t weave too tightly to avoid warping the edges once you take your wall hanging off the loom.
You can weave by threading the wool under one vertical row then back over the next vertical row or over and under 2 rows at a time to create a different texture.
For each length of wool you weave onto the loom, leave a small length of wool on either side that you can tuck in.
After each row you weave, use the wooden comb to push the wool down the vertical rows to lay flat along the previous row.
When adding the wool roving, weave using your hands instead of the needle and loosen each weave to make it bubble out. You can use the full width of the wool roving provided or separate it into thinner strips.
Once your weaving is close to the top of the loom, remove the wooden dowel.
Turn the loom over and cut along the middle of the back vertical rows.
Tie off each pair of strings in a double knot as close to the weave as possible. Do this along the bottom and the top. This will prevent your weaving from falling apart.
Cut off the loose ends of each pair at the bottom only. Keep the top lengths long to hang.
Take a length of wool and tie it in a double knot around the top strands of wool.
You can trim the fringe along the bottom straight or in a diagonal line or keep it wild.
Done! The perfect Woven Wall Hanging is ready.
*TOP TIP – Stick to calm colour tones or brighten your creations by weaving in through bold primary coloured yarn and bright felt string.
Featured Product;
Weaving Loom & Wool Kit of 10 https://www.teaching.co.nz/product/cs8880k
Cardboard Weaving Loom
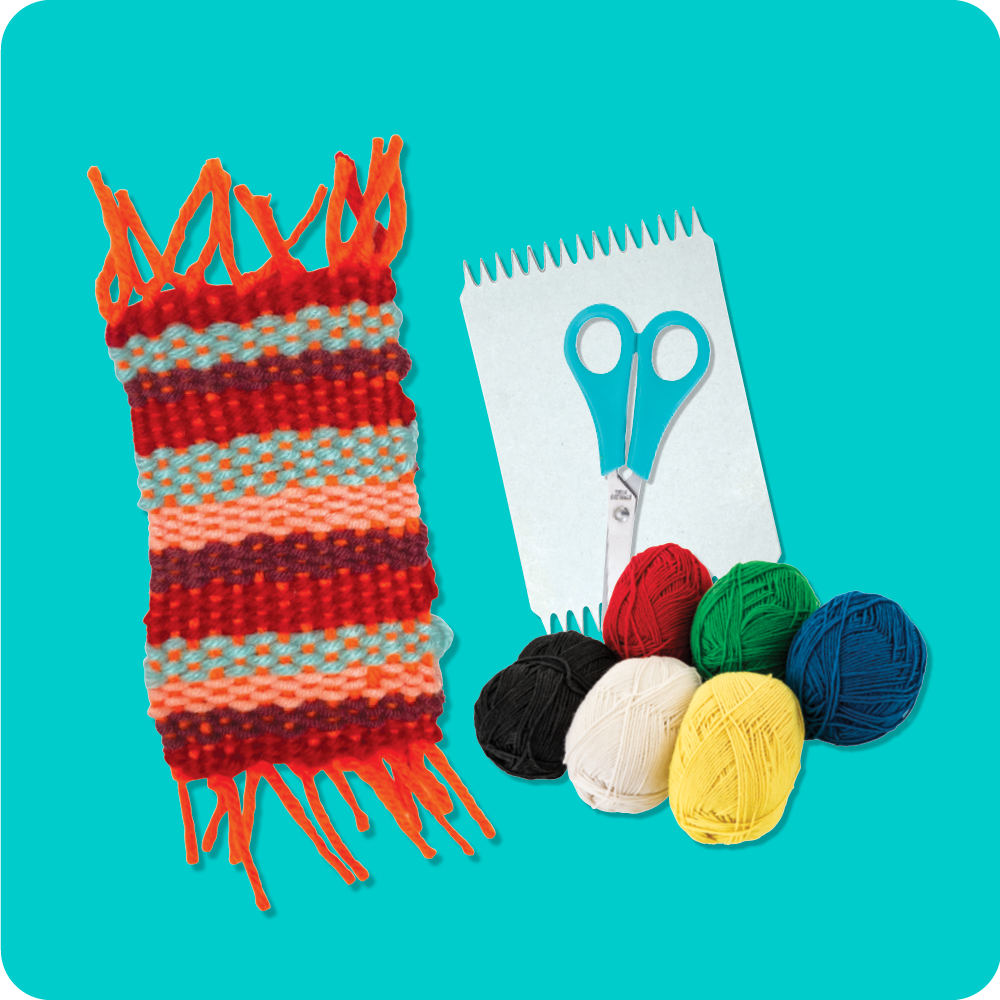
Weaving works by interlacing two sets of yarn interlaced at right angles – it sounds tricky, and looks tricky, but once you get started, you’ll see that it’s a super simple and brilliantly effective artform.
For our Cardboard Weaving Loom we’ve used various colours from the Weaving Wool Set of 6, Assorted Acrylic Yarn (includes 6 balls of yarn – black, white, blue, green, yellow, and green) and then supplemented the colours with individual shades including grey, brown, orange, pink, purple, dark blue and light blue. Lots of coloured yarn to choose from ensures students can bring their creative plans to life.
Step-by-step
Start by attaching a length of yarn to the back of the cardboard weaving loom at one end (pointed ends) secure with sticky tape.
Run the yarn through the ‘v’ shape down to the opposite ‘v’ at the other end (horizontally/ top to bottom of the cardboard loom).
Loop the yarn around the back of the pointy ‘v’ and then tun the yarn back up to the next ‘v’ shape at the opposite end.
Repeat steps 2 and 3 until you have threaded through every ‘v’ shape.
Secure to the back of the loom with a piece of sticky tape.
To begin weaving vertically, choose a length of contrasting coloured yarn and attach to the back of the cardboard loom with a knot, or sticky tape.
Thread the contrasting yarn through the 1st yarn, weaving over and under.
You can change coloured yarn at any stage, making sure to tie off in a knot to hide behind the weaving (you can also weave the ends back into the design).
Once you have finished creating your pattern, you can tie off securely and thread the ends back into the design.
Unhook the yarn from the pointy ends of the cardboard loom, cut them in half and tie off securely with a double knot.
Done! The perfect Cardboard Weaving Loom design is finished.
*TOP TIP – To turn your weaving into a bookmark, add some extra lengths of yarn to make a tassel at one end, or turn into a wall hanging with a length of dowel.
Featured Products;
Cardboard Weaving Loom – Pack of 10 https://www.teaching.co.nz/product/th867
Assorted Acrylic Yarn https://www.teaching.co.nz/product/th060
Black Yarn https://www.teaching.co.nz/product/mow283
Grey Yarn https://www.teaching.co.nz/product/mow263
Brown Yarn https://www.teaching.co.nz/product/mow288
Orange Yarn https://www.teaching.co.nz/product/MOW289
Pink Yarn https://www.teaching.co.nz/product/MOW262
Purple Yarn https://www.teaching.co.nz/product/MOW285
Dark Blue Yarn https://www.teaching.co.nz/product/MOW276
Light Blue Yarn https://www.teaching.co.nz/product/MOW268
White Yarn https://www.teaching.co.nz/product/MOW261
Wooden Pendent Threading Kit

Using the same motions as weaving, the Wooden Pendant Threading Kit uses students’ knowledge of ‘over & under’ to make wearable art. The kit includes all you need to make 30 wooden pendants including 6 different pendant designs, embroidering thread, leather cord and embroidery needles. Make a necklace for yourself or as a gift or mix it up with key chains to jazz up your keys or bag. How will you decorate yours?
Step-by-step
Cut a length of embroidery thread and thread it onto the needle.
Begin threading, leaving a length of thread at the back to tie securely.
Keep on threading in and out, forming your desired design (short lines, long lines, cross crosses and more).
Change colours as desired, tying off securely at the back each time.
When your design is finished, tie off securely one last time.
Attach a length of leather cord (long enough to fit comfortably around the wearers neck), and tie of securely.
Done! The perfect Wooden Threaded Pendant is ready.
*TOP TIP – Keep the design simple or make it as intricate as you like by layering different colours and experimenting with Raranga techniques.
Featured Product;
Wooden Pendant Threading Kit https://www.teaching.co.nz/product/cs680k#
Clay Star Photo Frames
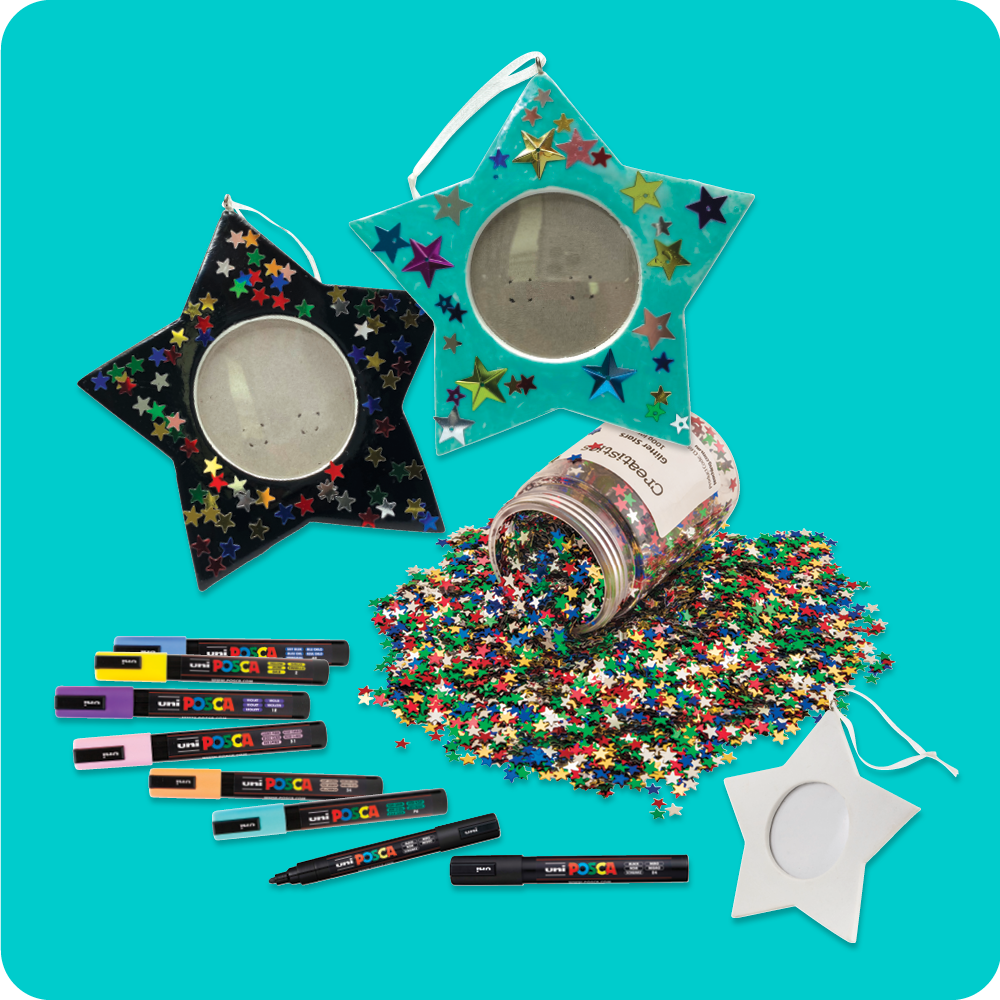
Pre-made from clay, these Star Photo Frames act like a blank canvas for children to decorate. The smooth surface lends itself to all sorts of artistic mediums – paint, markers, glitter, embellishments and more. They can be as advanced or simple as you like for even the youngest of students to get involved. Pop in a photo, drawing, poem, or message and either hang from the supplied ribbon or sit proudly with the included stand at the back. You’ll have a stunning Matariki keepsake to hold in your heart forever.
Step-by-step
Fill the front of your star with colour as desired and set aside to dry.
Apply a thin layer of school glue to front surface and sprinkle with glitter stars and set aside to dry.
Open the backing and remove the protective piece of paper.
Insert a photo or drawing (round, measuring approx. 53mm diameter – the same size as the protective paper), and close the backing.
Done! The perfect Clay Star Photo Frame is ready.
*TOP TIP – Use the round frame protective paper as a template to cut your photo or drawing for the perfect fit.
Featured Products;
Clay Photo Frames Stars Pack of 10 https://www.teaching.co.nz/product/th995#
POSCA Marker – Pack of 8 https://www.teaching.co.nz/product/um500
Glitter Stars https://www.teaching.co.nz/product/cl6586
All Purpose Washable School Glue https://www.teaching.co.nz/product/cs0001
Matariki Glass Lanterns
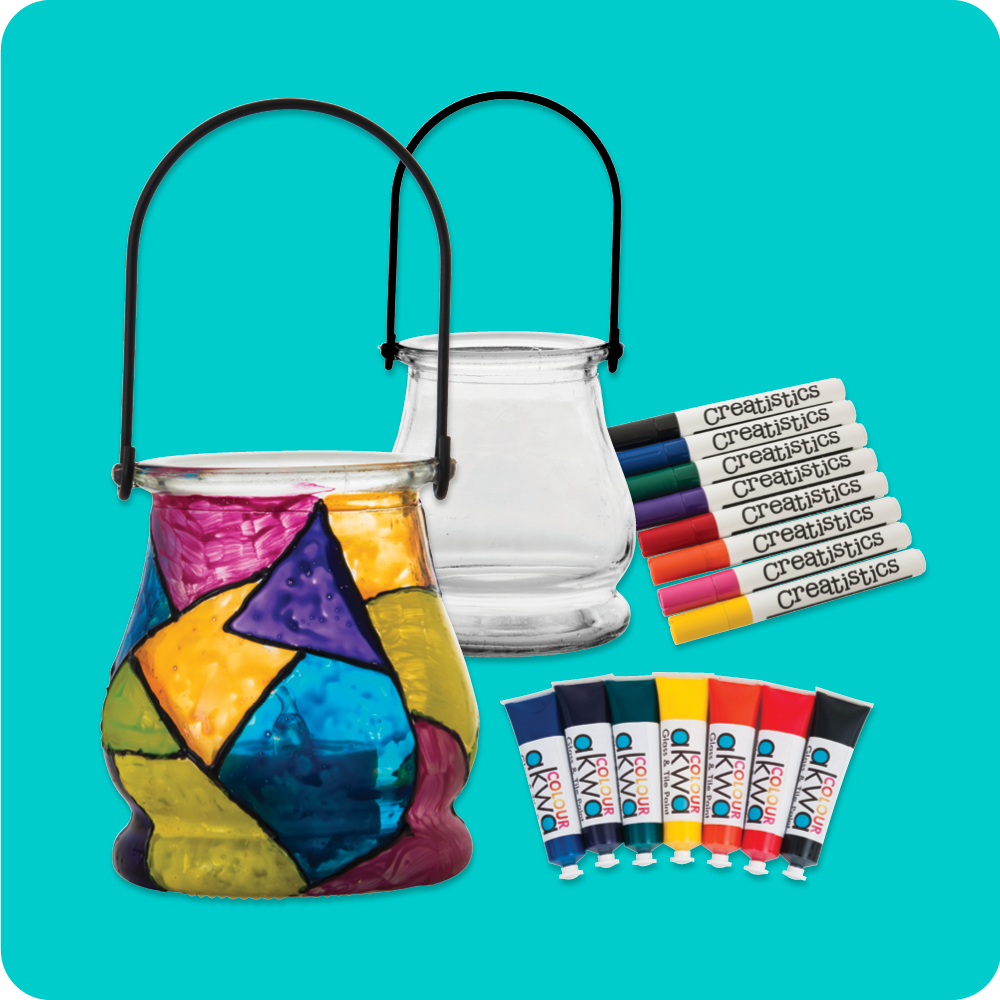
Make your own custom Glass Lanterns, the perfect symbol for lighting & brightening the path for the Māori new year. In packs of 6, these glass lanterns come supplied ready to go with their attached handles. All you need to do is choose how to design yours. Decorate with glass paint or markers or use tissue paper or cellophane to cover with colour. Glue on some sparkly stars and you’re ready to go. Pop in a tea candle or LED safety light and your lanterns will light up the night sky beautifully.
Step-by-step
Give your glass lantern a good clean to ensure the surface is ready for painting (soap and water, or methylated spirits work well), and set aside to air dry for 24 hours.
Paint your designs onto the surface of the lantern using glass paint and markers as desired.
Set aside for 24 to 48 hours to dry thoroughly (over the weekend is ideal).
To fully set your artwork, place the lantern in a cool oven and set the temperature to 150 degrees Celsius. Once temperature is reached baked for 30 minutes then turn off oven and allow to cool before removing.
Use a strong glue to add any embellishments to the outside of the lantern, Star Sequins are ideal to celebrate Matariki.
Set aside to dry for 24 hours.
Add a tea candle or safety light (depending on child’s age).
Done! The perfect Matariki Glass Lantern is ready.
*TOP TIP – Glass & Tile Paint gives terrific coverage, while Glass & Porcelain Makers create precise lines and detail.
Featured Products;
Glass Lanterns – Pack of 6 https://www.teaching.co.nz/product/sh1718#
Glass & Tile Paint https://www.teaching.co.nz/product/cb2200
Glass & Porcelain Markers https://www.teaching.co.nz/product/CS8000
Star Sequins https://www.teaching.co.nz/product/sh1057
Strong Craft Glue https://www.teaching.co.nz/product/cs0004
We hope you’ve enjoyed the latest collection of crafts to celebrate all things Aotearoa New Zealand and are bursting with inspiration to get started. See you next time, Kia Ora!
Blog Home>
Shop MTA>


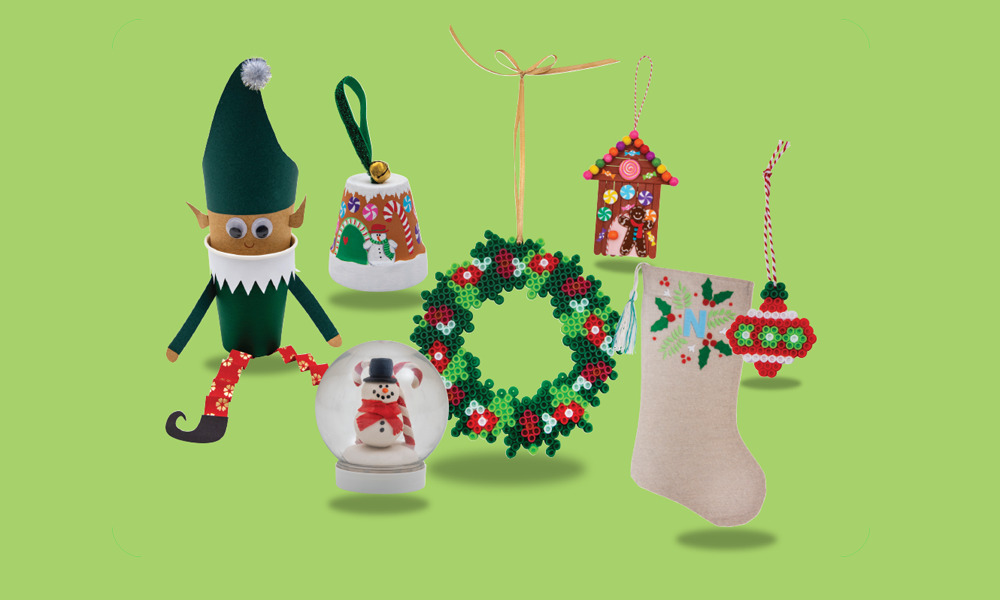

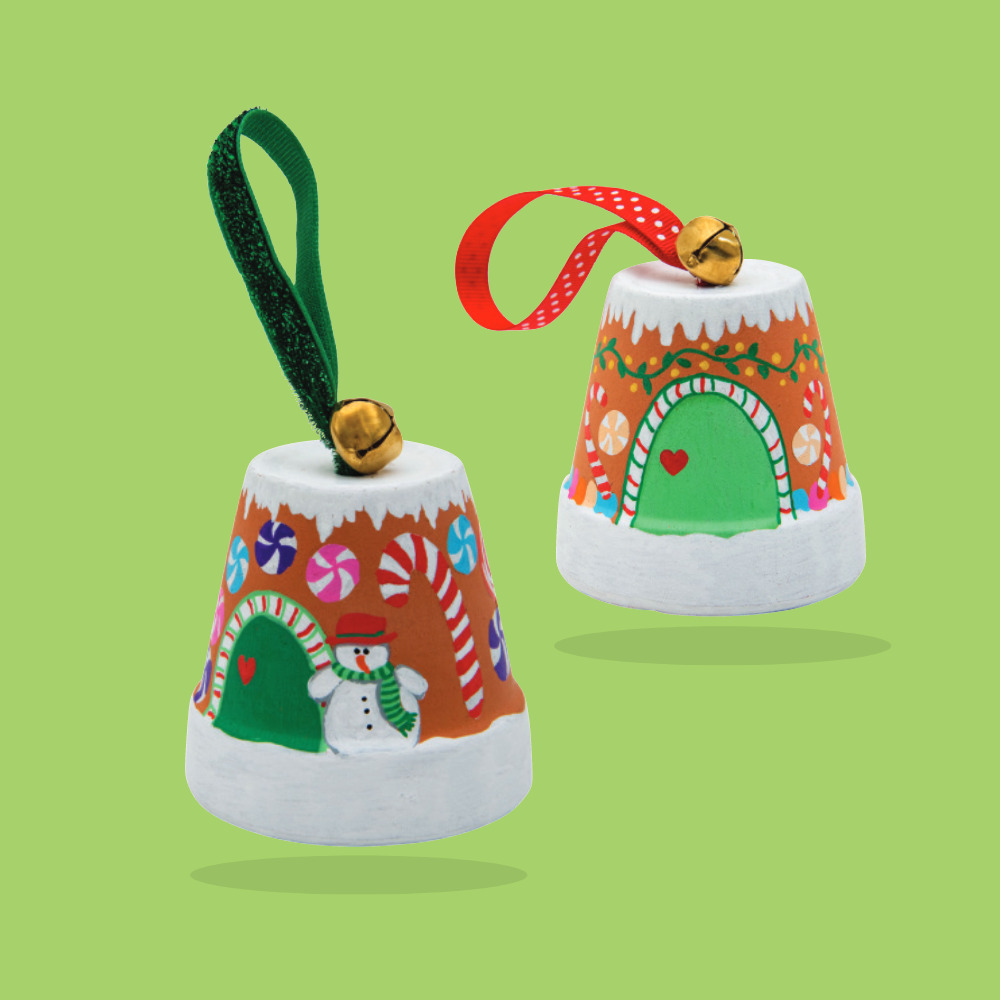
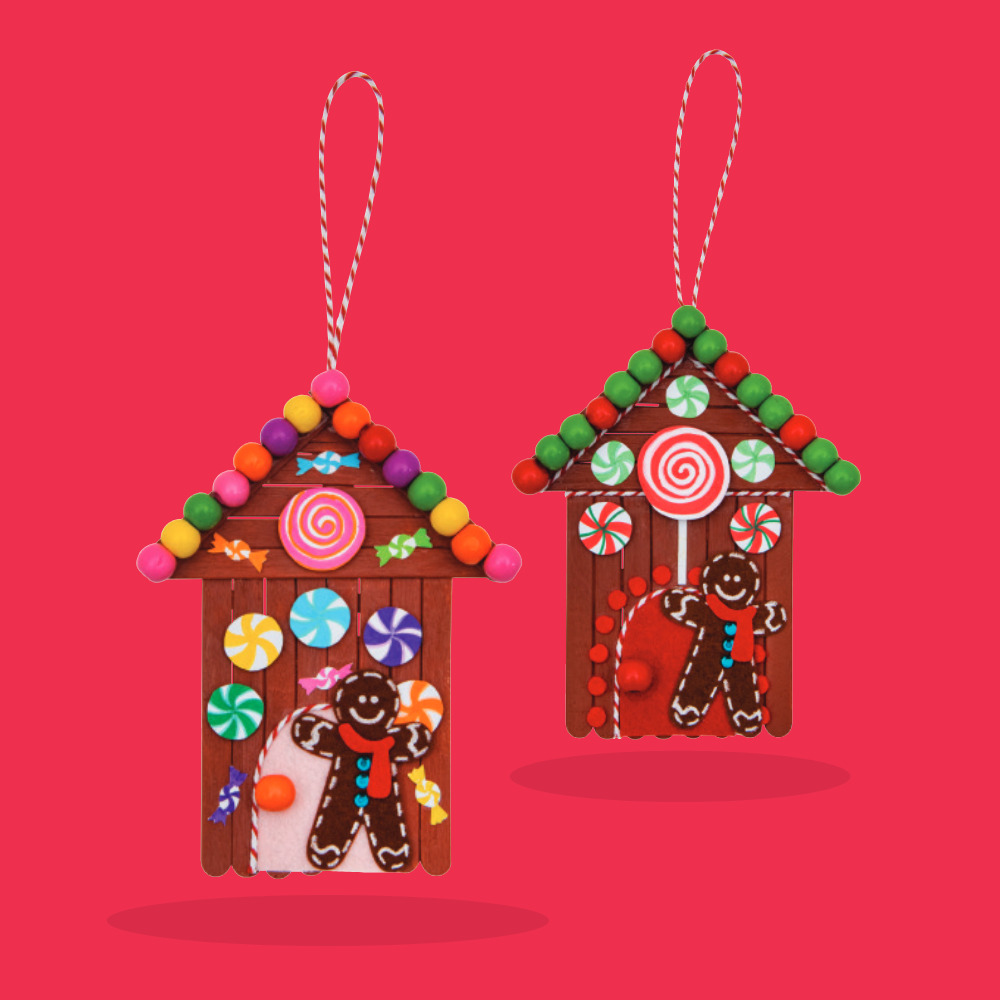 No holiday season is complete without a gingerbread house – the sort you can eat and the sort you can treasure, like these! Whimsical and looking oh-so-delicious, these quaint pop stick houses make beautiful seasonal displays. They’re so pretty to hang around the classroom, on the Christmas tree at home or to gift as thoughtful presents!