The most magical time of the year is fast approaching, which makes now a perfect time to organise your upcoming holiday season arts & crafts.
In this blog, we’ll showcase wonderfully inspiring crafting ideas to get you started. Whether you’re looking for classroom decoration activities or Christmastime keepsakes with memories to treasure for countless years to come, you’ll find all the projects you need for children of all ages including step-by-step guides to take the hassle out of planning.
So, sit back & relax and choose your favourite bright & merry handicrafts to release children’s festive creativity.
Santa’s Cookies Porcelain Plate
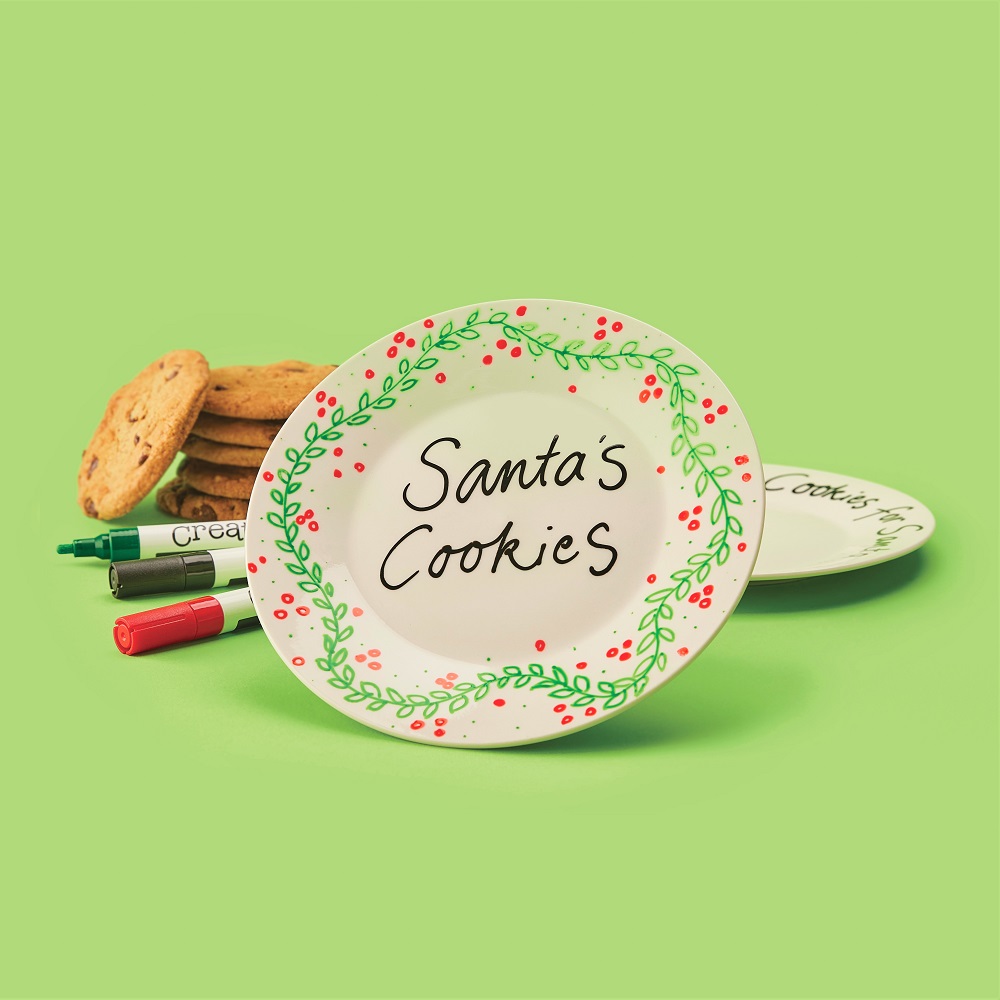
Father Christmas must get hungry with all that work he does! Santa’s very own cookie plate will surely go down a treat! White porcelain plates make a wonderful blank canvas for children to decorate with drawings and words, using glass & porcelain markers or paint. Whether it’s “Cookies for Santa”, “Carrots for Rudolf” or a personalised plate for the Christmas lunch table, children are sure to enjoy making their own tableware to be treasured for years to come.
To set the markers and paint for wear & tear and dishwasher use, the plate will need to be baked in an oven. Simply set oven to 150 degrees C, and once the oven temperature has been reached, bake the plate for 30 minutes. Turn the oven off and allow to cool before removing. Santa’s plate is now ready for his favourite snacks.
*TOP TIP – Paint provides great overall coverage of colour, while porcelain markers provide precise detail.
Featured Products;
Ceramic Hanging Ornaments
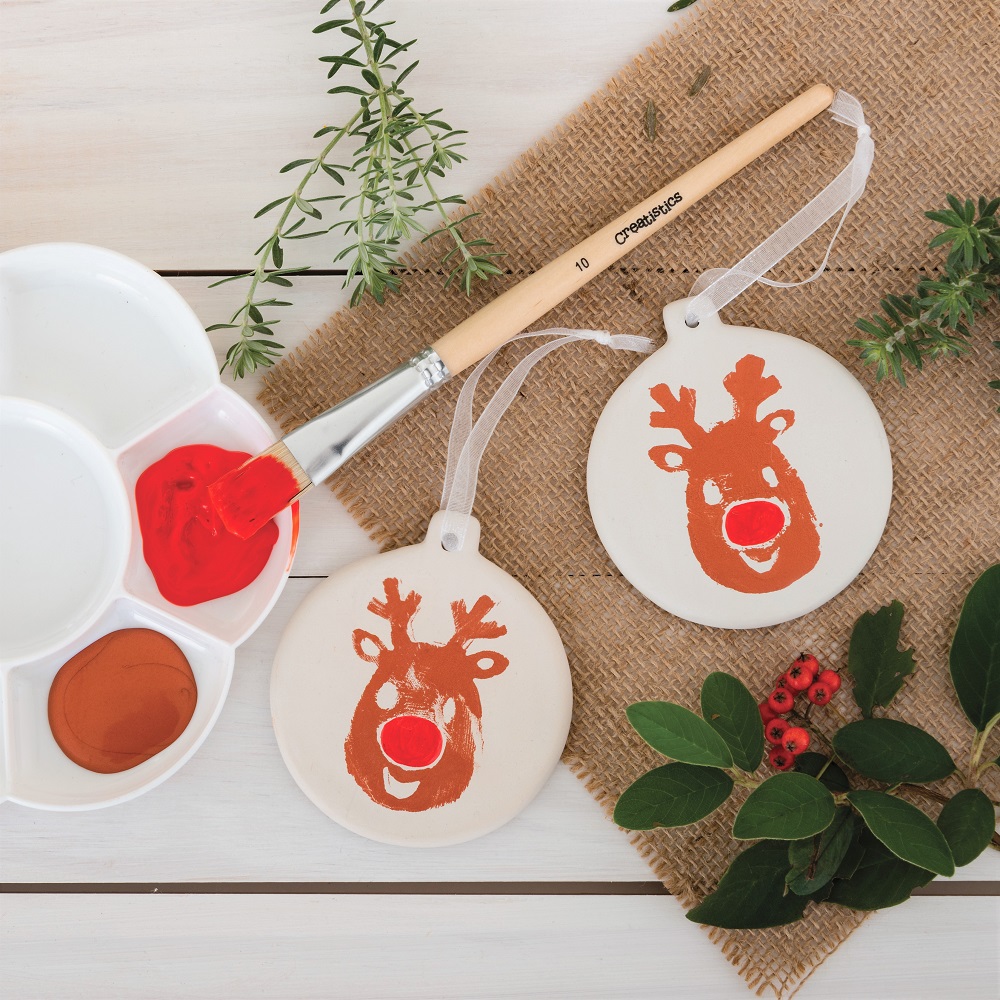
Fun & festive ceramic hanging baubles, also in Santa shapes, Christmas trees and candy canes and stockings make beautiful gifts and keepsakes.
Decorate your ceramic surfaces with porcelain markers, ceramic paint or poster paint and finish off with glitter glue or Christmas-themed glitter for extra sparkle and pizzazz.
Perfect for hanging around the classroom, on the Christmas tree at home or to gift as thoughtful presents that will no doubt take pride of place!
Featured Products;
Metallic Silver Porcelain & Glass Painter
Metallic Gold Porcelain & Glass Painter
Air Dry Clay Ornaments

Air dry clay, cookie cutters, wooden stampers and glitter glue – yes please! So many crafting favourites feature in this action-packed handicraft experience. The end results make very special ornaments that will surely adorn the family Christmas tree for countless years into the future. Metallic yarn in red, green, gold, silver or blue makes the perfect hanging cord to match the sparkly austere texture of the glittery clay to hang proudly.
STEP BY STEP
- Using the wooden rolling pin, roll out a handful of air-dry clay until it is smooth and flat (roughly 1cm thick to ensure your decorations are sturdy).
- Press a cookie cutter shape into the dough and press firmly until it cuts through the clay.
- Gently remove the excess clay (this clay can be used again or used to make extra embellishments including clay beads).
- Next, press one of the block print stamps into the clay and lift, creating an indented pattern.
- Using a skewer or the pointed end of a pencil, gently poke a hole in the top of your shape (ensuring your hole is large enough to thread your chosen cord or twine).
- Lift your decoration and gently smooth down the edges with your fingers.
- Set aside for 24 to 48 hours to dry.
- When the clay ornament is completely dry (firm to the touch) add a thick layer of glitter glue to the surface, letting the glue flow and sit in the indented pattern.
- Set aside to dry for 24 hours.
- When your ornament is completely dry, thread your desired length of cord or twine through the decoration, and tie in place with a knot.
- Lastly, tie off the very ends of the cord/twine with a firm knot to ensure your decoration is ready to hang safely.
*TOP TIP – Adding several layers of glitter glue (and setting aside to dry between layers) will add extra shine and lustre to your decorations.
Featured Products;
White Creatistics Air Dry Ceramic Clay
Paper Straw Decorations
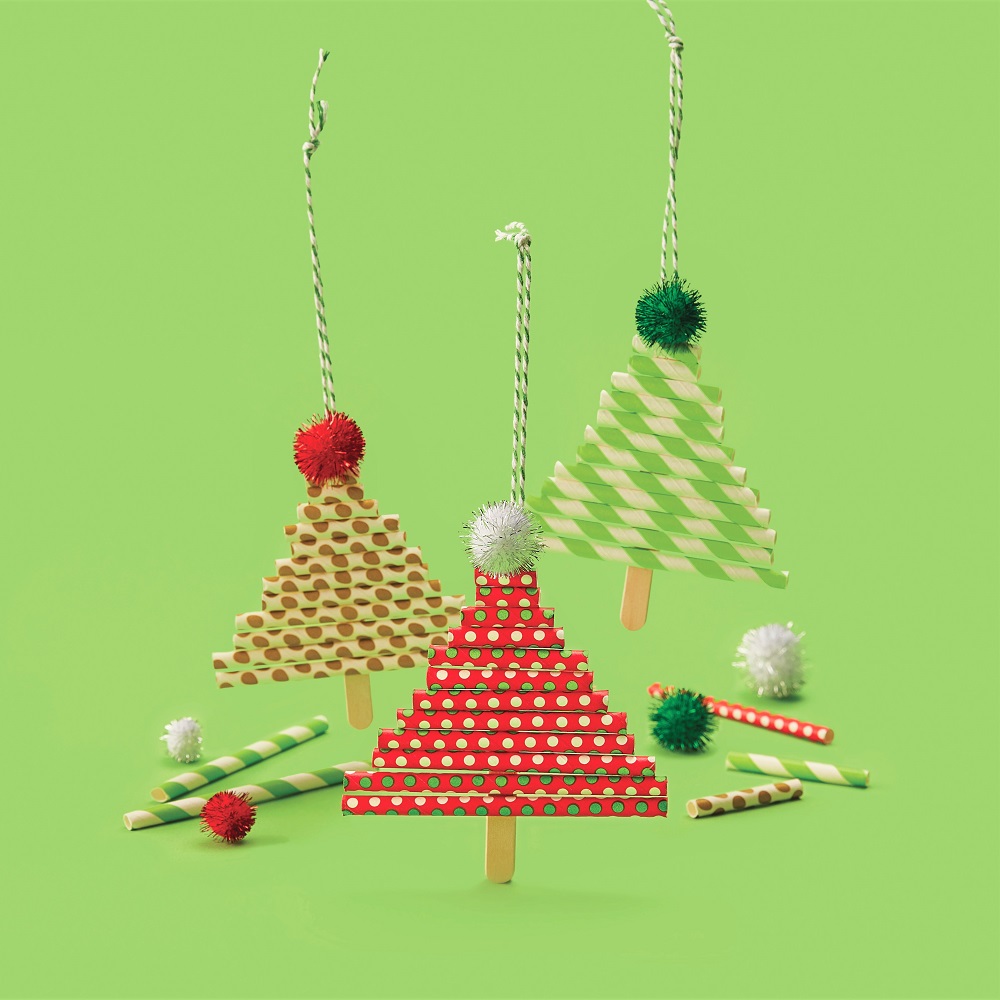
Over recent years the nation has been ditching plastic straws to better care for our environment – replacing those harmful plastics with eco-friendly paper alternatives, which is fantastic news both for the environment and for us teachers so we don’t need to ditch our favourite straw crafts!
These sweet Christmas trees are super simple to make, gluing ascending lengths of paper straws onto wooden paddle pop sticks and adding a length of twine to hang. Glitter pom poms or sparkly stars will make the perfect finishing touch to your project.
*TOP TIP – It’s not just Christmas trees that can be made – why not try candy canes, stars and bell shapes, or swap the pop sticks for pipe cleaners for round threaded wreath ornaments.
Featured Products;
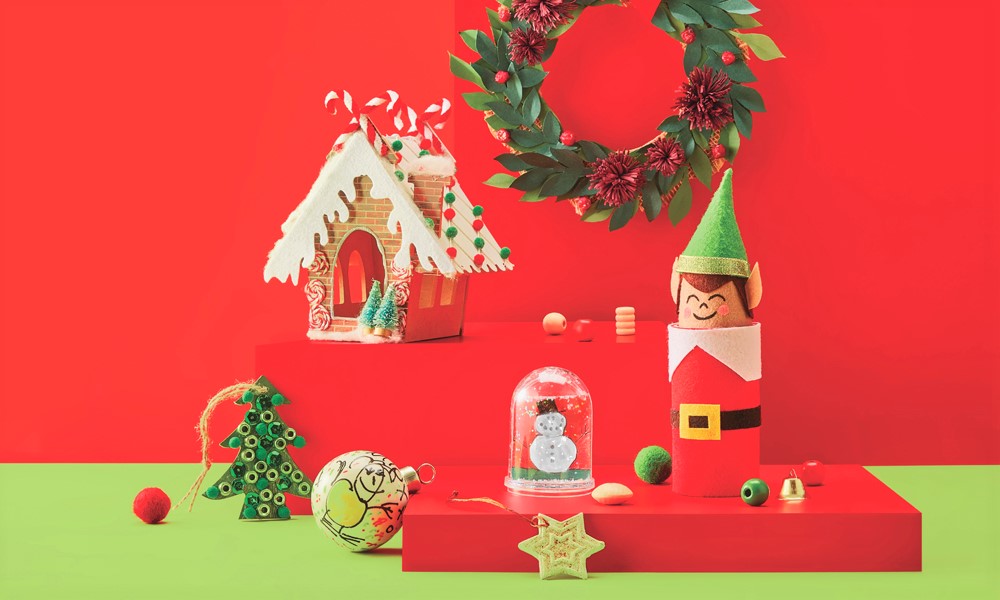
Gingerbread House
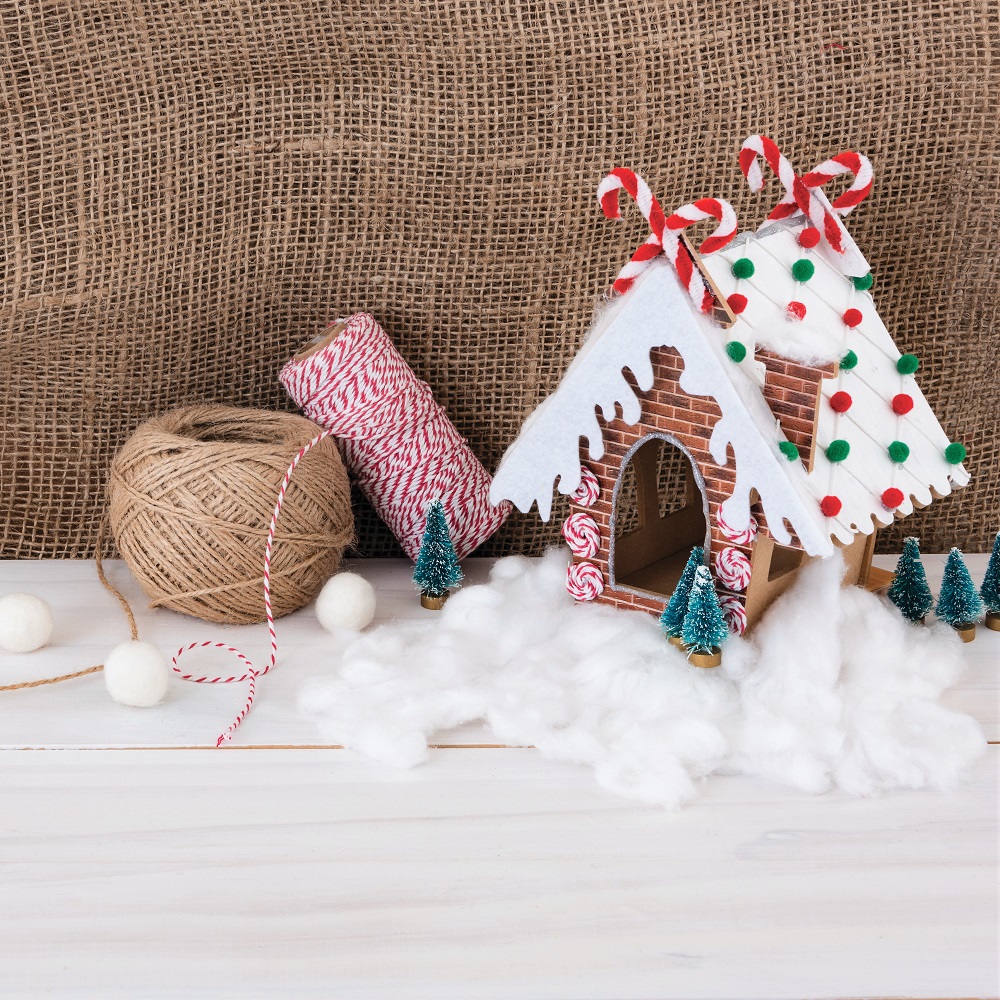
No holiday season is complete without a Gingerbread House! Whimsical and looking oh-so-delicious, these quaint wooden houses make beautiful seasonal displays or props to inspire imaginative play. Made from plain MDF, they’re calling out to be decorated with paint, patterned paper and Christmas embellishments & finished off with Christmas Bio Glitter & Stars.
*TOP TIP – Decorating Gingerbread houses over multiple days will allow glue to dry in between the paper and embellishment layers for a more workable crafting surface.
Featured Products;
Christmas Candy Colour Chenille Sticks
Native flora-inspired Christmas Wreath
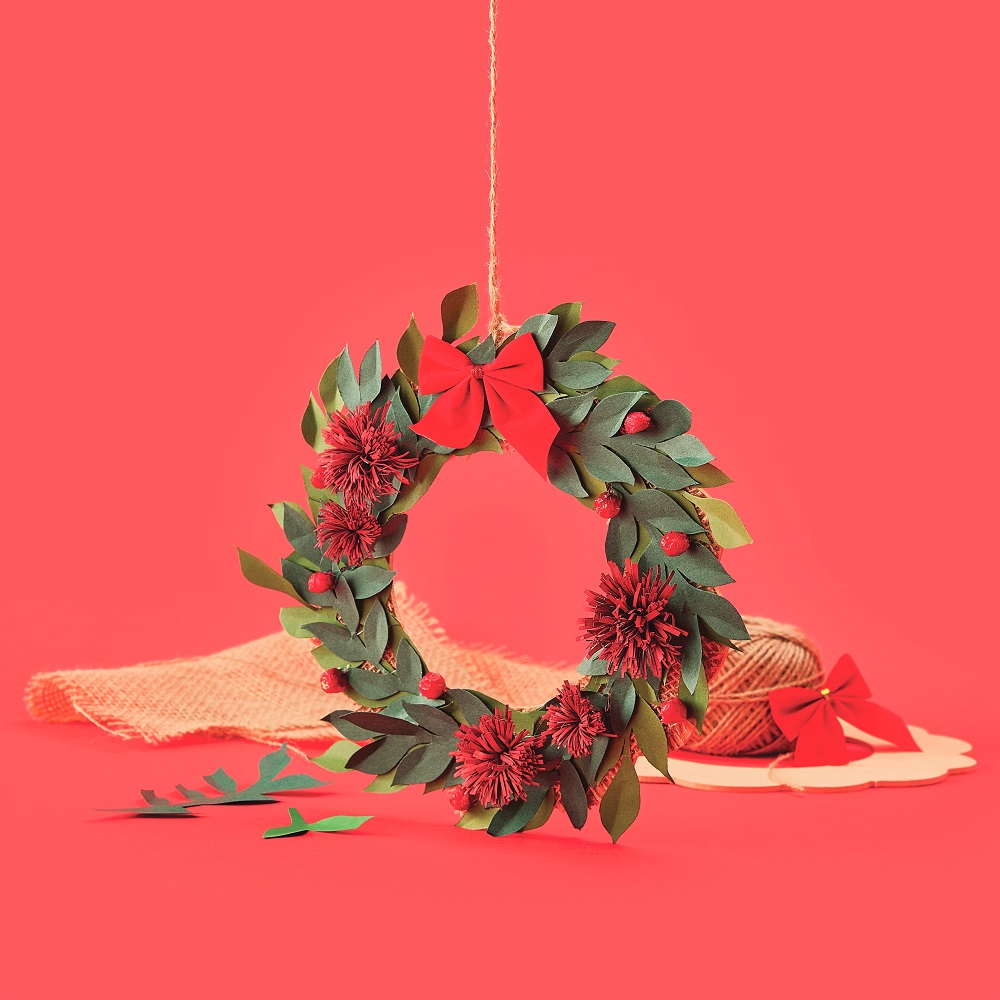
Traditionally, the Christmas wreath’s evergreen foliage represents growth, and the circular shape having no beginning and no end signifies eternal life. For such a long time they have been hung on the door to welcome the Christmas spirit in to bring good luck to all. These stunning wreaths may just bring you some good luck during the holiday too!
Made from a wooden base to provide a stable surface in which to glue or weave any number of arts & crafts resources, these beautiful wreaths make the perfect adornment for any front door.
The steps below are terrifically age-appropriate for older students. Younger students or preschool-aged children will likely enjoy painting their wreaths with wood-appropriate paint and using PVA washable glue to stick down Christmas collage items.
STEP BY STEP
- Apply strong glue over one surface of the wooden wreath and press a sheet of hessian onto the glue, set aside to dry.
- When the glue has dried, cut away excess Hessian.
- To make the leaves, fold a green piece of paper in half, and then half again (snipping with multiple layers of paper makes for light work). Two pieces of green A4 paper have made all the foliage for one wreath.
- Using a pencil, draw leaves or sprigs of leaves onto the paper and carefully cut around. Using a few shades of green will add depth and drama to your wreath.
- Arrange your leaves around the wreath and glue into place.
- To make the flowers, cut strips of red paper lengthways (1 piece of A4 paper will make 8 flowers).
- Using scissors, make fringing by carefully snipping down the length of the paper leaving ½ cm on one edge (snip gently to avoid cutting through the strip).
- Next, roll the fringe into a tight coil, adding a little bit of glue to hold in place. Pinch together to hold for a few moments (you can also use a peg to hold them in place until they dry completely). When thoroughly dry you can make the flowers look realistic by gently scrunching the petals to fan them out.
- Use strong glue to adhere the flowers onto the wreath.
- Glue any additional embellishments onto the wreath as desired.
- Attach a length of jute string to the top of the wreath and it’s ready to hang!
*TOP TIP – A layer of Hessian over the wooden wreath continues the natural feel and creates the perfect surface to weave or thread wire ornaments through.
Featured Products;
Shrink Film Ornaments
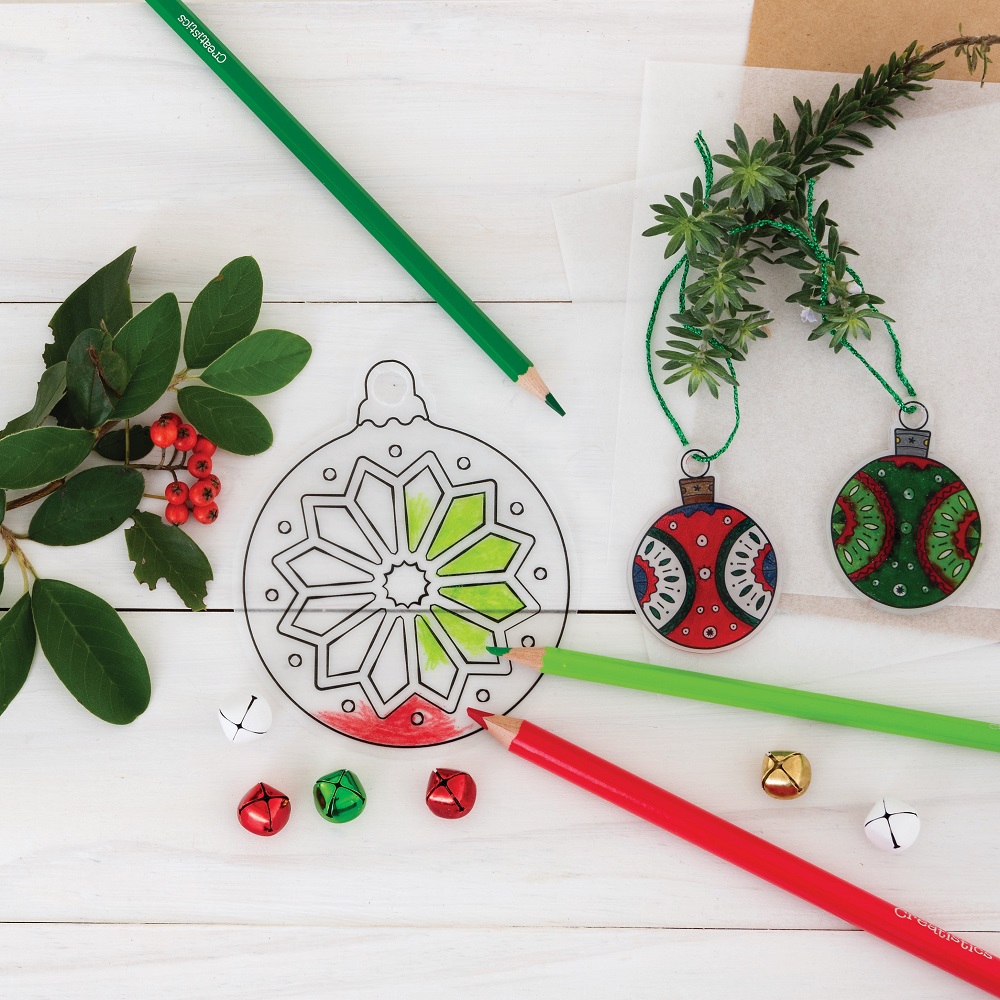
Shrink Film makes for incredibly fun art experiments! A teacher’s dream, the Christmas Shrink Film Ornament Pack includes all you need to make a whopping 96 bauble ornaments, with coloured pencils and hanging thread included. Simply use coloured pencils to design your bauble shapes and then bake in the oven to reduce the size by roughly 60%, turning your decoration into thick hard plastic.
The pre-cut Christmas ornaments are wonderfully convenient, however, if you’re after free form to design then the clear shrink film or printable shrink film options are terrifically open-ended.
Baking Instructions:
- Colour in your design on the matt side of the shrink film using coloured pencils or permanent markers.
- Preheat oven to 150°C.
- Place design on a lined tray (matt side up) and bake in preheated oven.
- Plastic will begin to shrink after 10 seconds. Remove from oven when plastic has returned to its flat shape.
- If your pieces don’t lie completely flat, lightly press with a spatula, cardboard or oven mitt.
- Wait for the shrink film to dry completely before handling.
*TOP TIP – With shrink film, coloured pencils go a long way. A very light shading only will result in bold and vibrant colours.
Featured Products;
Christmas Shrink Film Ornament Pack
Woven Christmas Tree Cards
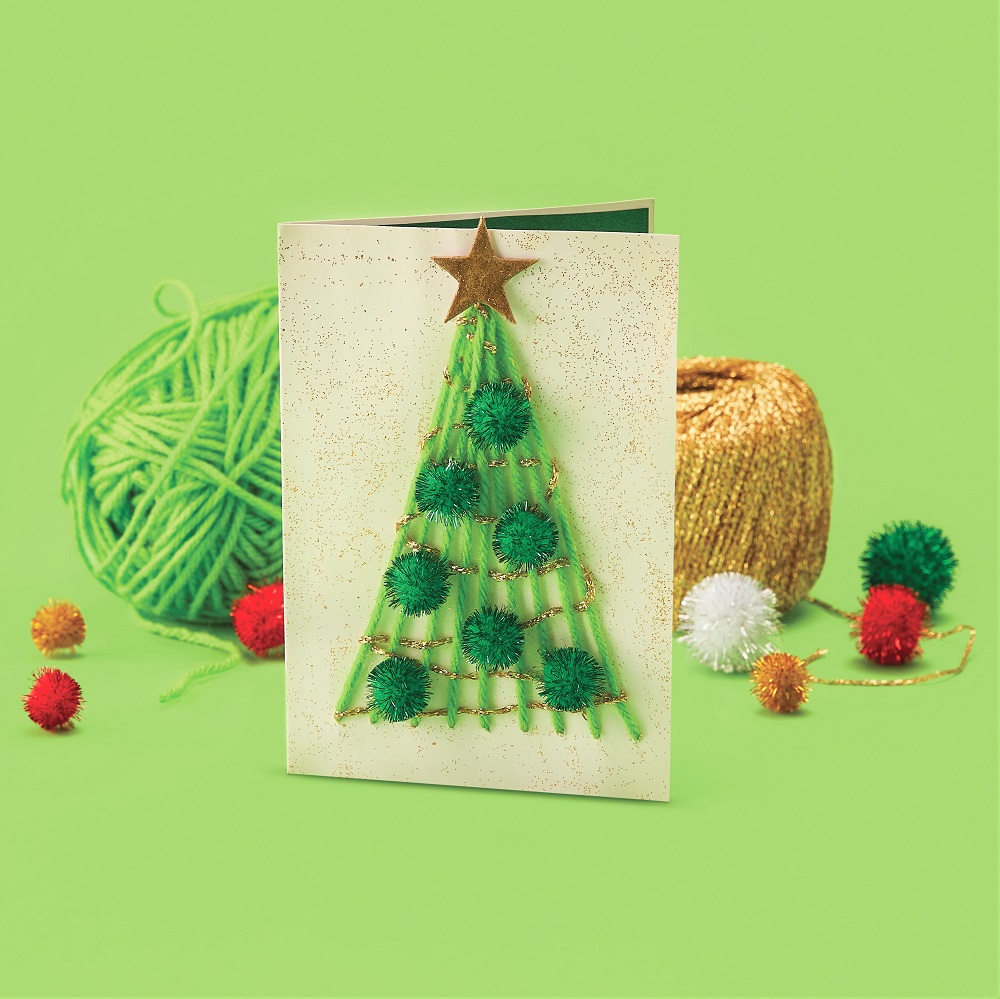
These festive Christmas tree cards incorporate paper crafts & threading together to make oh-so-special greeting cards for spreading the holiday cheer. The metallic and glitter elements add a magical touch to bring children’s creations to life.
To adapt this activity for younger early childhood age groups, simply omit the threading elements, with children enjoying pre-cut lengths of yarn to glue down into a tree design, using washable PVA glue, age-appropriate embellishments and liquid crayon markers to decorate the inside.
STEP BY STEP
- Mark the threading holes with a pencil, and then poke a tapestry needle or skewer through the pencil marking all the way through the cardboard.
- Cut a length of yarn, thread your needle, and then weave the yarn up and down, threading in and out of the holes until you’ve created a Christmas tree design.
- On the front of the tree use a length of metallic gold yarn to weave in and out of the tree, creating a Christmas Tree tinsel design, and tie off on the front reverse.
- On the front reverse of the card, secure your yarn with strong tape and create a flat surface).
- Glue half a piece of coloured cover paper onto the inside of the card to cover the back of the tree and press down to flatten (glue sticks are ideal for this task, so the paper won’t crinkle).
- The front of your card is now ready for embellishments – pom poms, a Christmas star and glitter glue.
- Set aside to dry completely for 24 hours.
- Your card is now ready for drawings or writing on the inside – paint pens are ideal for vibrant creations over coloured paper.
*TOP TIP – Writing or drawing on the coloured cover paper before sticking it inside the card will make a more workable surface for younger students.
Featured Products;
Creatistics Superstik Glue Stick
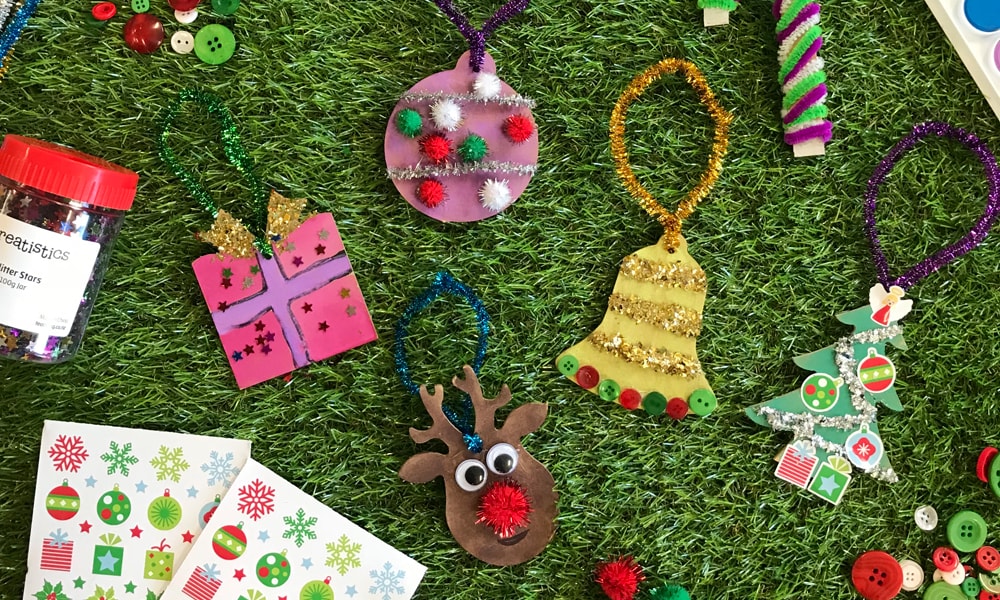
Wooden Crafts
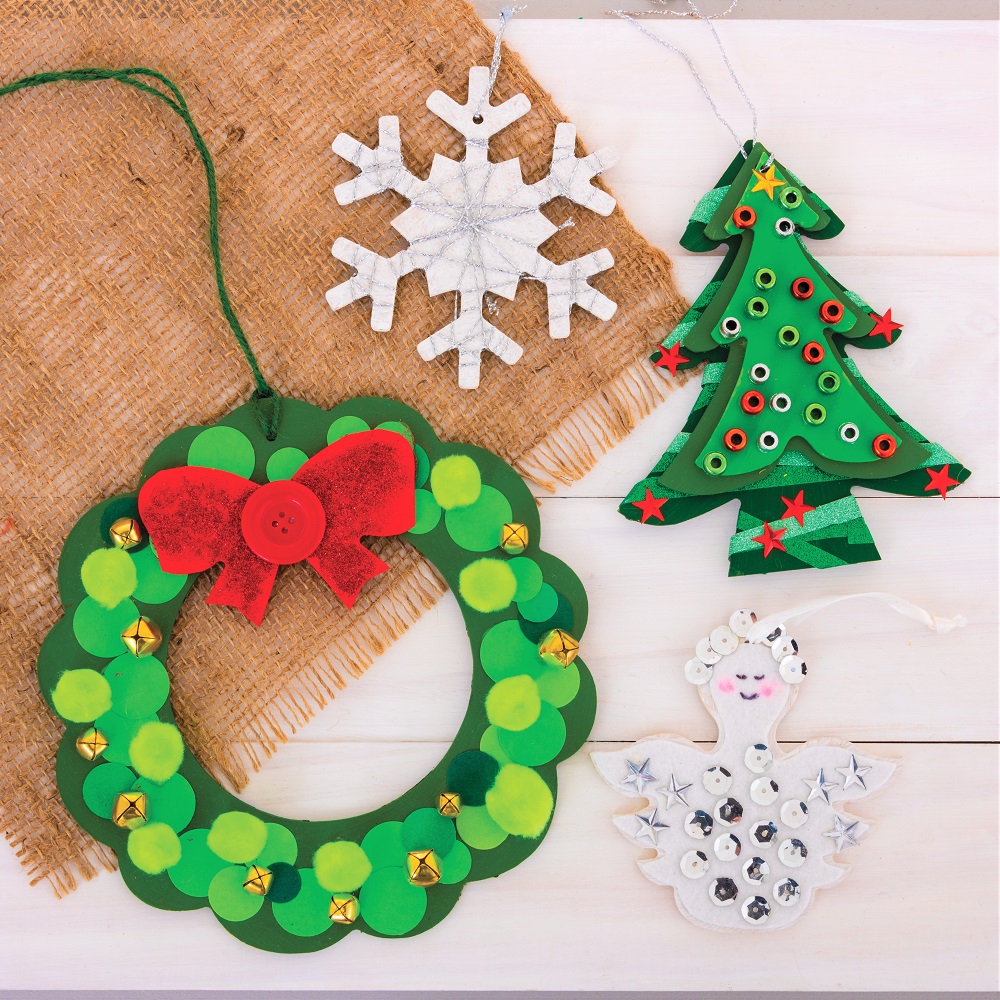
Pre-cut Wood Crafts are the perfect combination of woodworking, imagination and art – essentially blank canvases in which children can tinker with paint, glue and collage materials to design & personalise works that are truly their own.
You’ll find an incredibly large offering of wood crafts at MTA, so much to choose from that’ll make teachers giddy with excitement, including convenient ornament or tree packs that include all the glue, paint and embellishments you need to complete the activity.
*TOP TIP – Messy mats or table coverings make brilliant surfaces to protect tables from wet and messy play art activities.
Featured Products;
Metallic Christmas Collage Pack
Woven Wire Ornaments

Beautifully simple wire ornaments make a welcoming invitation for children’s personalisation. Use wire, yarn or string to weave around, filling the open space with Christmas colours and finishing off with metallic yarn & beads – and a sparkly pom pom star for the tree. Your woven ornaments are ready to hang on the tree year after year or share as gifts for loved ones.
Yarn can be wrapped around the wire ornaments in free form using your hands only (ideal for early childhood) or incorporate sewing elements into the activity using tapestry chenille needles for older students or plastic lacing needles for younger students. Tying off your yarn after every few wraps will ensure the younger years don’t unravel their creations when they need to take a break.
Tying off your yarn after every few wraps will ensure the younger years don’t unravel their creations when they need to take a break.
STEP BY STEP
- Cut a long piece of your desired coloured yarn and tie it around the metal shape (tying the yarn onto the wire shape will ensure you have a firm grip to get you started).
- Gently weave the yarn around the shape, wrapping over and under, in and out and all around, pulling firmly to ensure the yarn stays in place.
- When your decoration is starting to look colourful and almost finished, it’s time to start adding beads.
- Thread or slip a bead over the yarn, adjusting it into place as you continue to wrap the yarn.
- Add as many beads for your desired look, and finish tie the yarn firmly to the decoration to keep it all in place.
- Lastly, add a length of twine to the top of the decoration, making sure to tie it at the end to create a loop for hanging.
*TOP TIP – The thick acrylic woollen yarn is easier to handle and wrap to create form and colour, with the more delicate metallic yarn bringing a sparkly touch to finish off.
Featured Products;
Festive Terracotta Garden Pots
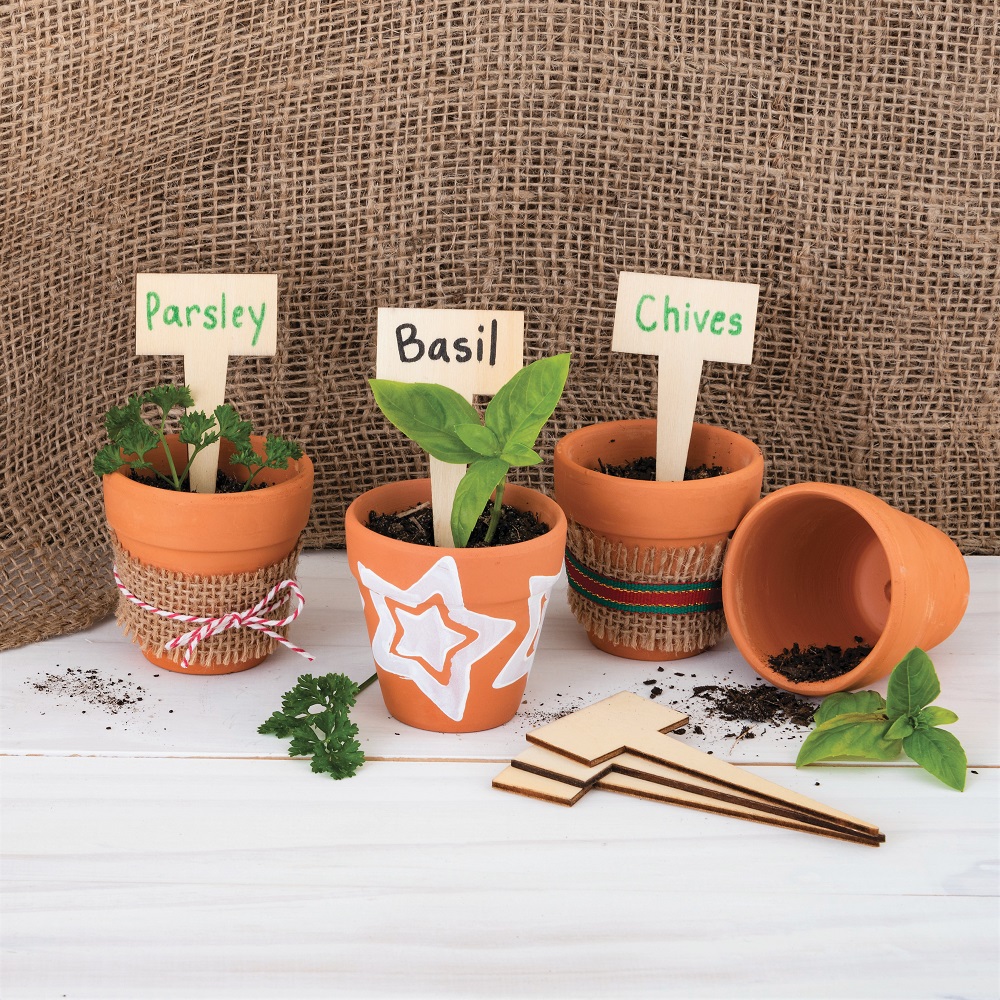
Personalised pots with seedlings are the perfect growing gift to keep the festive season thriving long after the Christmas Tree has been packed away. Endless decorating options await with the terracotta surface lending itself to porcelain or paint markers, paints and embellishments. Sparkle paint metallic markers and glitter glue add a magical touch for Christmas-inspired decorating.
TOP TIP – Use a spray varnish to ensure your pot is ready for outdoor use with a permanent barrier to dirt, tarnish, wear & tear and moisture.
Featured Products;
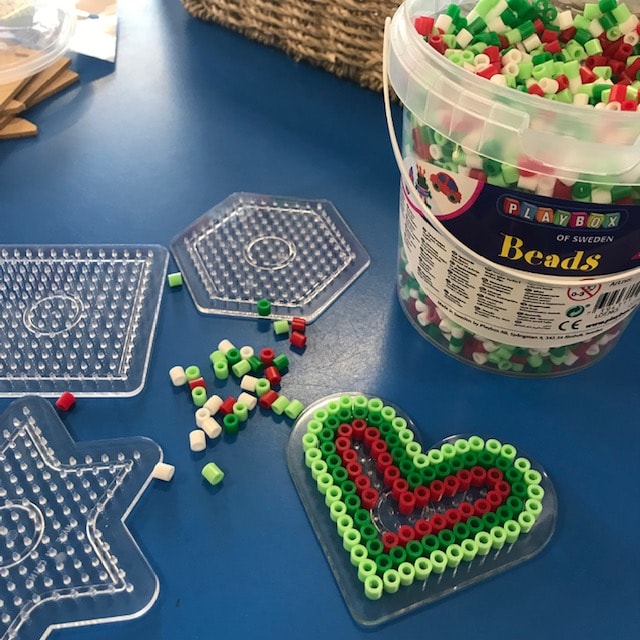
Iron-On Bead Ornaments
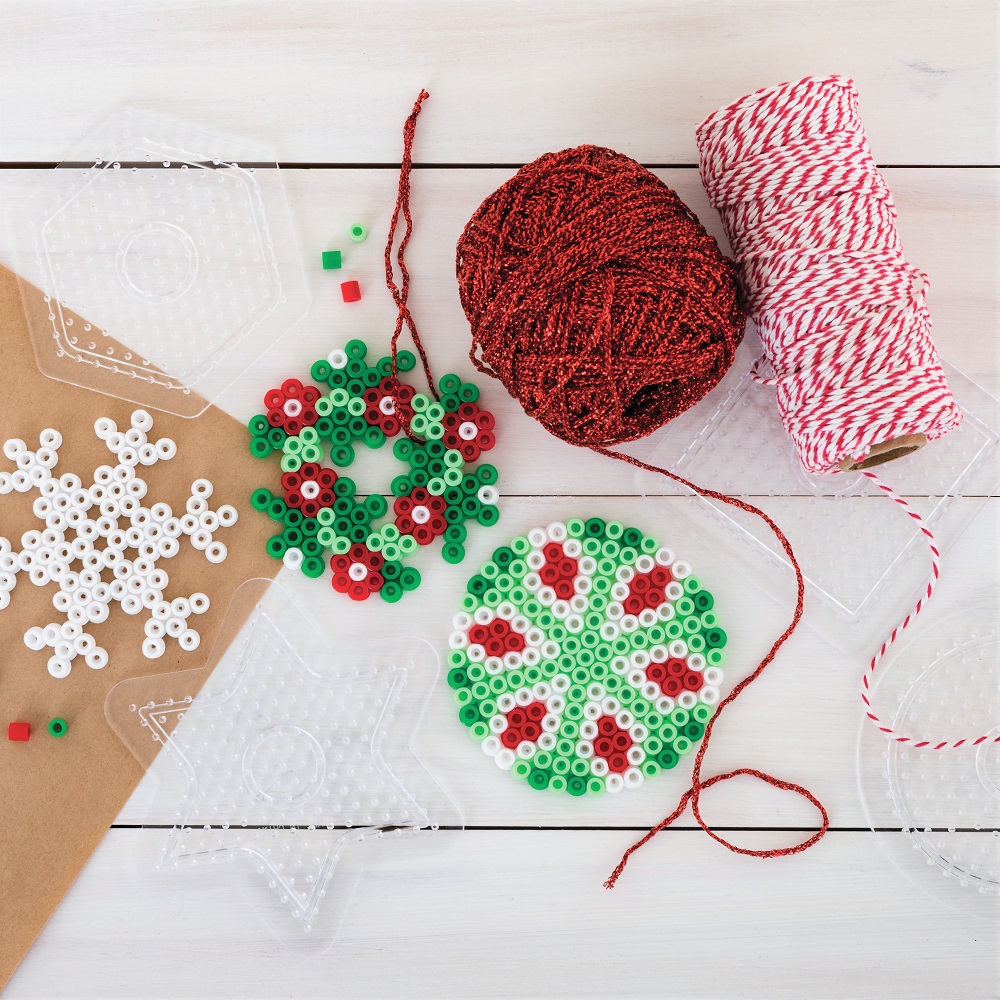
Have you tried making Iron on Bead ornaments? Simply arrange the Christmas-coloured beads on the peg boards to make your desired pattern. You’re then ready to fuse the beads together using a hot iron to make a long-lasting ornament to adorn classrooms, homes or the beloved family Christmas tree.
But it’s not just ornaments that can be made! Iron-on Beads are incredibly versatile – either fused together or used as traditional beads for loose parts threading. Ideal for jewellery including bracelets, necklaces and earrings. Glue them onto wood and paper crafts for textural collage embellishments. Make festive hot drink coasters, gift tag decorations, hanging key chains or bag decorations and even plates for treasured trinkets! My only advice for this activity would be to buy several tubs – because they’re wonderfully addictive!
STEP BY STEP
- Arrange the beads into a design on the boards.
- Warm a household iron to high making sure the steam is off.
- Cover the design with a sheet of ironing paper.
- Iron over until the beads start to melt and fuse together into a colourful and flexible shape.
- Allow your design to cool before removing from the bead board.
- Cut a length of twine and tie onto the top of your ornament ready to hang.
TOP TIP – Iron-on Beads are small loose parts, perfect for school-aged students. Preschool age groups (aged 3+ years) may find the Jumbo-sized Iron on Beads and boards a more comfortable working size.
Featured Products;
Creatistics Iron-on Beads Pack
*All these Christmas crafting activities can be modified or adapted to suit different age groups, taking away small parts for children under 3 years of age and replacing them with larger safe parts. Where scissors, glue guns or irons are used, educators may use adequate supervision to suit the needs of the children (pre-cut shapes for young children, PVA glue in place of glue guns etc.) or educators may safely carry out risky steps themselves (such as the iron for iron on beads).
What are your favourite seasonal crafts for the holiday season?
Download: Christmas activities PDF Bundle